PPTX Templates
Introduction
This section will go through all the tags that are available for pptx template, together with the appropriate data selection query. In this documentation, curly braces {...} are used as delimiters for the tags. Please check general template for how to change the delimiters. The templates can be made using various softwares like Microsoft PowerPoint, Libreoffice Impress, APEX Office Edit, or Google Slides. The files should be in .pptx or .pptm format.
Tag Overview
The following tables show the available tags in pptx template. The three dots in the format column shows what is variable, they should be either replaced by the cursor name or column name.
The column names are case-sensitive, you can use double quotes to force the casing.
| Tag Name | Format | Example | Short Description |
|---|---|---|---|
| Normal Substitution | {...} | {normal} | Normal Substitution, the data from the given column will be replaced. |
| Dynamic Text Styling | {style ...} | {style text} | Allows to define the style for given column text |
| Loop Tags | {#...}...{/...} | {#loop_over}...{/loop_over} | Tag that loops over the given cursor name and repeats everything in between the tags for each record(s). |
| Horizontal Tabular Looping | {:...} {/...} | {:data_loop_horizontal} … {/data_loop_horizontal} | Tag to be used when inside a table column. Will repeated horizontally in the given column(s) for the given cursor. |
| Slide Repeat | {!...} | {!records} | Repeat the template slide for each record in the given cursor. |
| Table Row Span | {=...} {/...} | {=table_row_key} … {/table_row_key} | Tag to be used for row span of similar row data. |
| Image Tag | {%...} | {&imgKey} | Tag to be used when the content is an image. (can point to url, file, base64encoded string that refers image) |
| Barcode/QR Code | {|...} | {|barcode} | Tag to use when a barcode or QR code needs to be generated in it's place. |
| QR Code Image Replacing | QR code of Tag | QR code of Tag | Tag to be used when the content is an image, barcode, or QR code but needs custom styling. Options available see details |
| Chart | {$...} | {$chart} | Tag to be used when a native Powerpoint chart should be generated, see details for specific format of what this cursor should contain. |
| AOP Chart Templating | {aopchart ...} | {aopchart chartData} | Tag to be used near a chart that is defined and style in the template, see details for passing the data for this dummy chart. |
| D3 Images | {$d3 ...} | {$d3 image_data} | Tag to be used to insert d3 images. |
| Hyperlink | {*...} | {*hyperlink} | Substitution like normal tag, but will contain a hyperlink so that a user can be directed. |
| Auto Link | {*auto ...} | {*auto text} | Substitution like normal tag, but will detect if there are any hyperlinks, if so then a hyperlink will be created. |
| Link Slide | {+...} | {+linkTogether} | Link two slides together. |
| Insert Document | {?insert ...} | {?insert document} | Tag that will attach the given document(docx, ppt, xlsx, pdf) inside the template/output. |
| Hide Slide | {hide ... } or {..._hide} | {hide condition} or {product_hide} | Hide Slide based while generating the slide for given cursor value. |
| PDFInclude Tag | {?pdfinclude ...} | {?pdfinclude filename} | Tag that will insert the files in between main template when output type is pdf |
| Slide Note Rendering | {...} | {normal} | Tags to render the Slide Note (can use tags directly in slide note just like you use them in the slide) |
| Text Box/ Shape Removal Tag | {...?} | {toShow?} | Tags to remove the entire shape if associated tag evaluates false. |
| Password Encryption | - | - | Feature to password protect/encryption the DOCX file |
Tags can't start with a number and should start with an alphabetical character (a-z,A-Z)
HTML Contents are not supported in PPTX Templates.
Normal Substitution
Available from: v1.0These kind of tags are the simplest tag to use. These tags are enclosed in curly braces and can include variables (name of column) that will be replaced with actual data when the output is generated. The replaced value will have the same style of the tag itself. To be more specific the style of starting curly brace. This info might be useful when the tag is long. In this case, you can style the starting curly braces and change the font of remaining tag to a smaller size. eg: {cust_first_name}.
For instance, suppose the template contains text with formatting like {text1} {text2}, and your data source is:
'Hello this is first text' as "text1",
'This is second text' as "text2"
If they are processed with AOP, Hello this is first text This is second text is produced.
AOP provides a feature that enables users to define text styling dynamically, called Dynamic Text Style. This feature allows users to apply different text styles to their content from the pl/sql.
Example
The data source below was created using the database available in the sample data of AOP. The database contains numerous tables and views with raw data that can be used for reference.
Date Source
Hereby example data source for different data type options.
- SQL
- PL/SQL returning SQL
- PL/SQL returning JSON
- JSON
select
    'file1' as "filename",
    cursor
    (select
         c.cust_first_name as "cust_first_name",
         c.cust_last_name as "cust_last_name"
       from aop_sample_customers c
      where c.customer_id = 1
    ) as "data"
from dual
declare
    l_return clob;
begin
    l_return := q'[
        select
            'file1' as "filename",
            cursor (
                select
                    c.cust_first_name as "cust_first_name",
                    c.cust_last_name as "cust_last_name"
                    from aop_sample_customers c
                    where c.customer_id = 1
            ) as "data"
        from dual
        ]';
    return l_return;
end;
declare
  l_cursor sys_refcursor;
  l_return clob;
begin
  apex_json.initialize_clob_output(dbms_lob.call, true, 2) ;
  open l_cursor for
  select 'file1' as "filename",
  cursor
    (select
         c.cust_first_name as "cust_first_name",
         c.cust_last_name as "cust_last_name"
       from aop_sample_customers c
      where c.customer_id = 1
    ) as "data"
  from dual;
  apex_json.write(l_cursor) ;
  l_return := apex_json.get_clob_output;
  return l_return;
end;
{
  "filename": "file1",
  "data": [
    {
        "cust_first_name": "John",
        "cust_last_name": "Dulles"
    }
  ]
}
Template
The template should contain the name of the columns that were provided in the query above. For example, we have template with following content:
Hello {cust_first_name} {cust_last_name},

This is the basic example of using normal tags.
Thank you for choosing AOP.

Best Regards,
AOP Team
Output
When the above data source (which results in one row with John as cust_first_name and Dulles as cust_last_name) together with the given template is passed to AOP, the output will be as follows.
Hello John Dulles,

This is the basic example of using normal tags.
Thank you for choosing AOP.

Best Regards,
AOP Team
Dynamic Text Styling
Available From: v20.3The dynamic style tag enables users to customize the style of text in PowerPoint (.pptx). With support for eight distinct options, users can choose the styling that best fits their desired outcome. Typically, in Normal substitution, the rendered output is identical to the template definition. However, by adding the style keyword in front of the column name enclosed by delimiters, users can modify the style of the text in the output.
| Features | Objects |
|---|---|
| Font Family | _font_family |
| Font Size | _font_size |
| Font Color | _font_color |
| Bold | _bold |
| Italic | _italic |
| Underline | _underline |
| Strikethrough | _strikethrough |
| Highlight | _highlight |
Example
The data source below was created using the database available in the sample data of AOP. The database contains numerous tables and views with raw data that can be used for reference.
Data Source
Hereby examples of data source.
- SQL
- PL/SQL returning SQL
- PL/SQL returning JSON
- JSON
select 'file1' as " filename",
       cursor (
         select c.cust_first_name      as "cust_first_name",
                c.cust_last_name       as "cust_last_name",
                c.cust_city            as "cust_city",
                c.cust_street_address1 as "cust_st_addr",
                c.cust_email           as "cust_email",
                c.cust_state           as "state",
                c.cust_postal_code     as "postal_code",
                'NanumMyeongjo'        as "cust_first_name_font_family",
                '25pt'                 as "cust_first_name_font_size",
                '#ff00ff'              as "cust_first_name_font_color",
                1                      as "cust_last_name_bold",
                1                      as "cust_city_italic",
                1                      as "cust_st_addr_underline",
                1                      as "cust_email_strikethrough",
                'black'                as "cust_st_addr_highlight",
                'white'                as "cust_st_addr_font_color",
                ''                     as
         from aop_sample_customers c
         where c.customer_id = 1
       )       as "data"
from dual;
declare
  l_return clob;
begin
  l_return := q'[
    select 'file1' as " filename",
           cursor (
             select c.cust_first_name      as "cust_first_name",
                    c.cust_last_name       as "cust_last_name",
                    c.cust_city            as "cust_city",
                    c.cust_street_address1 as "cust_st_addr",
                    c.cust_email           as "cust_email",
                    c.cust_state           as "state",
                    c.cust_postal_code     as "postal_code",
                    'NanumMyeongjo'        as "cust_first_name_font_family",
                    '25pt'                 as "cust_first_name_font_size",
                    '#ff00ff'              as "cust_first_name_font_color",
                    1                      as "cust_last_name_bold",
                    1                      as "cust_city_italic",
                    1                      as "cust_st_addr_underline",
                    1                      as "cust_email_strikethrough",
                    'black'                as "cust_st_addr_highlight",
                    'white'                as "cust_st_addr_font_color",
                    ''                     as
             from aop_sample_customers c
             where c.customer_id = 1
           )       as "data"
    from dual;
    ]';
  return l_return;
end;
declare
  l_cursor sys_refcursor;
  l_return clob; -- can also be varchar2, make sure it corresponds to the structure in the JSON
begin
  apex_json.initialize_clob_output(dbms_lob.call, true, 2);
  open l_cursor for
    select 'file1' as " filename",
           cursor (
             select c.cust_first_name      as "cust_first_name",
                    c.cust_last_name       as "cust_last_name",
                    c.cust_city            as "cust_city",
                    c.cust_street_address1 as "cust_st_addr",
                    c.cust_email           as "cust_email",
                    c.cust_state           as "state",
                    c.cust_postal_code     as "postal_code",
                    'NanumMyeongjo'        as "cust_first_name_font_family",
                    '25pt'                 as "cust_first_name_font_size",
                    '#ff00ff'              as "cust_first_name_font_color",
                    1                      as "cust_last_name_bold",
                    1                      as "cust_city_italic",
                    1                      as "cust_st_addr_underline",
                    1                      as "cust_email_strikethrough",
                    'black'                as "cust_st_addr_highlight",
                    'white'                as "cust_st_addr_font_color",
                    ''                     as
             from aop_sample_customers c
             where c.customer_id = 1
           )       as "data"
    from dual;

  apex_json.write(l_cursor);
  l_return := apex_json.get_clob_output;
  return l_return;
end;
[
  {
    " filename": "file1",
    "data": [
      {
        "cust_first_name": "John",
        "cust_last_name": "Dulles",
        "cust_city": "Sterling",
        "cust_st_addr": "45020 Aviation Drive",
        "cust_email": "john.dulles@email.com",
        "state": "VA",
        "postal_code": 20166,
        "cust_first_name_font_family": "NanumMyeongjo",
        "cust_first_name_font_size": "25pt",
        "cust_first_name_font_color": "#ff00ff",
        "cust_last_name_bold": 1,
        "cust_city_italic": 1,
        "cust_st_addr_underline": 1,
        "cust_email_strikethrough": 1,
        "cust_st_addr_highlight": "black",
        "cust_st_addr_font_color": "white"
      }
    ]
  }
]
Template
In the above data source we want to make the style of cust_first_name dynamic. Thus our template will contain {style cust_first_name} as style tag.
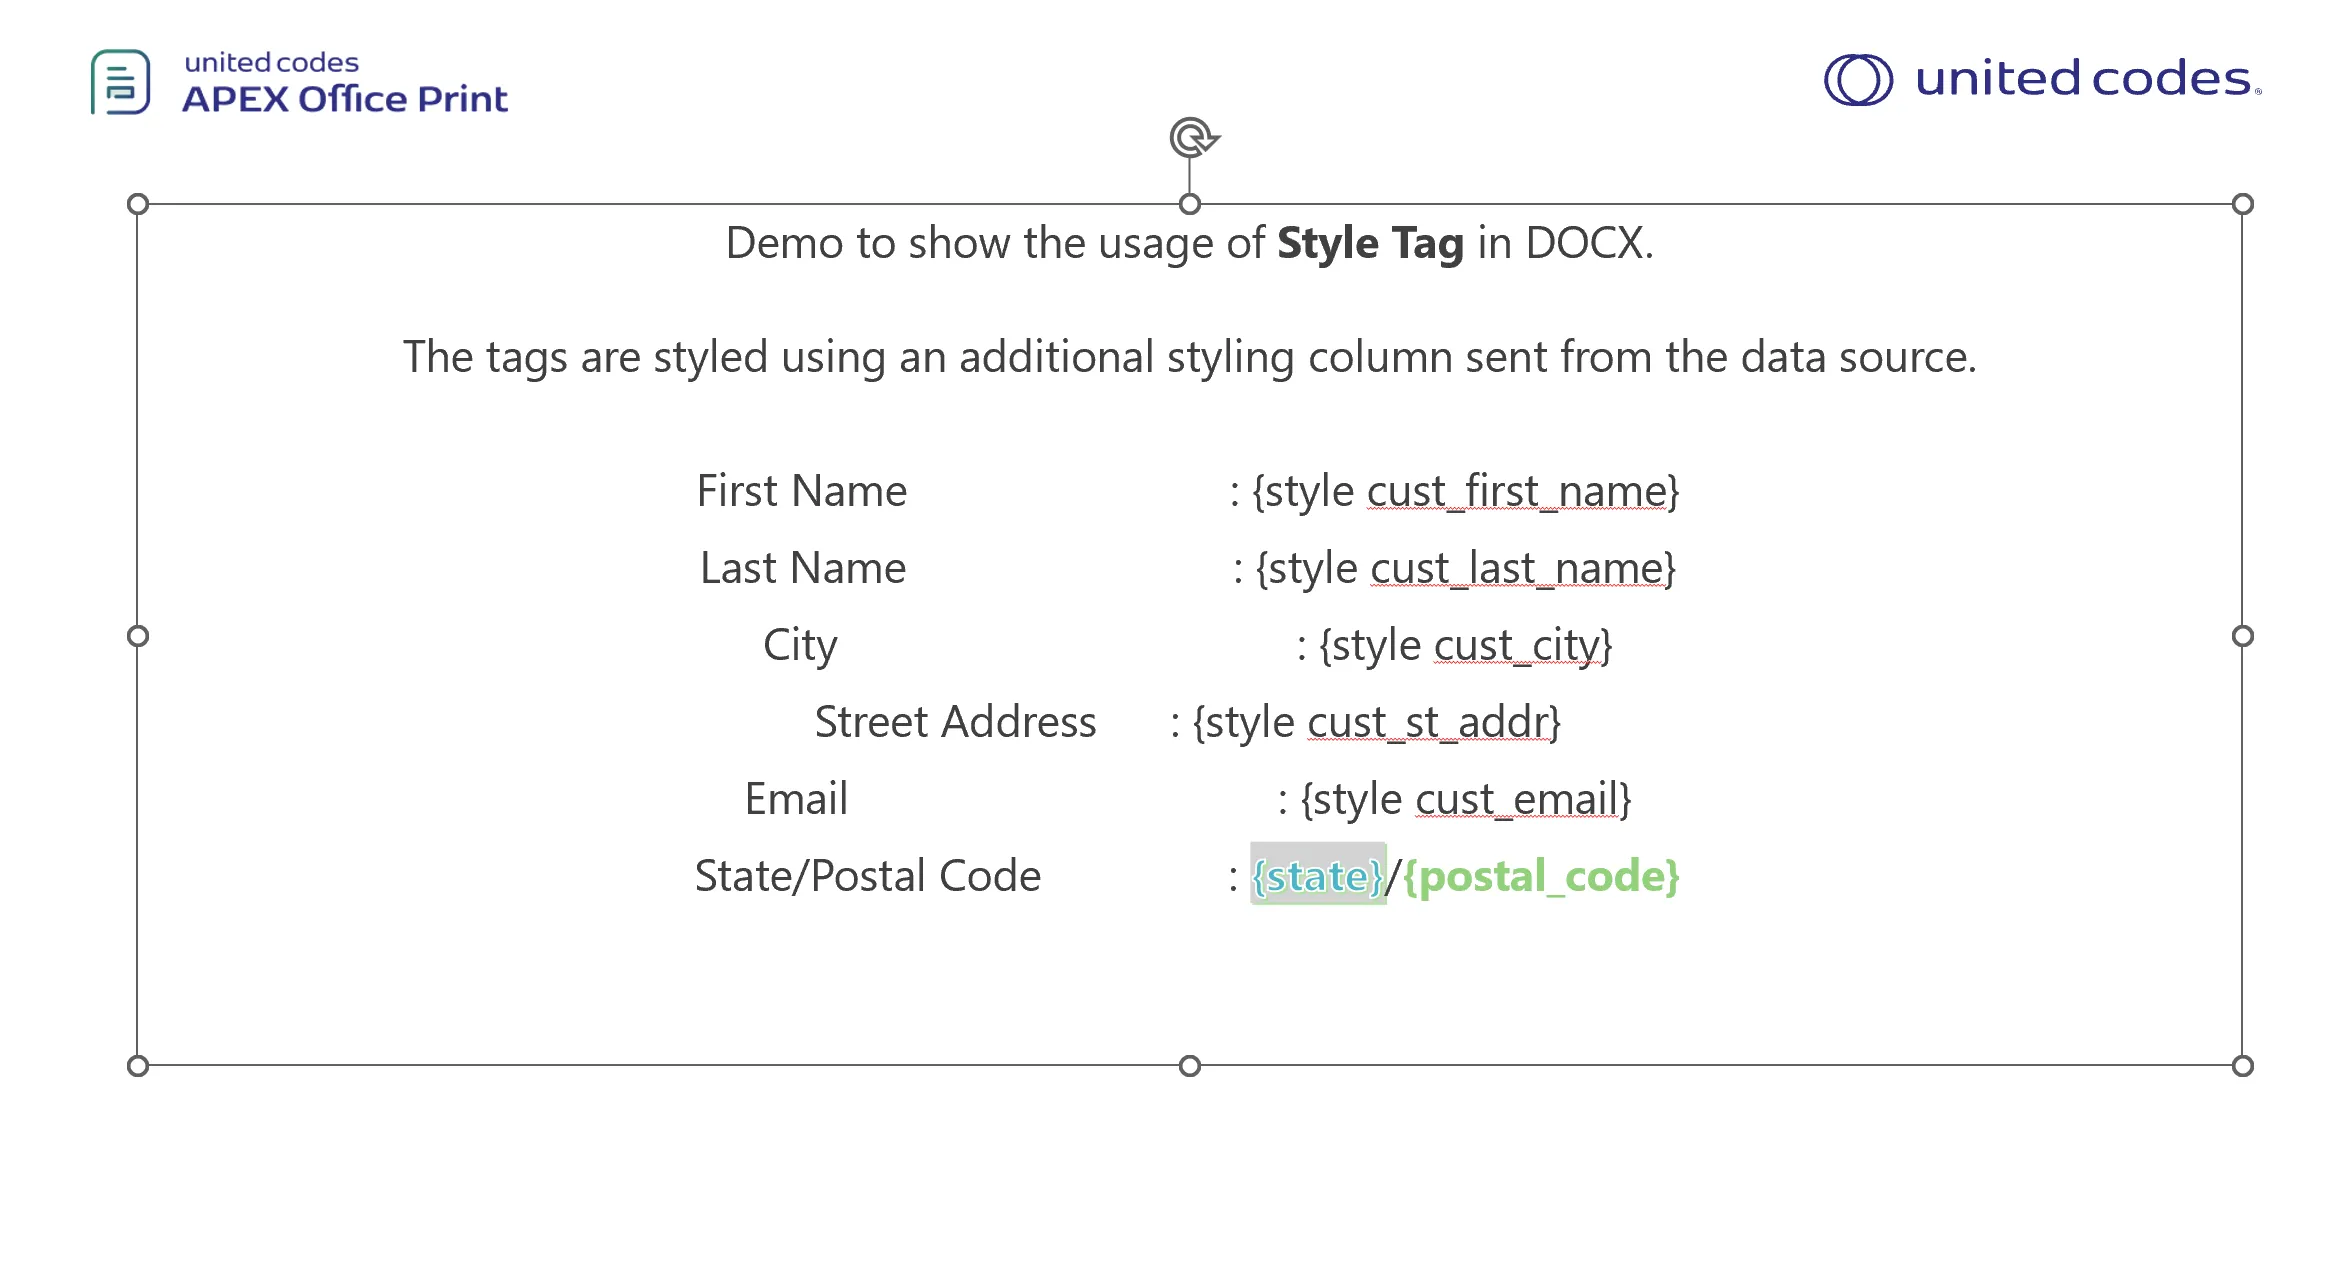
Output
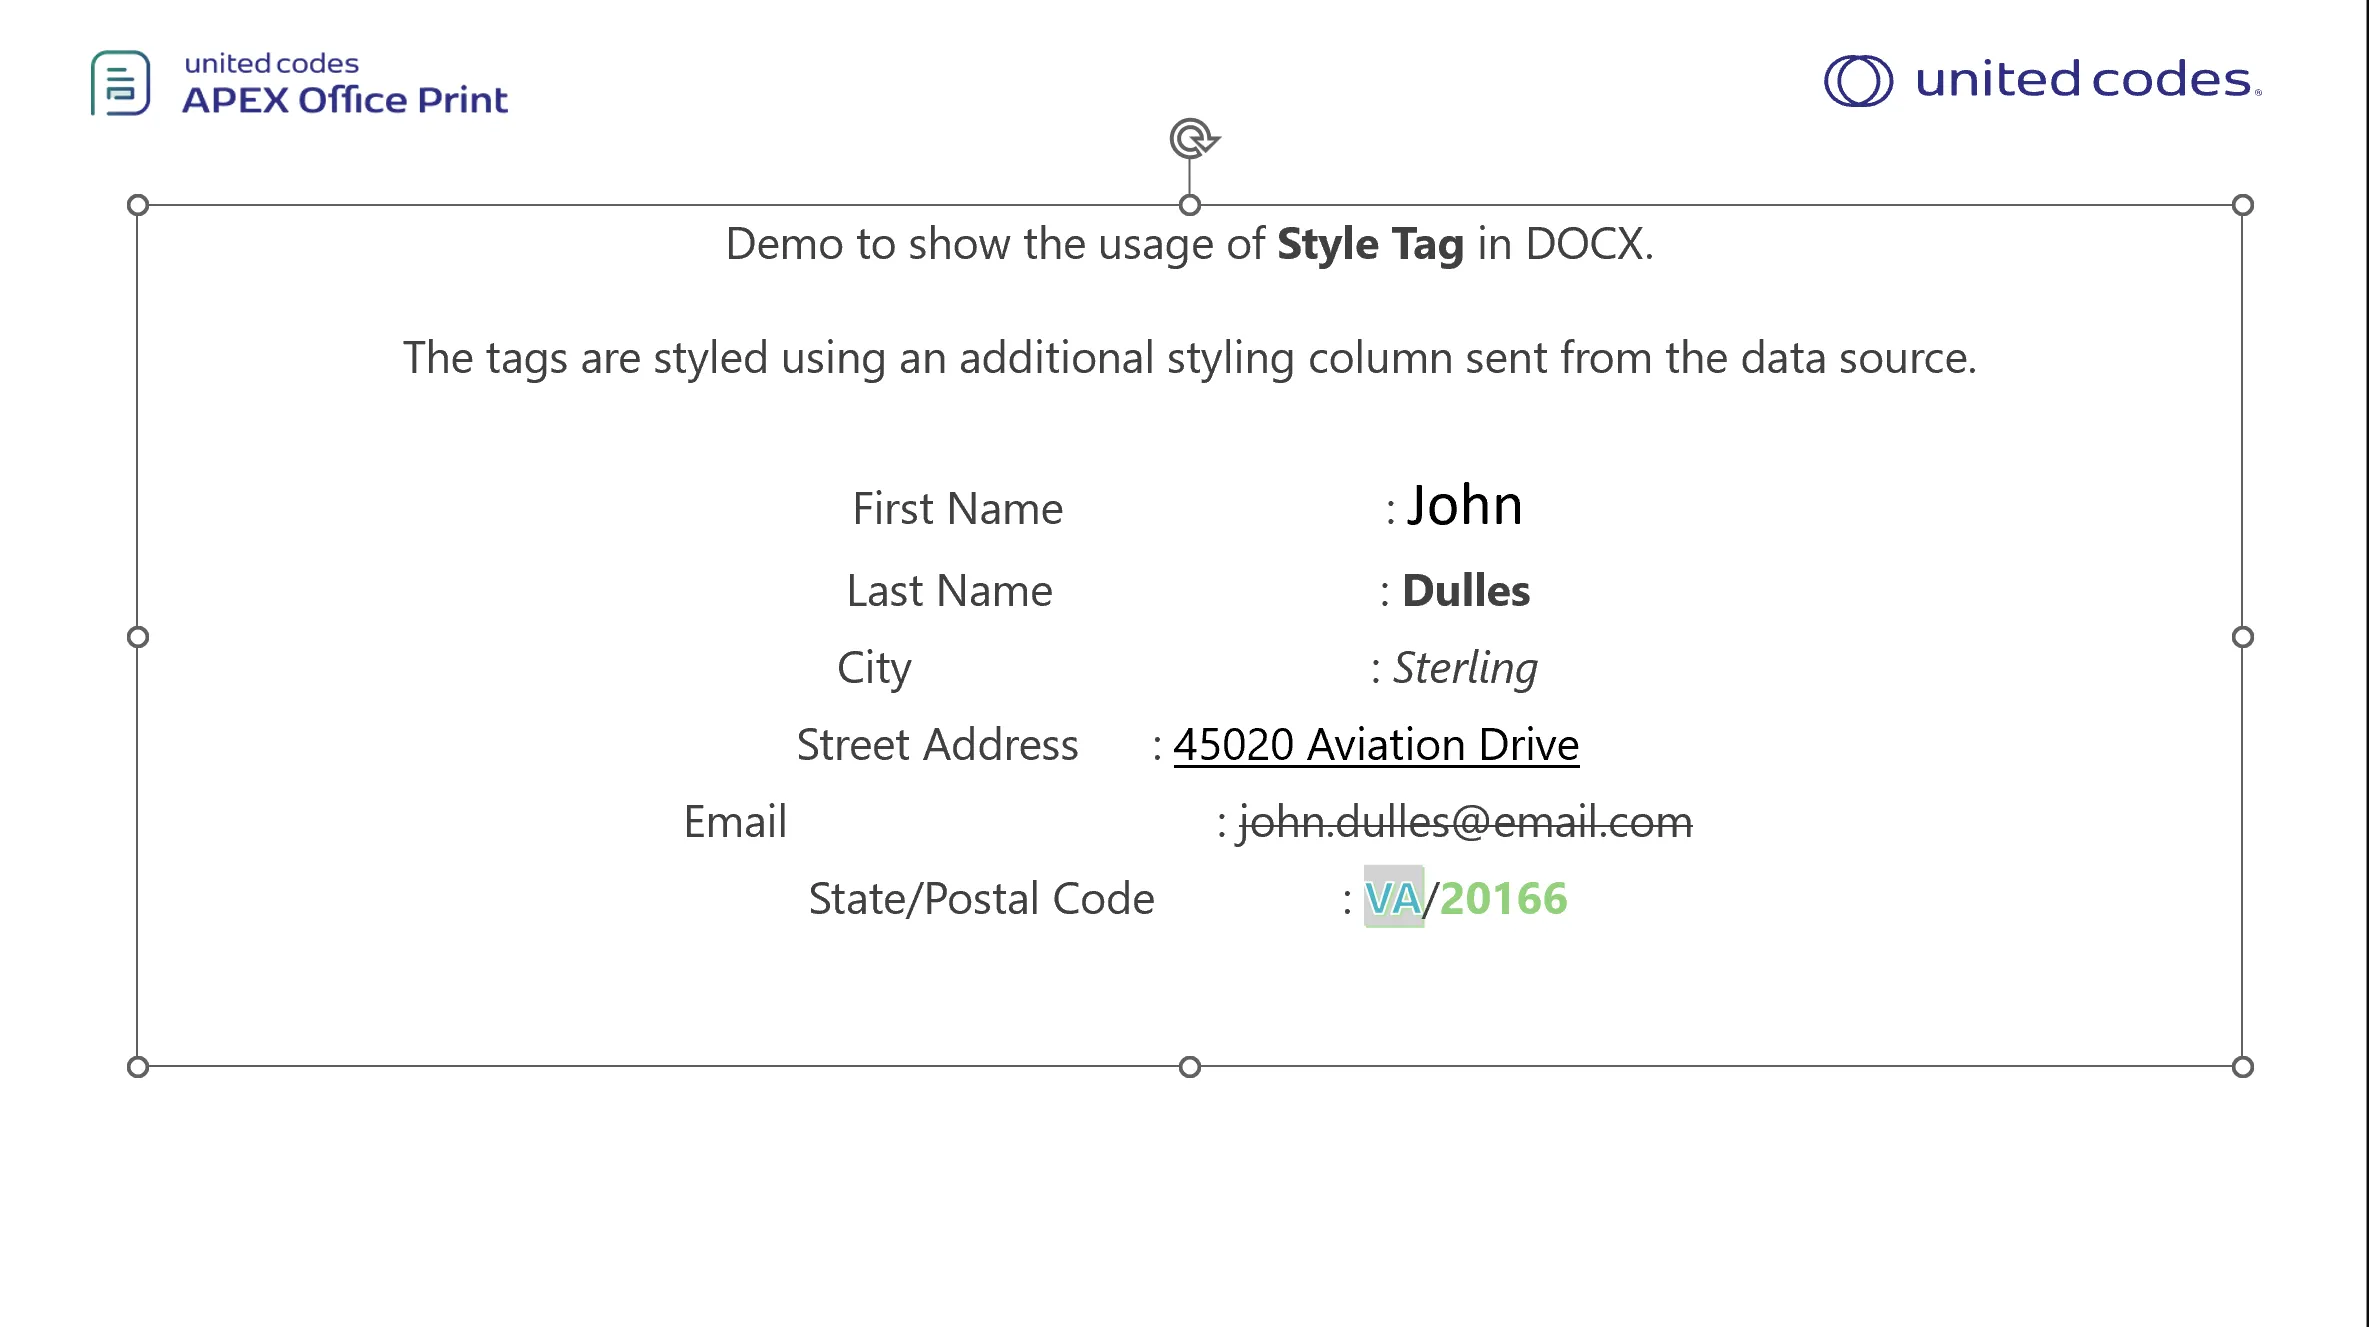
When the above data source together with the given template is passed to AOP, the output will be as follows.
Loop Tags
Available From: v1.0AOP allows you to loop through a record by using the loop tag, which has two parts: the start of the loop and the end of the loop. The start of the loop is denoted by a # symbol followed by the record name enclosed in delimiters, such as {#record1}. The end of the loop is denoted by a / symbol followed by the same record name enclosed in delimiters, such as {/record1}.
The contents/tags that are in the bounded by these two tags will be looped over and filled in using the data available in the record. Nested loops are possible. Style will be copied from the template to the generated file accordingly.
Ex:
{#record}start

Contents of loop and other

end{/record}
Example
The data source below was created using the database available in the sample data of AOP. The database contains numerous tables and views with raw data that can be used for reference.
Data Source
Hereby examples of data source.
- SQL
- PL/SQL returning SQL
- PL/SQL returning JSON
- JSON
select 'file1' as "filename",
  cursor(
    select c.cust_first_name as "cust_first_name",
      c.cust_last_name as "cust_last_name",
      c.cust_city as "cust_city",
      cursor(
        select o.order_total as "order_total",
          'Order ' || rownum as "order_name",
          cursor(
            select p.product_name as "product_name",
              i.quantity as "quantity",
              i.unit_price as "unit_price",
              APEX_WEB_SERVICE.BLOB2CLOBBASE64(p.product_image) as "image"
            from aop_sample_order_items i,
              aop_sample_product_info p
            where o.order_id = i.order_id
              and i.product_id = p.product_id
          ) "product"
        from aop_sample_orders o
        where c.customer_id = o.customer_id
      ) "orders"
    from aop_sample_customers c
    where customer_id = 1
  ) as "data"
from dual
declare
    l_return clob;
begin
    l_return := q'[
        select 'file1' as "filename",
          cursor(
            select c.cust_first_name as "cust_first_name",
              c.cust_last_name as "cust_last_name",
              c.cust_city as "cust_city",
              cursor(
                select o.order_total as "order_total",
                  'Order ' || rownum as "order_name",
                  cursor(
                    select p.product_name as "product_name",
                      i.quantity as "quantity",
                      i.unit_price as "unit_price",
                      APEX_WEB_SERVICE.BLOB2CLOBBASE64(p.product_image) as "image"
                    from aop_sample_order_items i,
                      aop_sample_product_info p
                    where o.order_id = i.order_id
                      and i.product_id = p.product_id
                  ) "product"
                from aop_sample_orders o
                where c.customer_id = o.customer_id
              ) "orders"
            from aop_sample_customers c
            where customer_id = 1
          ) as "data"
        from dual
        ]';
    return l_return;
end;
declare
  l_cursor sys_refcursor;
  l_return clob;
begin
  apex_json.initialize_clob_output(dbms_lob.call, true, 2) ;
  open l_cursor for
  select 'file1' as "filename",
  cursor(
    select c.cust_first_name as "cust_first_name",
      c.cust_last_name as "cust_last_name",
      c.cust_city as "cust_city",
      cursor(
        select o.order_total as "order_total",
          'Order ' || rownum as "order_name",
          cursor(
            select p.product_name as "product_name",
              i.quantity as "quantity",
              i.unit_price as "unit_price",
              APEX_WEB_SERVICE.BLOB2CLOBBASE64(p.product_image) as "image"
            from aop_sample_order_items i,
              aop_sample_product_info p
            where o.order_id = i.order_id
              and i.product_id = p.product_id
          ) "product"
        from aop_sample_orders o
        where c.customer_id = o.customer_id
      ) "orders"
    from aop_sample_customers c
    where customer_id = 1
  ) as "data"
from dual;
  apex_json.write(l_cursor) ;
  l_return := apex_json.get_clob_output;
  return l_return;
end;
[
  {
    "filename": "file1",
    "data": [
      {
        "cust_first_name": "John",
        "cust_last_name": "Dulles",
        "cust_city": "Sterling",
        "orders": [
          {
            "order_total": 2380,
            "order_name": "Order 1",
            "product": [
              {
                "product_name": "Business Shirt",
                "quantity": 3,
                "unit_price": 50,
                "image": " ...base64 encoded image... "
              },
              {
                "product_name": "Trousers",
                "quantity": 3,
                "unit_price": 80,
                "image": " ...base64 encoded image... "
              },
              {
                "product_name": "Jacket",
                "quantity": 3,
                "unit_price": 150,
                "image": " ...base64 encoded image... "
              },
              {
                "product_name": "Blouse",
                "quantity": 3,
                "unit_price": 60,
                "image": " ...base64 encoded image... "
              },
              {
                "product_name": "Skirt",
                "quantity": 3,
                "unit_price": 80,
                "image": " ...base64 encoded image... "
              },
              {
                "product_name": "Ladies Shoes",
                "quantity": 2,
                "unit_price": 120,
                "image": " ...base64 encoded image... "
              },
              {
                "product_name": "Belt",
                "quantity": 2,
                "unit_price": 30,
                "image": " ...base64 encoded image... "
              },
              {
                "product_name": "Bag",
                "quantity": 4,
                "unit_price": 125,
                "image": " ...base64 encoded image... "
              },
              {
                "product_name": "Mens Shoes",
                "quantity": 2,
                "unit_price": 110,
                "image": " ...base64 encoded image... "
              },
              {
                "product_name": "Wallet",
                "quantity": 2,
                "unit_price": 50,
                "image": " ...base64 encoded image... "
              }
            ]
          }
        ]
      }
    ]
  }
]
Template
The template here contains the loop tags for cursor orders and product and columns of product inside the product cursor. Template below includes the following content:

Output
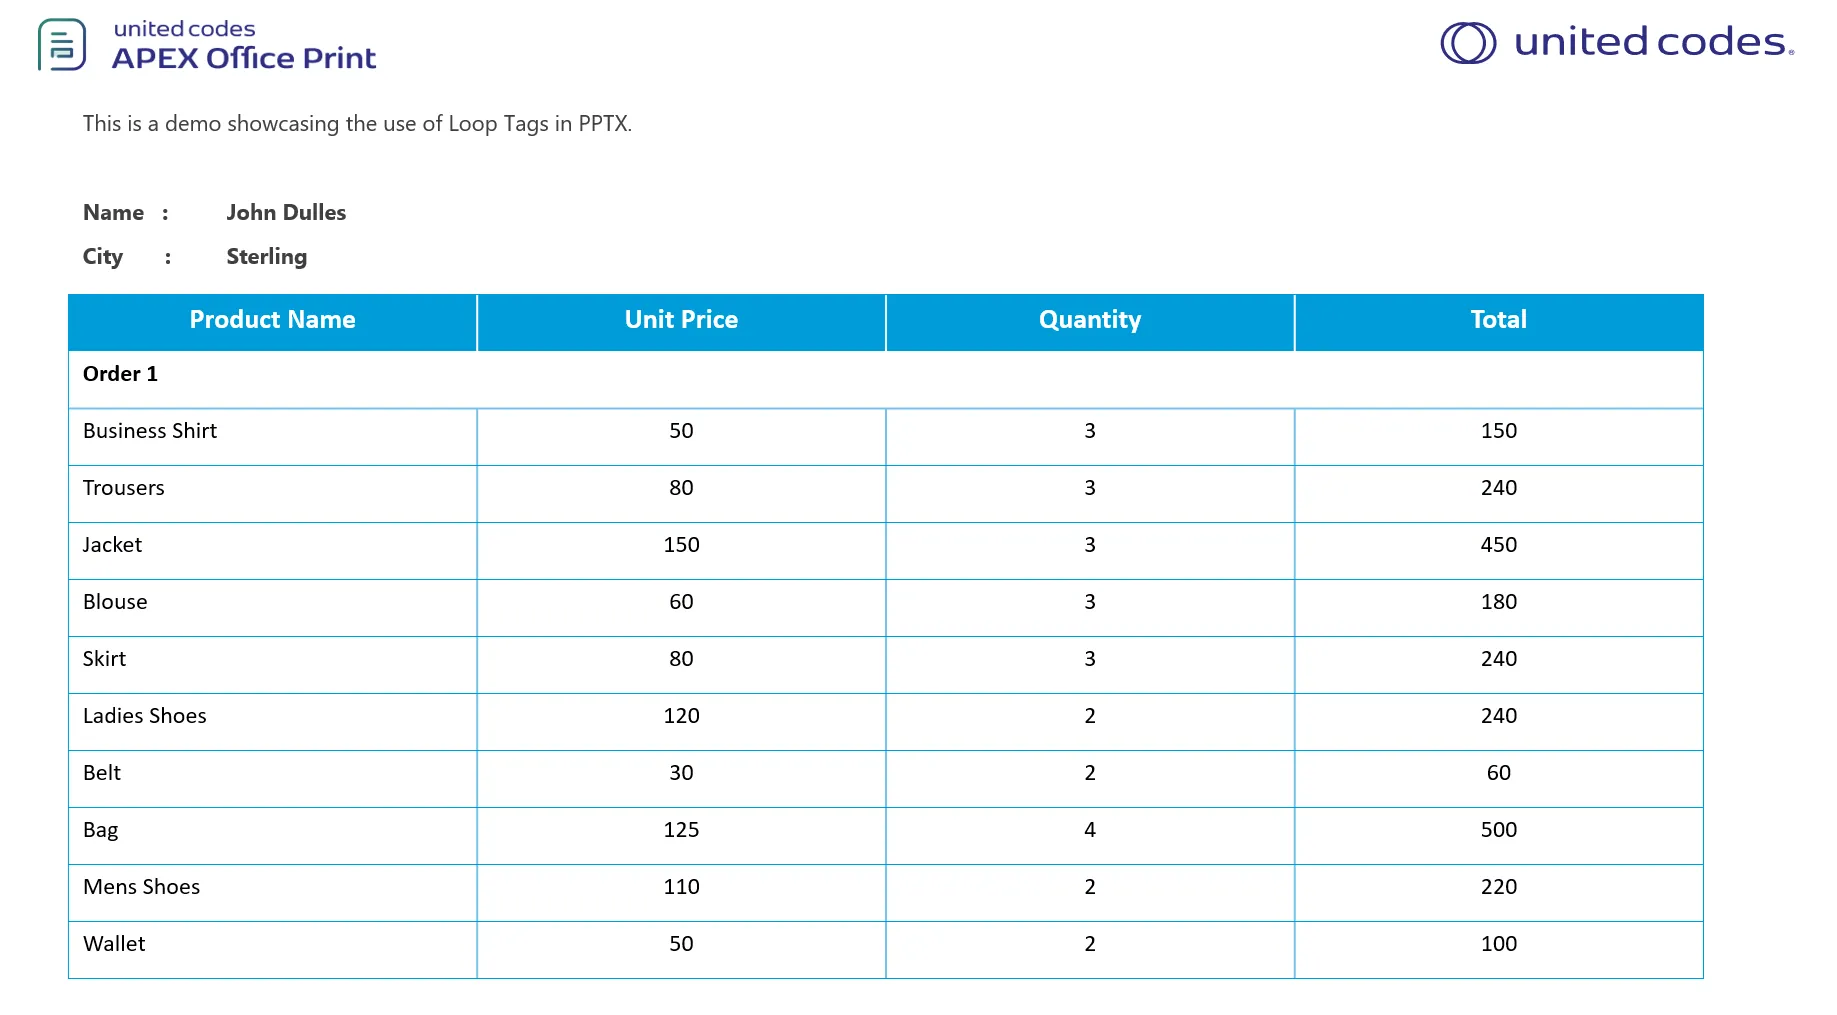
When the above data source (which results in few products with details inside product cursor which is inside another cursor named orders ) together with the given template is passed to AOP, the output will be as follows.
Horizontal Tabular Looping
Available From: v24.3Horizontal Tabular Looping iterates over the records and creates the column for each records. It also consists opening and closing tag, denoted by : and / followed by tagname enclosed inside delimiters respectively. For example: {:record1} ... {/record1} . However, this tag can be used to repeat only one row in Word(In Excel, this works like normal loop tag and repeats the cells defined by the rectangular boundary of starting and closing tag).
Available Option: _distribute can be used with tag name to distribute the data evenly among the columns. For example, the following tag will distribute the data evenly among the columns:
'true' as "tagname_distribute"
It's value can be boolean true or false depending on the use case.
Example
Following is an example on how this could be used:
Data Source
Hearby the example of data source for different options.
- SQL
- PL/SQL returning SQL
- PL/SQL returning JSON
- JSON
select 'file1' as "filename",
       cursor (
         select cursor (
           select product_name as "product_name"
           from aop_sample_product_info p
           where rownum < 5
         )      as "product_a",
                cursor (
                  select p.product_name as "product_name",
                         p.list_price   as "price",
                         p.category     as "category"
                  from aop_sample_product_info p
                  where rownum < 5
                        and product_id > 5
                )      as "product_b",
                "true" as "product_b_distribute",
                cursor (
                  select o.order_total      as "order_total",
                         'Order ' || rownum as "order_name",
                         cursor (
                           select p.product_name as "product_name",
                                  i.quantity     as "quantity",
                                  i.unit_price   as "unit_price"
                           from aop_sample_order_items  i,
                                aop_sample_product_info p
                           where o.order_id = i.order_id
                                 and i.product_id = p.product_id
                                 and rownum < 5
                         )                  "product"
                  from aop_sample_orders o
                  where o.customer_id < 3
                )      "orders"
         from dual
       )       as "data"
from dual
declare
  l_return clob;
begin
  l_return := q'[
    select 'file1' as "filename",
           cursor (
             select cursor (
               select product_name as "product_name"
               from aop_sample_product_info p
               where rownum < 5
             )      as "product_a",
                    cursor (
                      select p.product_name as "product_name",
                             p.list_price   as "price",
                             p.category     as "category"
                      from aop_sample_product_info p
                      where rownum < 5
                            and product_id > 5
                    )      as "product_b",
                    "true" as "product_b_distribute",
                    cursor (
                      select o.order_total      as "order_total",
                             'Order ' || rownum as "order_name",
                             cursor (
                               select p.product_name as "product_name",
                                      i.quantity     as "quantity",
                                      i.unit_price   as "unit_price"
                               from aop_sample_order_items  i,
                                    aop_sample_product_info p
                               where o.order_id = i.order_id
                                     and i.product_id = p.product_id
                                     and rownum < 5
                             )                  "product"
                      from aop_sample_orders o
                      where o.customer_id < 3
                    )      "orders"
             from dual
           )       as "data"
    from dual
    ]';
  return l_return;
end;
declare
  l_cursor sys_refcursor;
  l_return clob; -- can also be varchar2, make sure it corresponds to the structure in the JSON
begin
  apex_json.initialize_clob_output(dbms_lob.call, true, 2);
  open l_cursor for
    select 'file1' as "filename",
           cursor (
             select cursor (
               select product_name as "product_name"
               from aop_sample_product_info p
               where rownum < 5
             )      as "product_a",
                    cursor (
                      select p.product_name as "product_name",
                             p.list_price   as "price",
                             p.category     as "category"
                      from aop_sample_product_info p
                      where rownum < 5
                            and product_id > 5
                    )      as "product_b",
                    "true" as "product_b_distribute",
                    cursor (
                      select o.order_total      as "order_total",
                             'Order ' || rownum as "order_name",
                             cursor (
                               select p.product_name as "product_name",
                                      i.quantity     as "quantity",
                                      i.unit_price   as "unit_price"
                               from aop_sample_order_items  i,
                                    aop_sample_product_info p
                               where o.order_id = i.order_id
                                     and i.product_id = p.product_id
                                     and rownum < 5
                             )                  "product"
                      from aop_sample_orders o
                      where o.customer_id < 3
                    )      "orders"
             from dual
           )       as "data"
    from dual

  apex_json.write(l_cursor);
  l_return := apex_json.get_clob_output;
  return l_return;
end;
[
  {
    "filename": "file1",
    "data": [
      {
        "product_a": [
          {
            "product_name": "Business Shirt"
          },
          {
            "product_name": "Trousers"
          },
          {
            "product_name": "Jacket"
          },
          {
            "product_name": "Blouse"
          }
        ],
        "product_b": [
          {
            "product_name": "Ladies Shoes",
            "price": 120,
            "category": "Womens"
          },
          {
            "product_name": "Belt",
            "price": 30,
            "category": "Accessories"
          },
          {
            "product_name": "Bag",
            "price": 125,
            "category": "Accessories"
          },
          {
            "product_name": "Mens Shoes",
            "price": 110,
            "category": "Mens"
          }
        ],
        "product_b_distribute": true,
        "orders": [
          {
            "order_total": 2380,
            "order_name": "Order 1",
            "product": [
              {
                "product_name": "Business Shirt",
                "quantity": 3,
                "unit_price": 50
              },
              {
                "product_name": "Trousers",
                "quantity": 3,
                "unit_price": 80
              },
              {
                "product_name": "Jacket",
                "quantity": 3,
                "unit_price": 150
              },
              {
                "product_name": "Blouse",
                "quantity": 3,
                "unit_price": 60
              }
            ]
          },
          {
            "order_total": 1640,
            "order_name": "Order 2",
            "product": [
              {
                "product_name": "Blouse",
                "quantity": 4,
                "unit_price": 60
              },
              {
                "product_name": "Skirt",
                "quantity": 4,
                "unit_price": 80
              },
              {
                "product_name": "Ladies Shoes",
                "quantity": 4,
                "unit_price": 120
              },
              {
                "product_name": "Bag",
                "quantity": 4,
                "unit_price": 125
              }
            ]
          },
          {
            "order_total": 730,
            "order_name": "Order 3",
            "product": [
              {
                "product_name": "Blouse",
                "quantity": 4,
                "unit_price": 60
              },
              {
                "product_name": "Skirt",
                "quantity": 3,
                "unit_price": 80
              },
              {
                "product_name": "Bag",
                "quantity": 2,
                "unit_price": 125
              }
            ]
          }
        ]
      }
    ]
  }
]
Template
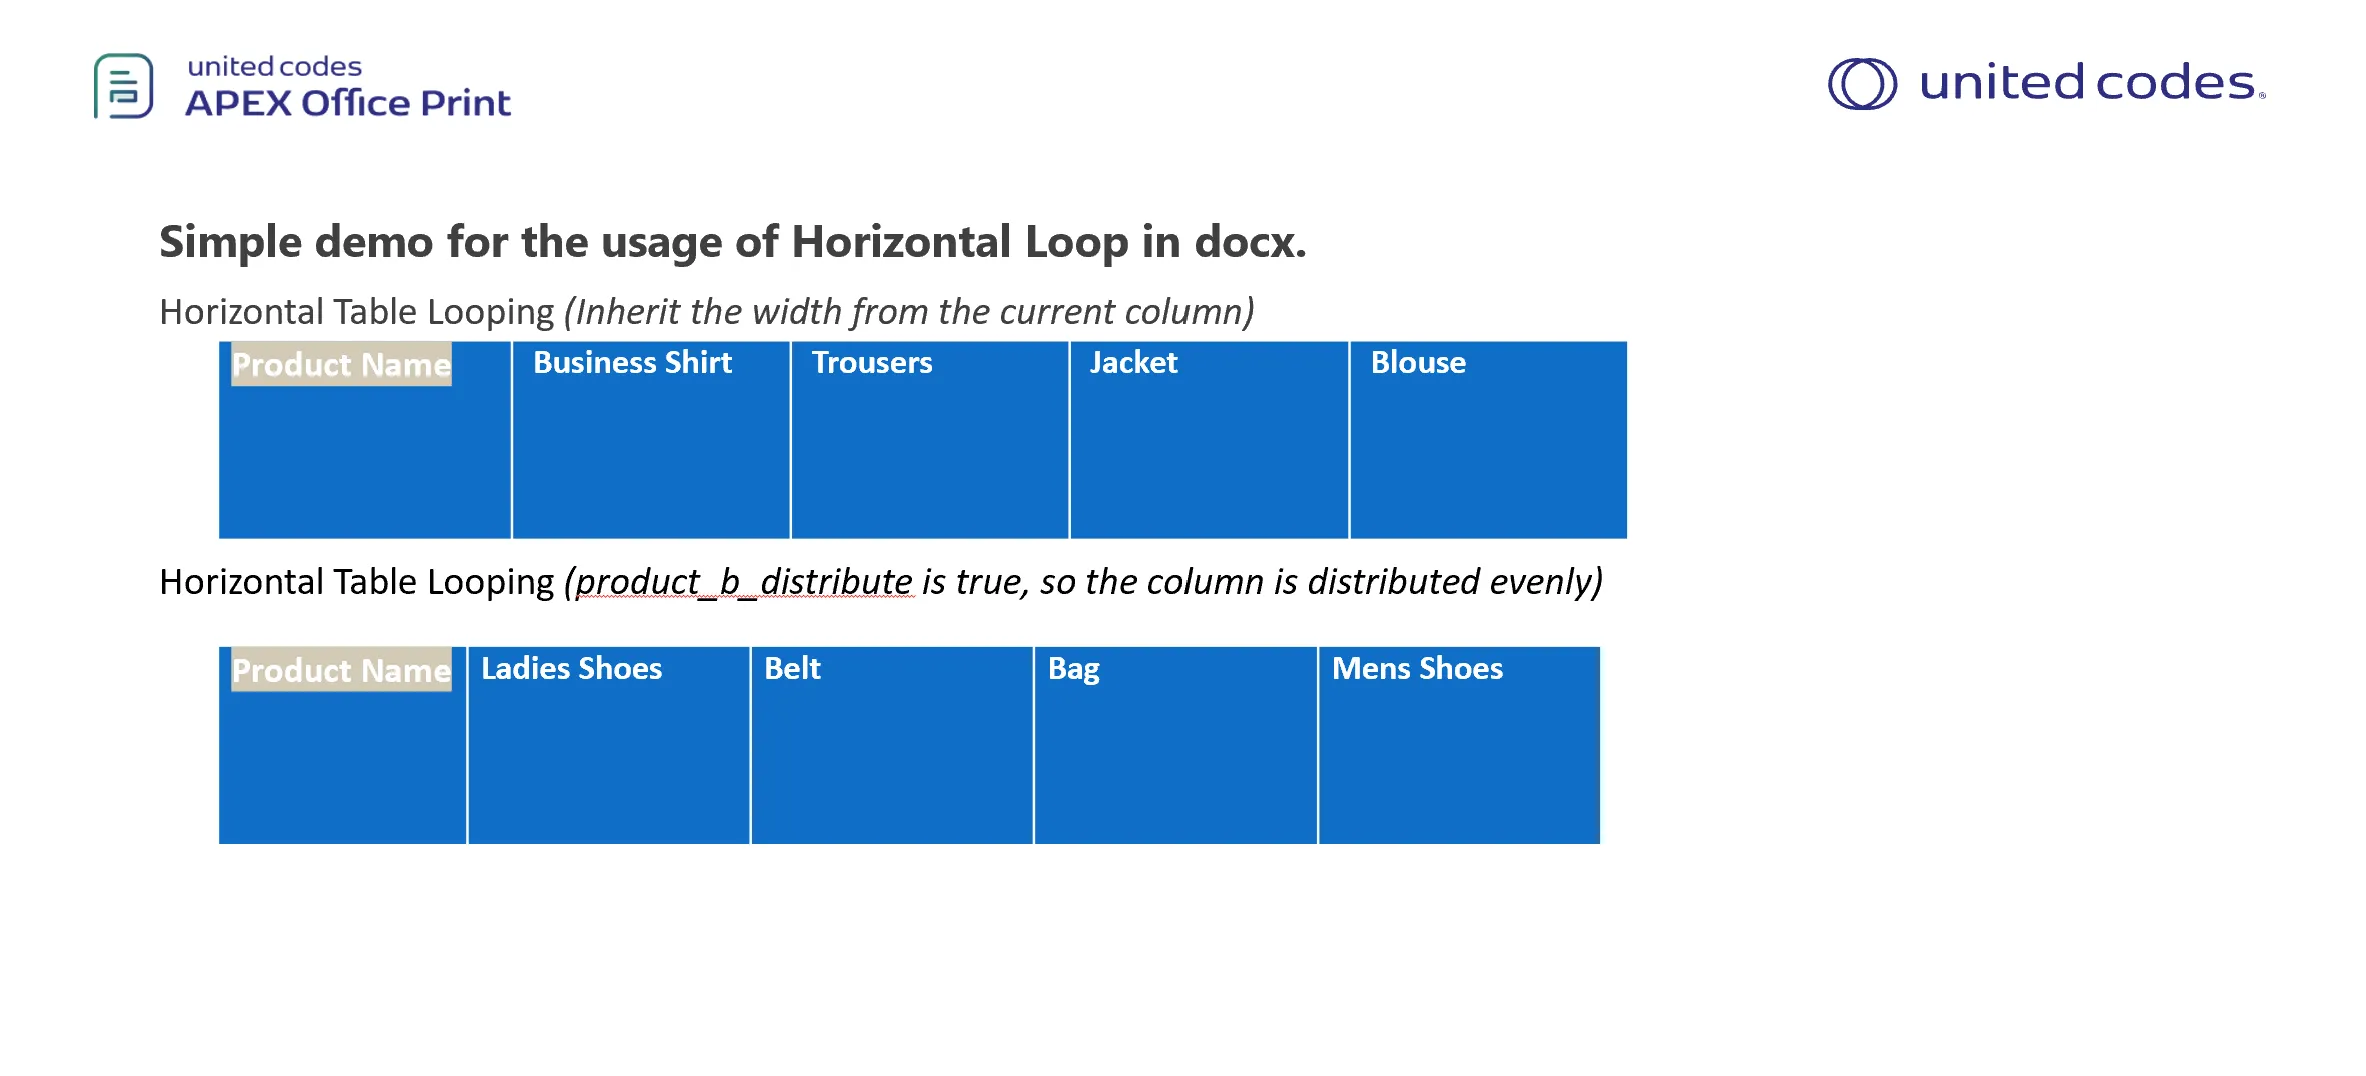
The template consists usage of horizontal looping with and without _distribute, and combination of vertical and horizontal loops as shown below.
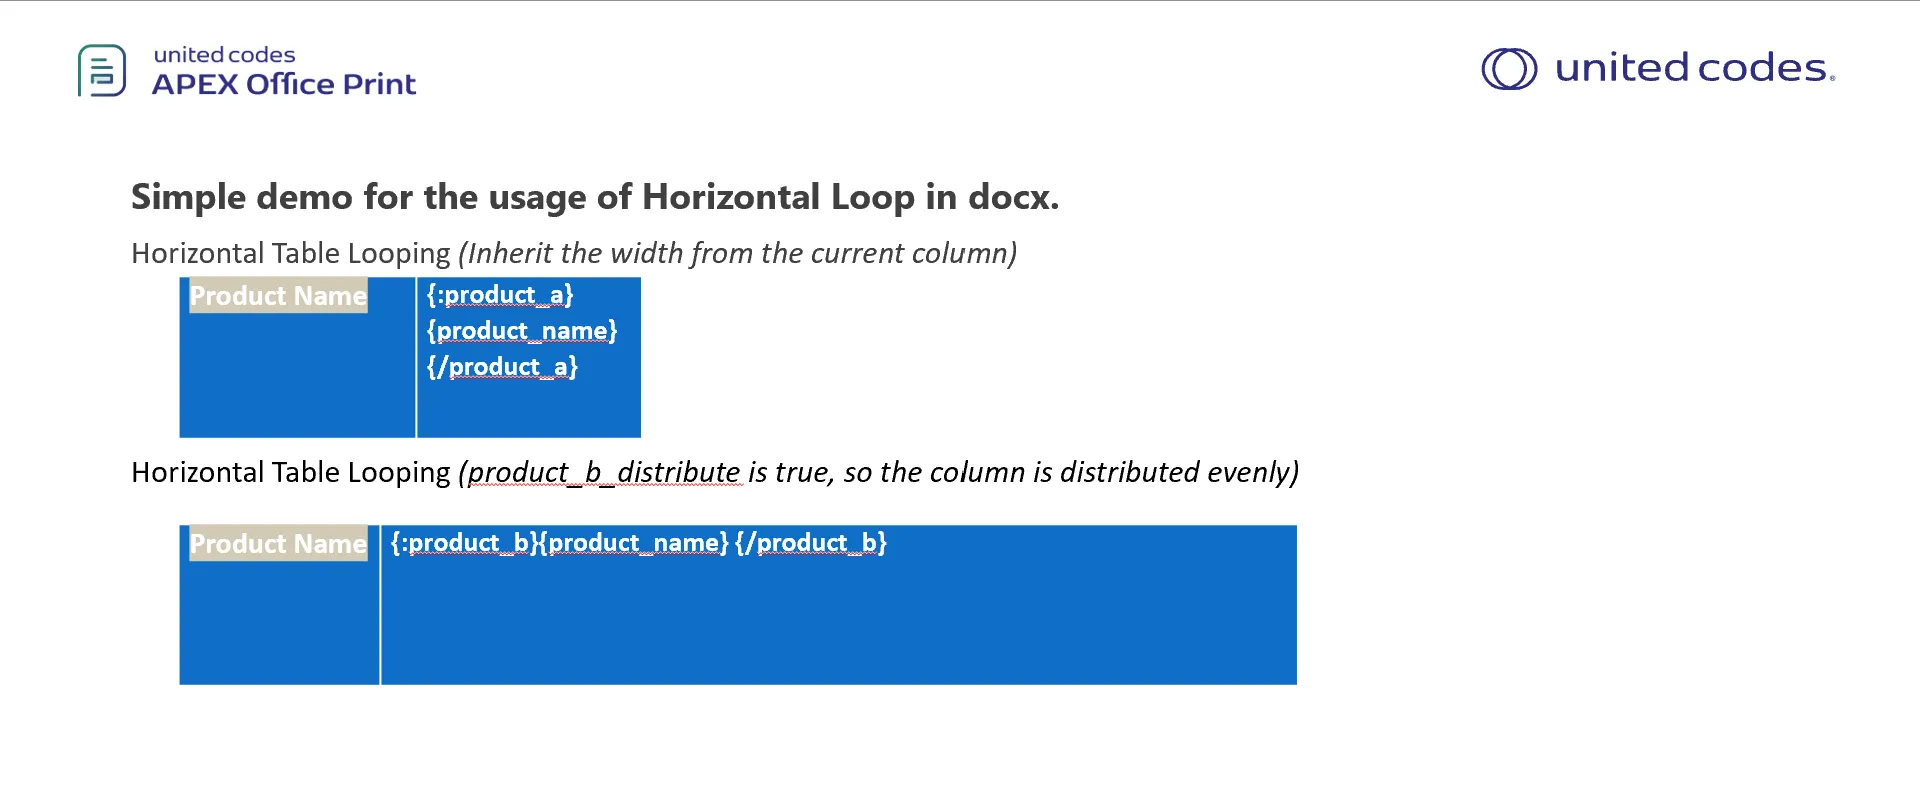
horizontal-table-template.pptx
Output
With the provided data source and the template, following output is generated by AOP.
Slide Repeat
Available From: v1.0Repeating a template slide is done by specifying which array should be looped over with a "!" tag after the curly bracket, for example {!products} to loop over the product array. If none is declared the root object is taken as array. Multiple "!" tags are not allowed in one slide.
See multi hierarchical loop to create slides for nested array or records.
Example
The data source below was created using the database available in the sample data of AOP. The database contains numerous tables and views with raw data that can be used for reference.
Lets take above case of generating the slide for each products.
Data Source
Hereby examples of data source for different data type options.
- SQL
- PL/SQL returning SQL
- PL/SQL returning JSON
- JSON
select 'file1' as "filename",
  cursor(
    select c.cust_first_name as "cust_first_name",
      c.cust_last_name as "cust_last_name",
      c.cust_city as "cust_city",
      cursor(
        select o.order_total as "order_total",
          'Order ' || rownum as "order_name",
          cursor(
            select p.product_name as "product_name",
              i.quantity as "quantity",
              i.unit_price as "unit_price",
              APEX_WEB_SERVICE.BLOB2CLOBBASE64(p.product_image) as "image"
            from aop_sample_order_items i,
              aop_sample_product_info p
            where o.order_id = i.order_id
              and i.product_id = p.product_id
          ) "product"
        from aop_sample_orders o
        where c.customer_id = o.customer_id
      ) "orders"
    from aop_sample_customers c
    where customer_id = 1
  ) as "data"
from dual
declare
    l_return clob;
begin
    l_return := q'[
        select 'file1' as "filename",
          cursor(
            select c.cust_first_name as "cust_first_name",
              c.cust_last_name as "cust_last_name",
              c.cust_city as "cust_city",
              cursor(
                select o.order_total as "order_total",
                  'Order ' || rownum as "order_name",
                  cursor(
                    select p.product_name as "product_name",
                      i.quantity as "quantity",
                      i.unit_price as "unit_price",
                      APEX_WEB_SERVICE.BLOB2CLOBBASE64(p.product_image) as "image"
                    from aop_sample_order_items i,
                      aop_sample_product_info p
                    where o.order_id = i.order_id
                      and i.product_id = p.product_id
                  ) "product"
                from aop_sample_orders o
                where c.customer_id = o.customer_id
              ) "orders"
            from aop_sample_customers c
            where customer_id = 1
          ) as "data"
        from dual
        ]';
    return l_return;
end;
declare
  l_cursor sys_refcursor;
  l_return clob;
begin
  apex_json.initialize_clob_output(dbms_lob.call, true, 2) ;
  open l_cursor for
  select 'file1' as "filename",
  cursor(
    select c.cust_first_name as "cust_first_name",
      c.cust_last_name as "cust_last_name",
      c.cust_city as "cust_city",
      cursor(
        select o.order_total as "order_total",
          'Order ' || rownum as "order_name",
          cursor(
            select p.product_name as "product_name",
              i.quantity as "quantity",
              i.unit_price as "unit_price",
              APEX_WEB_SERVICE.BLOB2CLOBBASE64(p.product_image) as "image"
            from aop_sample_order_items i,
              aop_sample_product_info p
            where o.order_id = i.order_id
              and i.product_id = p.product_id
          ) "product"
        from aop_sample_orders o
        where c.customer_id = o.customer_id
      ) "orders"
    from aop_sample_customers c
    where customer_id = 1
  ) as "data"
from dual;
  apex_json.write(l_cursor) ;
  l_return := apex_json.get_clob_output;
  return l_return;
end;
[
  {
    "filename": "file1",
    "data": [
      {
        "cust_first_name": "John",
        "cust_last_name": "Dulles",
        "cust_city": "Sterling",
        "orders": [
          {
            "order_total": 2380,
            "order_name": "Order 1",
            "product": [
              {
                "product_name": "Business Shirt",
                "quantity": 3,
                "unit_price": 50,
                "image": " ...base64 encoded image... "
              },
              {
                "product_name": "Trousers",
                "quantity": 3,
                "unit_price": 80,
                "image": " ...base64 encoded image... "
              },
              {
                "product_name": "Jacket",
                "quantity": 3,
                "unit_price": 150,
                "image": " ...base64 encoded image... "
              },
              {
                "product_name": "Blouse",
                "quantity": 3,
                "unit_price": 60,
                "image": " ...base64 encoded image... "
              },
              {
                "product_name": "Skirt",
                "quantity": 3,
                "unit_price": 80,
                "image": " ...base64 encoded image... "
              },
              {
                "product_name": "Ladies Shoes",
                "quantity": 2,
                "unit_price": 120,
                "image": " ...base64 encoded image... "
              },
              {
                "product_name": "Belt",
                "quantity": 2,
                "unit_price": 30,
                "image": " ...base64 encoded image... "
              },
              {
                "product_name": "Bag",
                "quantity": 4,
                "unit_price": 125,
                "image": " ...base64 encoded image... "
              },
              {
                "product_name": "Mens Shoes",
                "quantity": 2,
                "unit_price": 110,
                "image": " ...base64 encoded image... "
              },
              {
                "product_name": "Wallet",
                "quantity": 2,
                "unit_price": 50,
                "image": " ...base64 encoded image... "
              }
            ]
          }
        ]
      }
    ]
  }
]
Template
The template should contain the slide generation tag, which starts with ! followed by record name inside delimiters. Further, template will have column names. For example we have the template with following content:
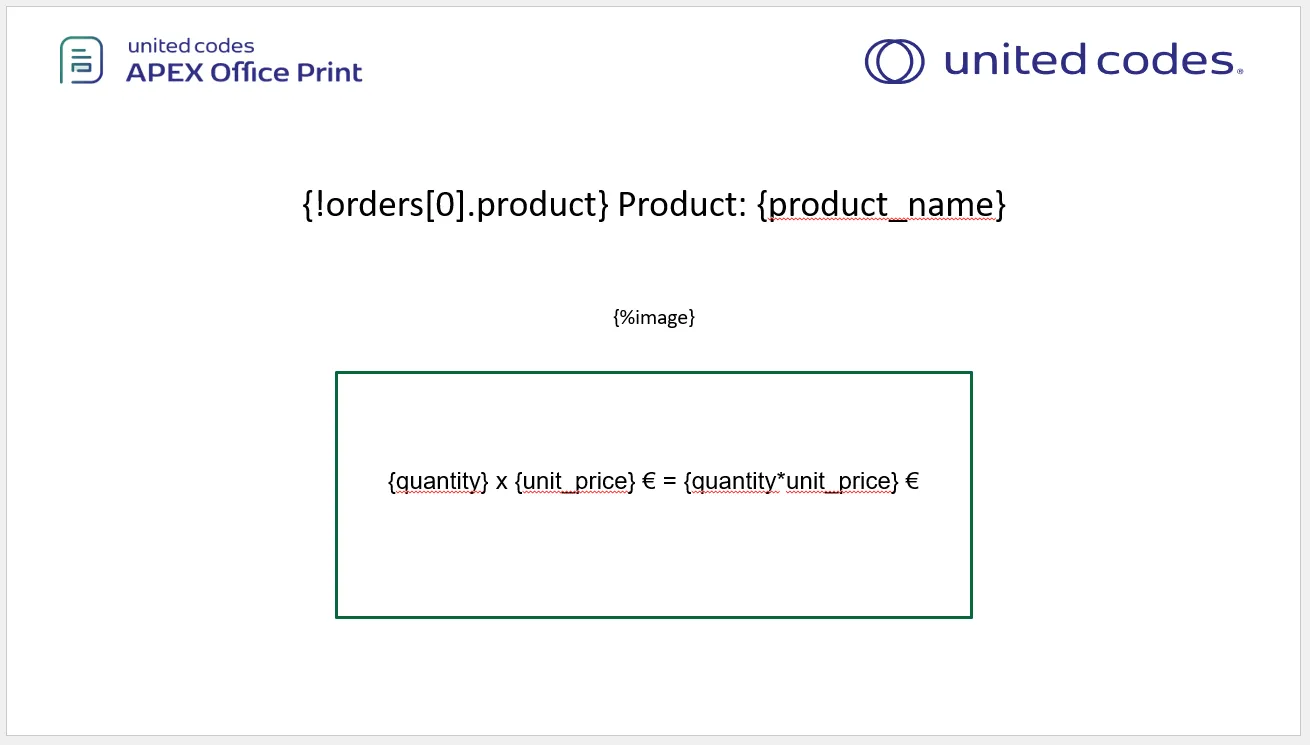
When using the slide generation tag, it is not necessary to create a loop tag for accessing the columns of records. The AOP system has the capability to recognize that you intend to access the columns of the record once the slide generation tag is implemented.
Output
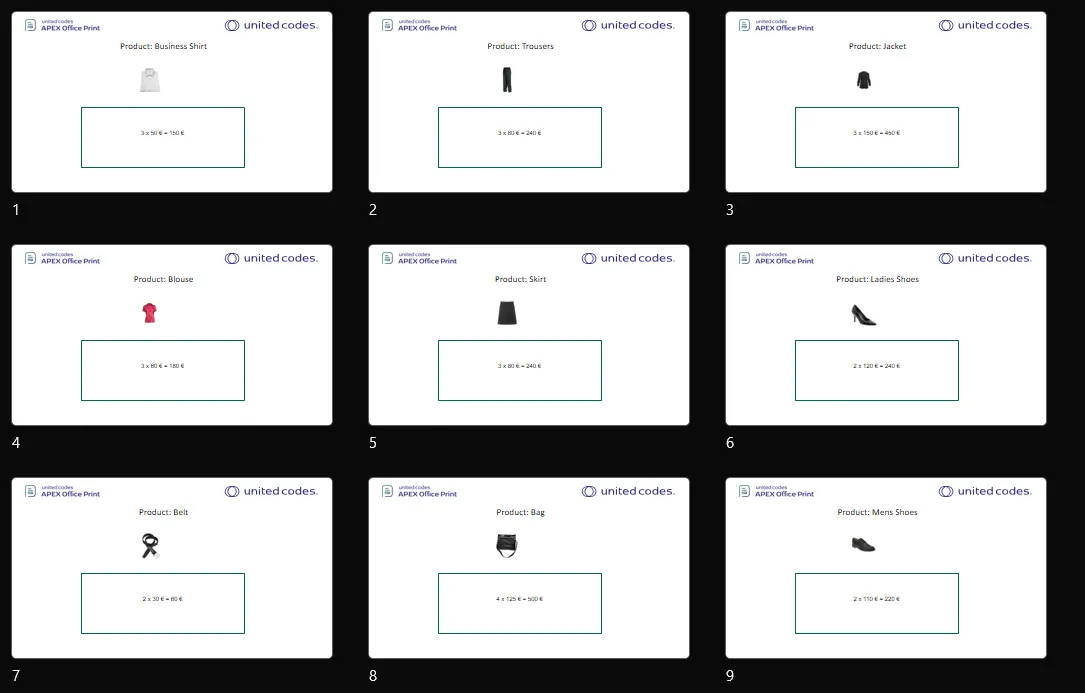
When the above data source (which results in a multiple rows of invoices which has customer first name, last name and with another record of orders with order name and order total.) together with the given template is passed to AOP, the output will be as follows.
Multi Hierarchical Loop
Available From: v22.1It is possible to create slide for nested array. For example, if you have multiple orders and each orders have multiple products and you have to create slide per product. It is possible to do so from AOP version 22.1, using records separated by ::.
This can be done like {!orders::products} and we can use multiple tags separated by :: like {!orders::product::colors} if the data format provided is correct.
Example
The data source below was created using the database available in the sample data of AOP. The database contains numerous tables and views with raw data that can be used for reference.
Data Source
Hereby examples of data source for different options.
- SQL
- PL/SQL returning SQL
- PL/SQL returning JSON
- JSON
select 'file1' as "filename",
       cursor (
         select c.cust_first_name as "cust_first_name",
                c.cust_last_name  as "cust_last_name",
                c.cust_city       as "cust_city",
                cursor (
                  select o.order_total      as "order_total",
                         'Order ' || rownum as "order_name",
                         cursor (
                           select p.product_name                                    as "product_name",
                                  i.quantity                                        as "quantity",
                                  i.unit_price                                      as "unit_price",
                                  apex_web_service.blob2clobbase64(p.product_image) as "image"
                           from aop_sample_order_items  i,
                                aop_sample_product_info p
                           where o.order_id = i.order_id
                                 and i.product_id = p.product_id
                         )                  "product"
                  from aop_sample_orders o
                  where c.customer_id = o.customer_id
                )                 "orders"
         from aop_sample_customers c
         where customer_id = 2
       )       as "data"
from dual;
declare
  l_return clob;
begin
  l_return := q'[
    select 'file1' as "filename",
           cursor (
             select c.cust_first_name as "cust_first_name",
                    c.cust_last_name  as "cust_last_name",
                    c.cust_city       as "cust_city",
                    cursor (
                      select o.order_total      as "order_total",
                             'Order ' || rownum as "order_name",
                             cursor (
                               select p.product_name                                    as "product_name",
                                      i.quantity                                        as "quantity",
                                      i.unit_price                                      as "unit_price",
                                      apex_web_service.blob2clobbase64(p.product_image) as "image"
                               from aop_sample_order_items  i,
                                    aop_sample_product_info p
                               where o.order_id = i.order_id
                                     and i.product_id = p.product_id
                             )                  "product"
                      from aop_sample_orders o
                      where c.customer_id = o.customer_id
                    )                 "orders"
             from aop_sample_customers c
             where customer_id = 2
           )       as "data"
    from dual;
    ]';
  return l_return;
end;
declare
  l_cursor sys_refcursor;
  l_return clob; -- can also be varchar2, make sure it corresponds to the structure in the JSON
begin
  apex_json.initialize_clob_output(dbms_lob.call, true, 2);
  open l_cursor for
    select 'file1' as "filename",
           cursor (
             select c.cust_first_name as "cust_first_name",
                    c.cust_last_name  as "cust_last_name",
                    c.cust_city       as "cust_city",
                    cursor (
                      select o.order_total      as "order_total",
                             'Order ' || rownum as "order_name",
                             cursor (
                               select p.product_name                                    as "product_name",
                                      i.quantity                                        as "quantity",
                                      i.unit_price                                      as "unit_price",
                                      apex_web_service.blob2clobbase64(p.product_image) as "image"
                               from aop_sample_order_items  i,
                                    aop_sample_product_info p
                               where o.order_id = i.order_id
                                     and i.product_id = p.product_id
                             )                  "product"
                      from aop_sample_orders o
                      where c.customer_id = o.customer_id
                    )                 "orders"
             from aop_sample_customers c
             where customer_id = 2
           )       as "data"
    from dual;
  apex_json.write(l_cursor);
  l_return := apex_json.get_clob_output;
  return l_return;
end;
[
  {
    "filename": "file1",
    "data": [
      {
        "cust_first_name": "William",
        "cust_last_name": "Hartsfield",
        "cust_city": "Atlanta",
        "orders": [
          {
            "order_total": 1640,
            "order_name": "Order 1",
            "product": [
              {
                "product_name": "Blouse",
                "quantity": 4,
                "unit_price": 60,
                "image": " ...base64 encoded image... "
              },
              {
                "product_name": "Skirt",
                "quantity": 4,
                "unit_price": 80,
                "image": " ...base64 encoded image... "
              },
              {
                "product_name": "Ladies Shoes",
                "quantity": 4,
                "unit_price": 120,
                "image": " ...base64 encoded image... "
              },
              {
                "product_name": "Bag",
                "quantity": 4,
                "unit_price": 125,
                "image": " ...base64 encoded image... "
              },
              {
                "product_name": "Wallet",
                "quantity": 2,
                "unit_price": 50,
                "image": " ...base64 encoded image... "
              }
            ]
          },
          {
            "order_total": 730,
            "order_name": "Order 2",
            "product": [
              {
                "product_name": "Blouse",
                "quantity": 4,
                "unit_price": 60,
                "image": " ...base64 encoded image... "
              },
              {
                "product_name": "Skirt",
                "quantity": 3,
                "unit_price": 80,
                "image": " ...base64 encoded image... "
              },
              {
                "product_name": "Bag",
                "quantity": 2,
                "unit_price": 125,
                "image": " ...base64 encoded image... "
              }
            ]
          }
        ]
      }
    ]
  }
]
Template
The template should contain the slide repeat tag in a text box which starts with ! followed by record name inside delimiters. For example we have the template with following content:
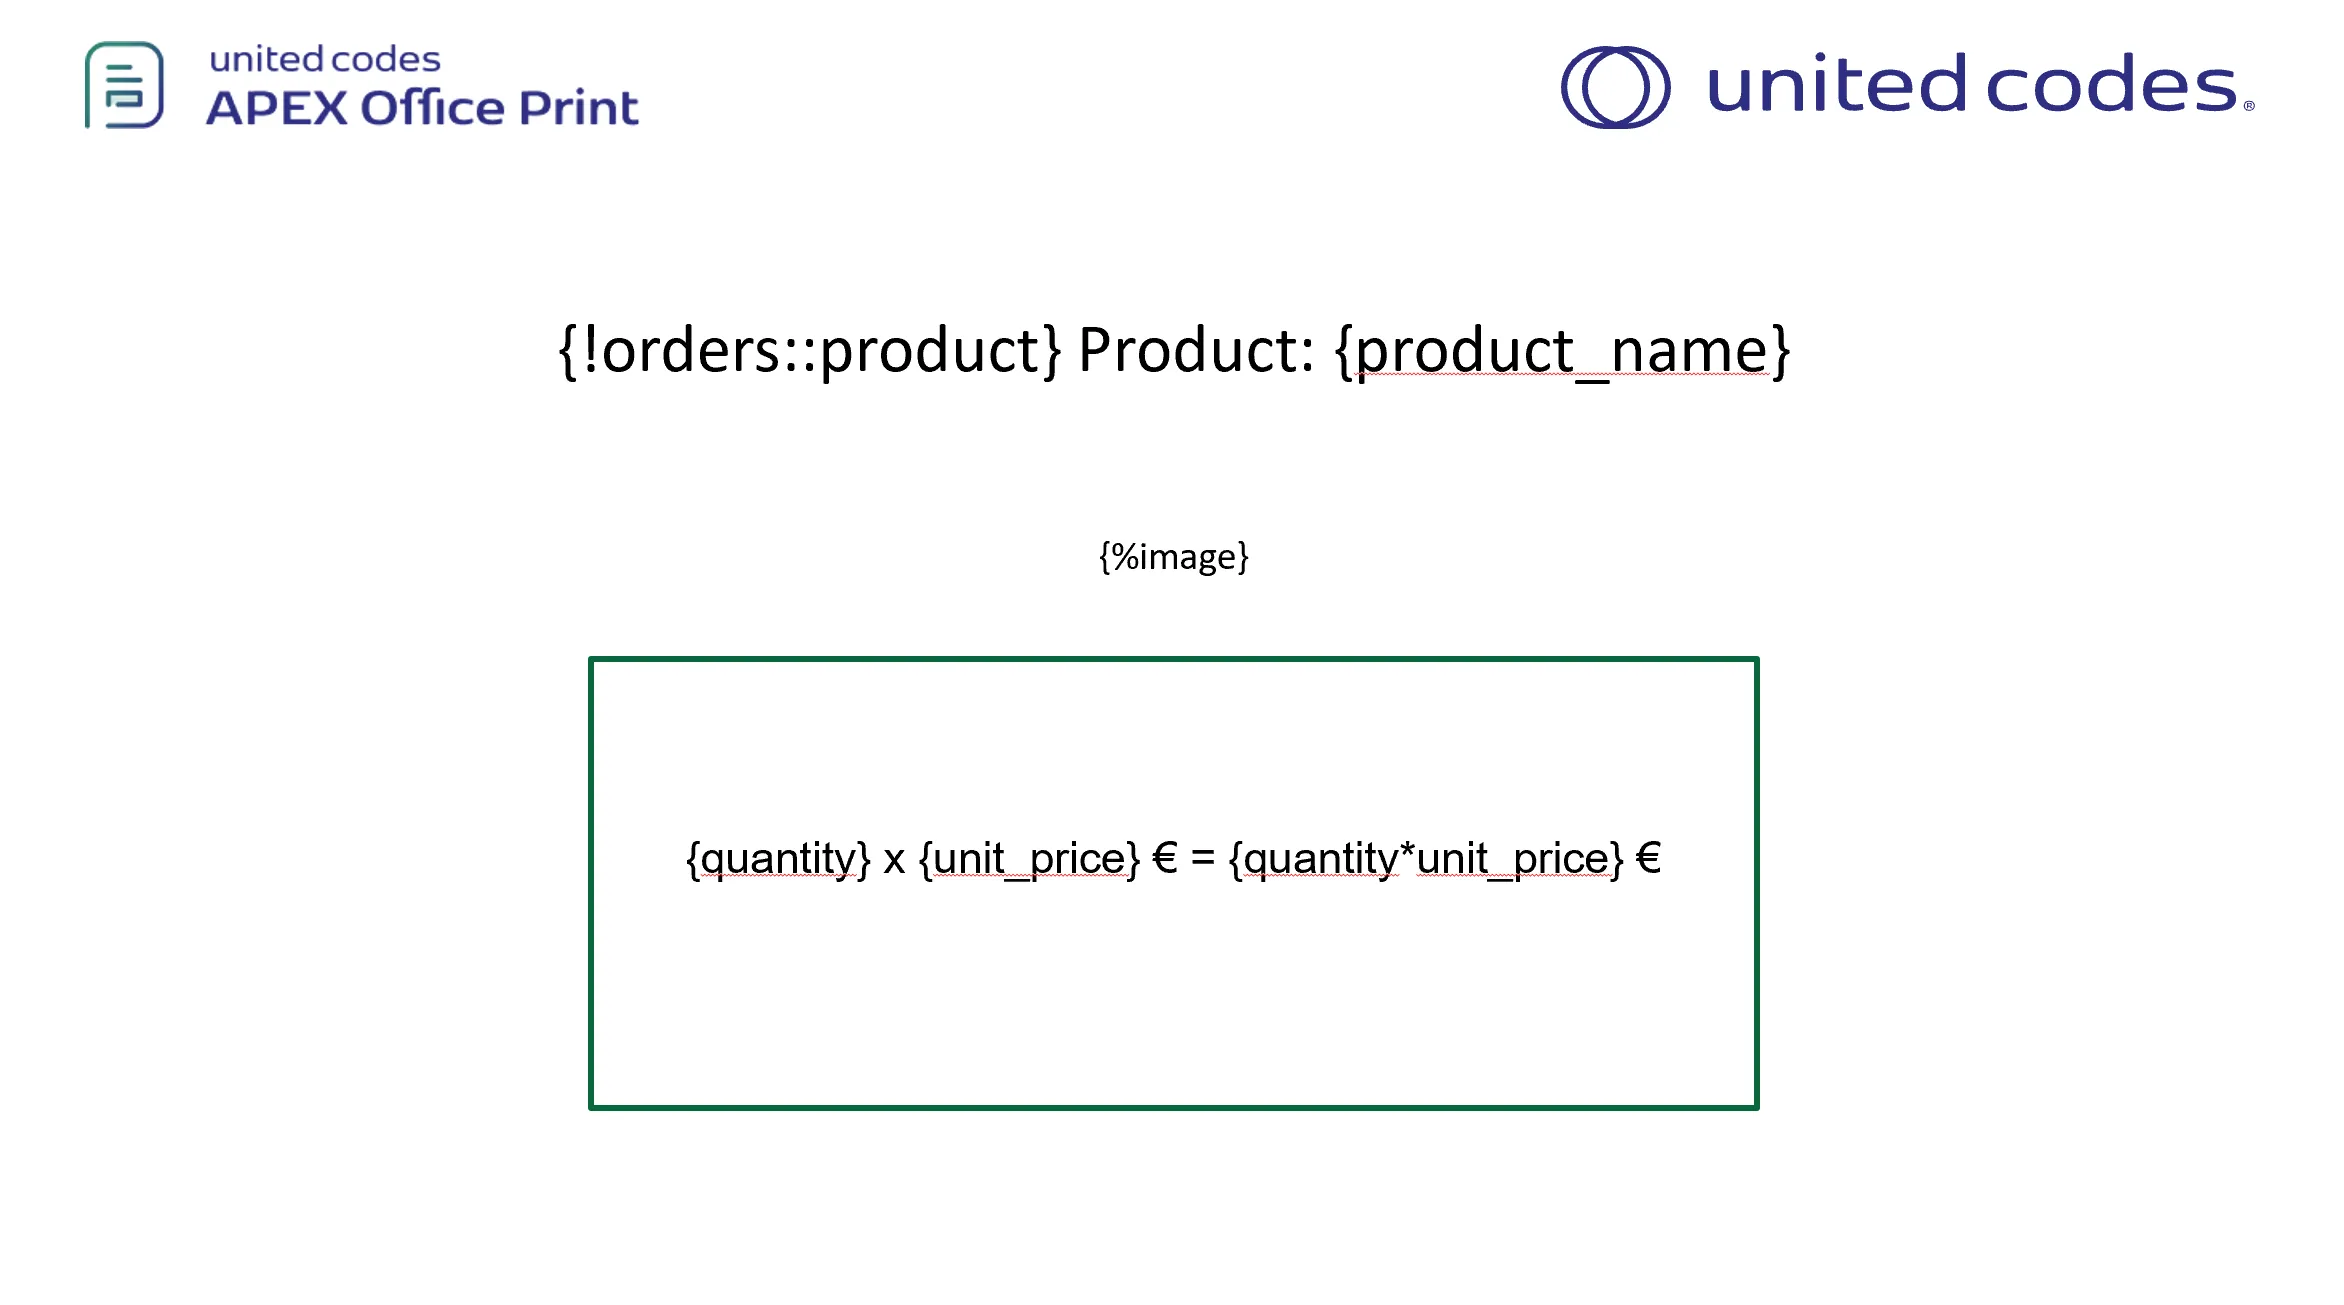
Output
When the above data source together with the given template is passed to AOP, the output will be as follows.
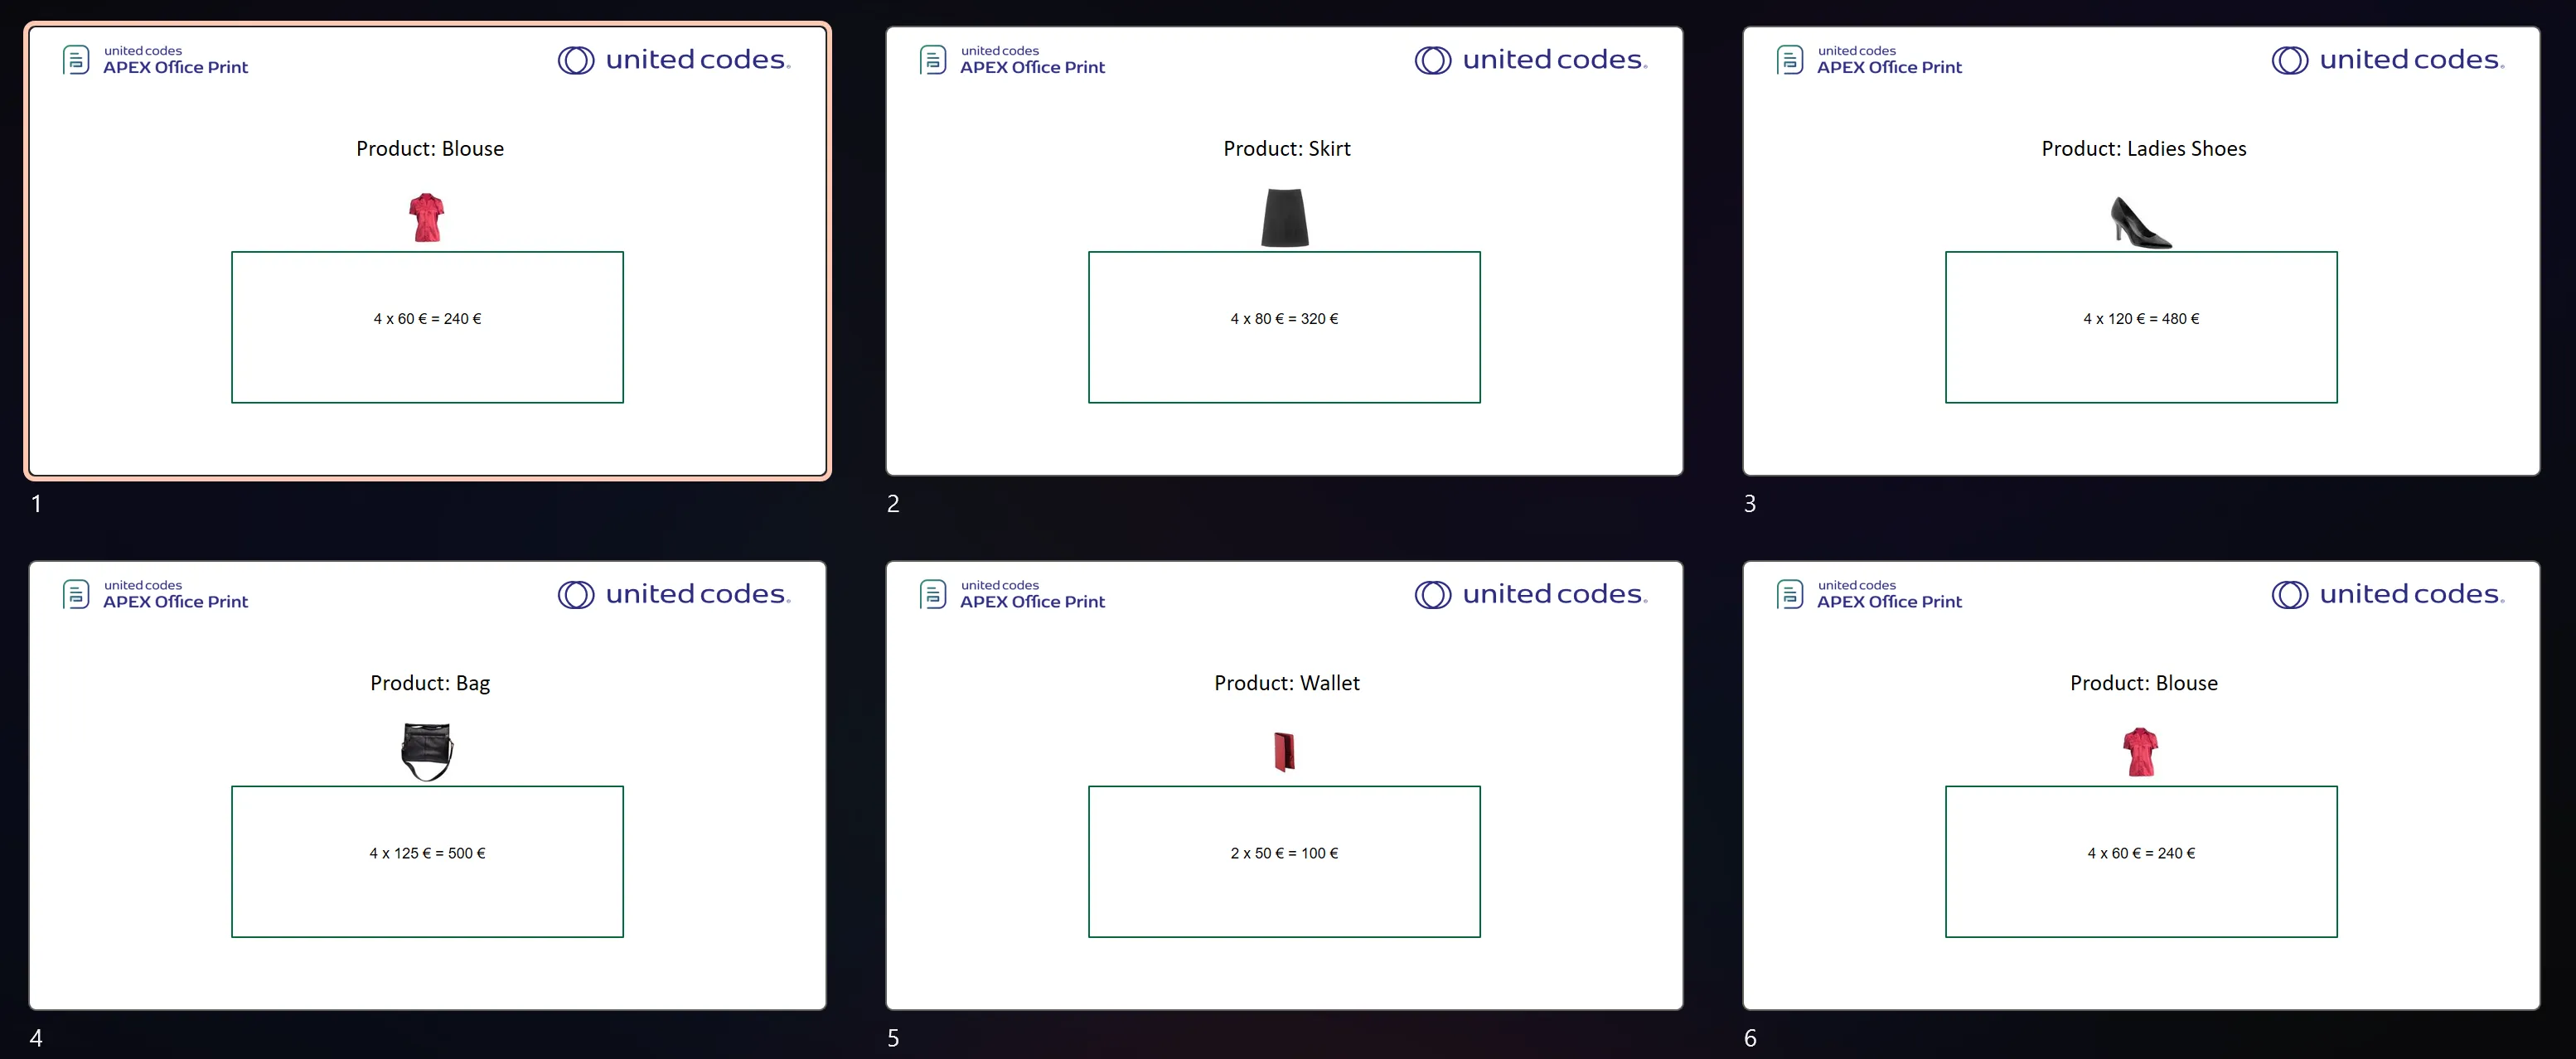
Please download the output above and observe that there are eight slides. Each slide represented a product and they were divided into two orders.
Slide Removal / Slide Deletion
This is similar to the slide repeat tag, but it is used to remove the slide from the output. The tag starts with ! followed by record name inside delimiters. For example if you want to remove any specific slide you just pass boolean value false like this "includeSummary": false. This will remove the particular slide from the output.
Example
This example uses similar data source as multi hierarchical loop but with a boolean value to remove the slide. Here in the example we will remove includeSummary from the output.
- SQL
- PL/SQL returning SQL
- PL/SQL returning JSON
- JSON
SELECT 'file1' AS "filename",
       CURSOR (
         SELECT c.cust_first_name     AS "cust_first_name",
                c.cust_last_name      AS "cust_last_name",
                c.cust_city           AS "cust_city",
                CURSOR (
                  SELECT o.order_total             AS "order_total",
                         'Order '||ROWNUM         AS "order_name",
                         CURSOR (
                           SELECT p.product_name                                    AS "product_name",
                                  i.quantity                                        AS "quantity",
                                  i.unit_price                                      AS "unit_price",
                                  apex_web_service.blob2clobbase64(p.product_image) AS "image"
                           FROM   aop_sample_order_items i
                                  JOIN aop_sample_product_info p
                                    ON i.product_id = p.product_id
                           WHERE  o.order_id = i.order_id
                         )                                                     AS "product"
                  FROM   aop_sample_orders o
                  WHERE  o.customer_id = c.customer_id
                )                 AS "orders",
                'false'           AS "includeSummary"
         FROM   aop_sample_customers c
         WHERE  c.customer_id = 2
       )       AS "data"
FROM   dual;
declare
  l_return clob;
begin
  l_return := q'[
    SELECT 'file1' AS "filename",
       CURSOR (
         SELECT c.cust_first_name     AS "cust_first_name",
                c.cust_last_name      AS "cust_last_name",
                c.cust_city           AS "cust_city",
                CURSOR (
                  SELECT o.order_total             AS "order_total",
                         'Order '||ROWNUM         AS "order_name",
                         CURSOR (
                           SELECT p.product_name                                    AS "product_name",
                                  i.quantity                                        AS "quantity",
                                  i.unit_price                                      AS "unit_price",
                                  apex_web_service.blob2clobbase64(p.product_image) AS "image"
                           FROM   aop_sample_order_items i
                                  JOIN aop_sample_product_info p
                                    ON i.product_id = p.product_id
                           WHERE  o.order_id = i.order_id
                         )                                                     AS "product"
                  FROM   aop_sample_orders o
                  WHERE  o.customer_id = c.customer_id
                )                 AS "orders",
                'false'           AS "includeSummary"
         FROM   aop_sample_customers c
         WHERE  c.customer_id = 2
       )       AS "data"
FROM   dual;
    ]';
  return l_return;
end;
declare
  l_cursor sys_refcursor;
  l_return clob; -- can also be varchar2, make sure it corresponds to the structure in the JSON
begin
  apex_json.initialize_clob_output(dbms_lob.call, true, 2);
  open l_cursor for
    SELECT 'file1' AS "filename",
       CURSOR (
         SELECT c.cust_first_name     AS "cust_first_name",
                c.cust_last_name      AS "cust_last_name",
                c.cust_city           AS "cust_city",
                CURSOR (
                  SELECT o.order_total             AS "order_total",
                         'Order '||ROWNUM         AS "order_name",
                         CURSOR (
                           SELECT p.product_name                                    AS "product_name",
                                  i.quantity                                        AS "quantity",
                                  i.unit_price                                      AS "unit_price",
                                  apex_web_service.blob2clobbase64(p.product_image) AS "image"
                           FROM   aop_sample_order_items i
                                  JOIN aop_sample_product_info p
                                    ON i.product_id = p.product_id
                           WHERE  o.order_id = i.order_id
                         )                                                     AS "product"
                  FROM   aop_sample_orders o
                  WHERE  o.customer_id = c.customer_id
                )                 AS "orders",
                'false'           AS "includeSummary"
         FROM   aop_sample_customers c
         WHERE  c.customer_id = 2
       )       AS "data"
FROM   dual;
  apex_json.write(l_cursor);
  l_return := apex_json.get_clob_output;
  return l_return;
end;
[
    {
        "filename": "file1",
        "data": [
            {
                "cust_first_name": "William",
                "cust_last_name": "Hartsfield",
                "cust_city": "Atlanta",
                "orders": [
                    {
                        "order_total": 1640,
                        "order_name": "Order 1",
                        "product": [
                            {
                                "product_name": "Blouse",
                                "quantity": 4,
                                "unit_price": 60,
                                "image": " ...base64 encoded image... "
                            },
                            {
                                "product_name": "Skirt",
                                "quantity": 4,
                                "unit_price": 80,
                                "image": " ...base64 encoded image... "
                            },
                            {
                                "product_name": "Ladies Shoes",
                                "quantity": 4,
                                "unit_price": 120,
                                "image": " ...base64 encoded image... "
                            },
                            {
                                "product_name": "Bag",
                                "quantity": 4,
                                "unit_price": 125,
                                "image": " ...base64 encoded image... "
                            },
                            {
                                "product_name": "Wallet",
                                "quantity": 2,
                                "unit_price": 50,
                                "image": " ...base64 encoded image... "
                            }
                        ]
                    },
                    {
                        "order_total": 730,
                        "order_name": "Order 2",
                        "product": [
                            {
                                "product_name": "Blouse",
                                "quantity": 4,
                                "unit_price": 60,
                                "image": " ...base64 encoded image... "
                            },
                            {
                                "product_name": "Skirt",
                                "quantity": 3,
                                "unit_price": 80,
                                "image": " ...base64 encoded image... "
                            },
                            {
                                "product_name": "Bag",
                                "quantity": 2,
                                "unit_price": 125,
                                "image": " ...base64 encoded image... "
                            }
                        ]
                    }
                ],
                     "includeSummary": false // this will remove the slide
            }
        ]
    }
]
Template
The template should contain the slide repeat tag in a text box which starts with ! followed by record name inside delimiters. For example we have the template with following content:

Output
When the above data source together with the given template is passed to AOP, the output will be as follows.

Please download the output above and observe that there are eight slides. Each slide represented a product and they were divided into two orders.
Table Row Loop
Available From: v3.0You can merge cells of columns in an table by utilizing the table row loop that includes an equal sign(=) followed by the name of the cursor or record enclosed by delimiters. If you introduce a table row loop ('country') it will check for the number of rows in that record('country') and merge that many number of cells vertically.
The tag consists of two parts - a beginning and an ending. The starting part comprises an equal sign followed by the record name enclosed in delimiters {=record1}, while the ending part comprises a forward slash followed by the same record name enclosed in delimiters {/record1}.
For example:
select
  cursor(
    select 'p1' as "productName" from dual
    union all
    select 'p2' as "productName" from dual
  ) as "products"
from dual
If you use {=products} in a cell two vertical cells will be merged. This can be implemented for nested loop also.
Example
The data source below was created using the database available in the sample data of AOP. The database contains numerous tables and views with raw data that can be used for reference.
Data Source
Hereby examples of data source for different options.
- SQL
- PL/SQL returning SQL
- PL/SQL returning JSON
- JSON
select 'file1' as "filename",
       cursor (
         select c.cust_first_name as "cust_first_name",
                c.cust_last_name  as "cust_last_name",
                c.cust_city       as "cust_city",
                cursor (
                  select o.order_total      as "order_total",
                         'Order ' || rownum as "order_name",
                         cursor (
                           select p.product_name                                    as "product_name",
                                  i.quantity                                        as "quantity",
                                  i.unit_price                                      as "unit_price",
                                  apex_web_service.blob2clobbase64(p.product_image) as "image"
                           from aop_sample_order_items  i,
                                aop_sample_product_info p
                           where o.order_id = i.order_id
                                 and i.product_id = p.product_id
                         )                  "product"
                  from aop_sample_orders o
                  where c.customer_id = o.customer_id
                )                 "orders"
         from aop_sample_customers c
         where customer_id = 2
       )       as "data"
from dual;
declare
  l_return clob;
begin
  l_return := q'[
    select 'file1' as "filename",
           cursor (
             select c.cust_first_name as "cust_first_name",
                    c.cust_last_name  as "cust_last_name",
                    c.cust_city       as "cust_city",
                    cursor (
                      select o.order_total      as "order_total",
                             'Order ' || rownum as "order_name",
                             cursor (
                               select p.product_name                                    as "product_name",
                                      i.quantity                                        as "quantity",
                                      i.unit_price                                      as "unit_price",
                                      apex_web_service.blob2clobbase64(p.product_image) as "image"
                               from aop_sample_order_items  i,
                                    aop_sample_product_info p
                               where o.order_id = i.order_id
                                     and i.product_id = p.product_id
                             )                  "product"
                      from aop_sample_orders o
                      where c.customer_id = o.customer_id
                    )                 "orders"
             from aop_sample_customers c
             where customer_id = 2
           )       as "data"
    from dual;
    ]';
  return l_return;
end;
declare
  l_cursor sys_refcursor;
  l_return clob; -- can also be varchar2, make sure it corresponds to the structure in the JSON
begin
  apex_json.initialize_clob_output(dbms_lob.call, true, 2);
  open l_cursor for
    select 'file1' as "filename",
           cursor (
             select c.cust_first_name as "cust_first_name",
                    c.cust_last_name  as "cust_last_name",
                    c.cust_city       as "cust_city",
                    cursor (
                      select o.order_total      as "order_total",
                             'Order ' || rownum as "order_name",
                             cursor (
                               select p.product_name                                    as "product_name",
                                      i.quantity                                        as "quantity",
                                      i.unit_price                                      as "unit_price",
                                      apex_web_service.blob2clobbase64(p.product_image) as "image"
                               from aop_sample_order_items  i,
                                    aop_sample_product_info p
                               where o.order_id = i.order_id
                                     and i.product_id = p.product_id
                             )                  "product"
                      from aop_sample_orders o
                      where c.customer_id = o.customer_id
                    )                 "orders"
             from aop_sample_customers c
             where customer_id = 2
           )       as "data"
    from dual;
  apex_json.write(l_cursor);
  l_return := apex_json.get_clob_output;
  return l_return;
end;
[
  {
    "filename": "file1",
    "data": [
      {
        "cust_first_name": "William",
        "cust_last_name": "Hartsfield",
        "cust_city": "Atlanta",
        "orders": [
          {
            "order_total": 1640,
            "order_name": "Order 1",
            "product": [
              {
                "product_name": "Blouse",
                "quantity": 4,
                "unit_price": 60,
                "image": " ...base64 encoded image... "
              },
              {
                "product_name": "Skirt",
                "quantity": 4,
                "unit_price": 80,
                "image": " ...base64 encoded image... "
              },
              {
                "product_name": "Ladies Shoes",
                "quantity": 4,
                "unit_price": 120,
                "image": " ...base64 encoded image... "
              },
              {
                "product_name": "Bag",
                "quantity": 4,
                "unit_price": 125,
                "image": " ...base64 encoded image... "
              },
              {
                "product_name": "Wallet",
                "quantity": 2,
                "unit_price": 50,
                "image": " ...base64 encoded image... "
              }
            ]
          },
          {
            "order_total": 730,
            "order_name": "Order 2",
            "product": [
              {
                "product_name": "Blouse",
                "quantity": 4,
                "unit_price": 60,
                "image": " ...base64 encoded image... "
              },
              {
                "product_name": "Skirt",
                "quantity": 3,
                "unit_price": 80,
                "image": " ...base64 encoded image... "
              },
              {
                "product_name": "Bag",
                "quantity": 2,
                "unit_price": 125,
                "image": " ...base64 encoded image... "
              }
            ]
          }
        ]
      }
    ]
  }
]
Template
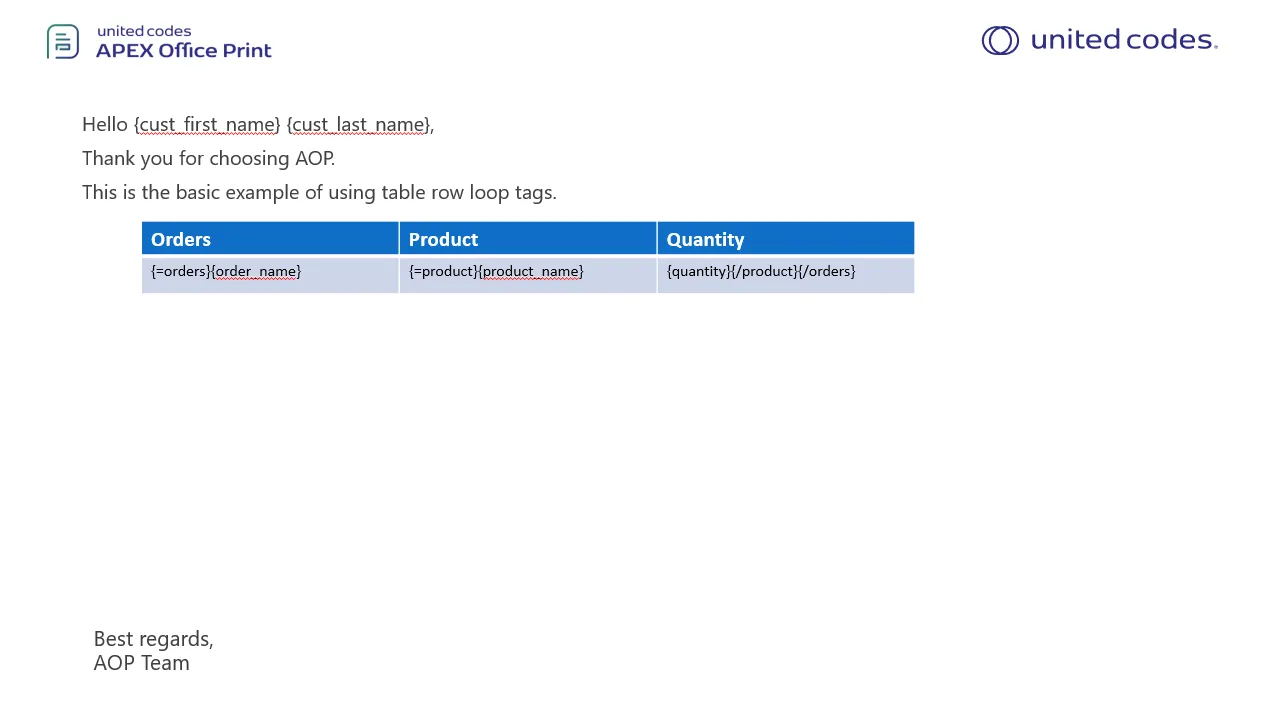
The template should contain the table row loop tag (start of loop ({=recordName}) and end of loop {/recordName}). For example we have the template with following content:
Output
When the above data source together with the given template is passed to AOP, the output will be as follows.

Image Tag
Available From: v1.0You can insert images in slide using an image tag that begins with a percentage (%) symbol followed by the column name. The image source can be a URL, a base64 encoded image, or a file path. When you use this tag in a template, it will be substituted by the corresponding image.
Image Tag {%imgKey} requires a seperate textbox and cannot not placed with other text contents. The image are positioned relative to content box and Therefore, when inserting an image, be aware that the size of the text box will not automatically adjust unless manually changed using following options to adjust width and height.
There are many different options that you can choose from when using image tags.
- width : "80px" (For specifying fixed width of image)
- height : "80px" (For specifying fixed height of image)
- alt_text : "Alternative image text" (For specifying alternative image)
- max_height : "80px" (Maximum height for scaling image proportionally)
- max_width : "80px" (Maximum width for scaling image proportionally)
- transparency : "80%" (For specifying transparency of image)
- rotation : "90" (For specifying rotation to image)
- ignore_error : true (boolean) if default image should be inserted if image cannot be fetched, if false, throws error. default: true
- url : "http://www.dummyimage.com/sampleimage" (For specifying url of image)
- maintain_aspect_ratio : true (boolean, to maintain aspect ration of images, width should be specified for this option to work)
To use theses options, join column name and option you want to use using (_) character.
For ex if imagekey is your column name then you can use these options as:
'80px' as "imagekey_width",
'80px' as "imagekey_height",
'Alternative image text'as "imagekey_alt_text",
'80px' as "imagekey_max_height",
'80px' as "imagekey_max_width",
'80%' as "imagekey_transparency",
'90' as "imagekey_rotation",
'true' as "imagekey_ignore_error", -- boolean value
'http://www.dummyimage.com/sampleimage' as "imagekey_url",
'true' as "imagekey_maintain_aspect_ratio" -- boolean value
Since 21.1.1, Exif information is taken into account if it exists in image.
Since AOP 20.3, we have included support for other units other than px (default), in, cm, pt, and em.
The given data can be a base64 encoded image, a URL pointing to an image (the URL must have image extension), path to the image or a FTP or SFTP server image.
While using URL's or fetching images from the server, it is possible that image cannot be fetched due to various reasons on server, generally it gives an error from AOP. But specifying "imagekey_ignore_error" as true replaces it with default image instead of returning error.
When manual height and width is not provided and the dimensions of image are greater than the page width or page height, then image size is reduced, such that it fits in page without changing the aspect ratio of image.
Supported Image Types
| Format | Extension | MimeType |
|---|---|---|
| JPEG | .jpg, .jpeg, .jfif, .pjpeg, .pjp | image/jpeg |
| PNG | .png | image/png |
| GIF | .gif | image/gif |
| BMP | .bmp | image/bmp |
| TIFF | .tiff , .tif | image/tiff |
| SVG | .svg | image/svg+xml |
| WEBP | .webp | image/webp |
| HEIC | .heic | image/heic |
Example
The data source below was created using the database available in the sample data of AOP. The database contains numerous tables and views with raw data that can be used for reference.
Below is the example of using image tag with different options.
Data Source
Hereby examples of data source for different options.
- SQL
- PL/SQL returning SQL
- PL/SQL returning JSON
- JSON
select
  'file1' as "filename",
  cursor(
    select
      -- base64 source
      p.product_name as "product_name",
      APEX_WEB_SERVICE.BLOB2CLOBBASE64(p.product_image) "image1",
      '150px' as "image1_max_height",
      '150px' as "image1_max_width",

      -- url as source and with few options
      'https://www.apexofficeprint.com/assets/dist/images/office-print/logo-large.svg' as "image2",
      '200px' as "image2_width",
      '200px' as "image2_height",
      'AOP Logo Large' as "image2_alt_text",
      '20%' as "image2_transparency",
      'https://www.apexofficeprint.com/' as "image2_url"
    from
      aop_sample_product_info p
    where
      p.product_id = 1
  ) as "data"
from
  dual
declare l_return clob;

begin l_return := q'[
        select
          'file1' as "filename",
          cursor(
            select
              APEX_WEB_SERVICE.BLOB2CLOBBASE64(p.product_image) "image1",
              '150px' as "image1_max_height",
              '150px' as "image1_max_width",
              'https://www.apexofficeprint.com/assets/dist/images/office-print/logo-large.svg' as "image2",
              '100px' as "image2_width",
              '100px' as "image2_height",
              'AOP Logo Large' as "image2_alt_text",
              '20%' as "image2_transparency",
              'https://www.apexofficeprint.com/' as "image2_url"
            from
              aop_sample_product_info p
            where
              p.product_id = 1
          ) as "data"
        from
          dual
        ]';

return l_return;

end;
declare l_cursor sys_refcursor;

l_return clob;

begin apex_json.initialize_clob_output(dbms_lob.call, true, 2);

open l_cursor for
select
  'file1' as "filename",
  cursor (
    select
      APEX_WEB_SERVICE.BLOB2CLOBBASE64(p.product_image) "image1",
      '150px' as "image1_max_height",
      '150px' as "image1_max_width",
      'https://www.apexofficeprint.com/assets/dist/images/office-print/logo-large.svg' as "image2",
      '100px' as "image2_width",
      '100px' as "image2_height",
      'AOP Logo Large' as "image2_alt_text",
      '20%' as "image2_transparency",
      'https://www.apexofficeprint.com/' as "image2_url"
    from
      aop_sample_product_info p
    where
      p.product_id = 1
  ) as "data"
from
  dual;

apex_json.write(l_cursor);

l_return := apex_json.get_clob_output;

return l_return;

end;
[
  {
    "filename": "file1",
    "data": [
        {
          "product_name": "Business Shirt",
            "image1": " ...base64 encoded image... ",
            "image1_max_height": "150px",
            "image1_max_width": "150px",
            "image2": "https:\/\/www.apexofficeprint.com\/assets\/dist\/images\/office-print\/logo-large.svg",
            "image2_width": "100px",
            "image2_height": "100px",
            "image2_alt_text": "AOP Logo Large",
            "image2_transparency": "20%",
            "image2_url": "https:\/\/www.apexofficeprint.com\/"
        }
    ]
  }
]
Template
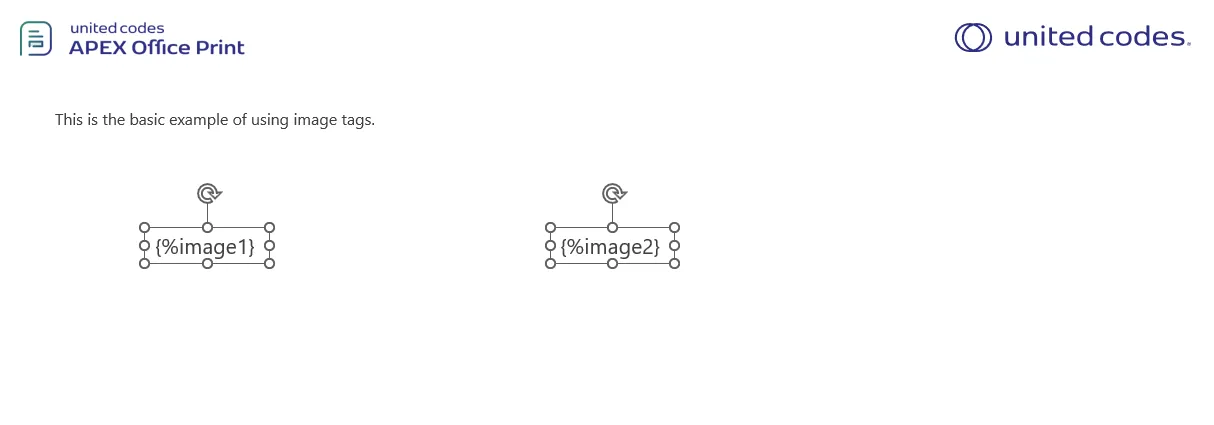
The template should contain the image tag in any cell which starts with % followed by column name inside delimiters. For example we have the template with following content:
Output
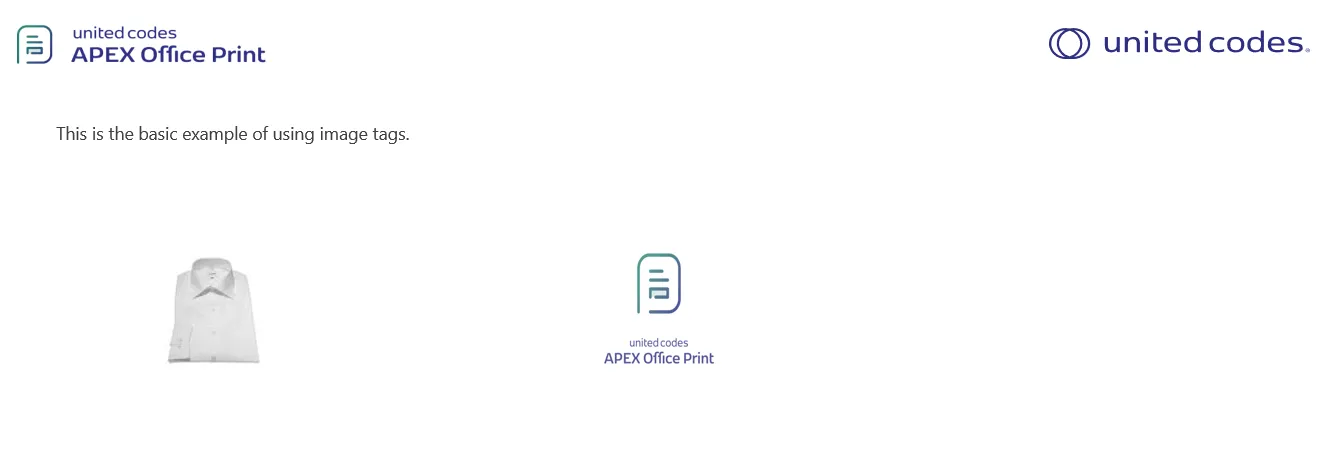
When the above data source together with the given template is passed to AOP, the output will be as follows.
Barcode and QR code
Available From v3.1AOP allows for the insertion of barcode and QR code in PPTX using tags with syntax pipe(|) followed by column name inside delimiters (e.g., {|barcode}). To differentiate between barcode and QR code tags, an additional option is required to confirm the type of tag i.e option type .
When the AOP identifies one of these tags in a template, it replaces it with the corresponding barcode or QR code.
To avoid encountering an error, it is necessary to place this tag within a text box when working with PPTX files.
Please visit Barcode and QR code of general tags documentation for detailed information.
QR Code Image Replacing
Available From: v18.1AOP allows you to replace a QRcode image with another image. The QR code can contain the image tags and barcode tags, i.e {%key} or {|key}. This method can be used if you are inserting a floating image, or need to have certain border styles on the image. The tag replacing will work as look as there are no artistic effects used for the image themselves.
Please visit QR Code Image Replacing in general tags documentation for detailed information.
Chart
Available From: v2.0It is possible to insert charts in PowerPoint using $ tag followed by cursor name inside delimiters. Ex ({$chart}).
To avoid encountering an error, it is necessary to place this tag within a text box when working with PPTX files.
Please refer to Chart Tags documentation of general for detailed information and implementation.
Chart Templating
Available From: v20.3Since AOP 20.3, there is another way to create charts. You can provide a chart in the template and mark it with a preceding
{aopchart chartData} where aopchart is the tag identifier and chartData is the cursor in the data which contains information about the chart. Using this method, the chart in the template can be styled through MS Office or LibreOffice as an alternative to passing the style options as a part of the input data. This allows the use of style options we do not support, but moves the chart styling from the data to the template (e.g. loops containing a chart with different style on each iteration would not be possible using this tag).
To avoid encountering an error, it is necessary to place this tag within a text box when working with PPTX files.
Please visit Chart Templating of general tags documentation.
D3 Images
Available From: v18.1You can insert a d3 image in your report using the d3 tag, which follows the syntax $d3 followed by the column with the javascript d3 code within delimiters (for ex {$d3 test} considering test has javascript d3 code). When AOP runs the code for the d3 image, it will replace the tag with the resulting image.
To avoid encountering an error, it is necessary to place this tag within a text box when working with PPTX files.
Please visit D3 Images of general tags documentation.
HyperLink
Available From: v3.3AOP allows you to include hyperlinks to web and email addresses in Powerpoint by using the {*column_name} tag, where asterisk * is followed by the column name enclosed by delimiters.
Available options while using hyperlink tag of AOP are:
- text : The text to show for the hyperlink (ex:
website_text) - font_color: This is used to set the font color of the text or hyperlink itself (e.g.,
website_font_color). The values should be the hex code of the respective color (e.g., #FFFFFF, #000000). - underline_color: Set the color of the underline for the link (e.g.,
website_underline_color). The values should be the hex code of the respective color (e.g., #FFFFFF, #000000).
Since hyperlinks are blue and always underlined, the styling cannot be disabled.
As a workaround, you can provide the font color of the text and the underline color to display it as normal text. For example, you can set the font color to black and the underline color to white to show the link as normal text while still maintaining its hyperlink functionality.
For ex, you can set the font color to black and underline color to white to show the link as normal text and still functional as hyperlink.
When creating a hyperlink, you have the option to include text that will be displayed as the clickable link as columName_text.
For ex:
  'https://www.apexofficeprint.com/' as "website",
  'AOP Website' as "website_text", -- text to show for the link.
  'support@apexofficeprint.com' as "AOPSupport",
  'mail to support' as "AOPSupport_text", -- text to show for the link.
Example
The data source below was created using the database available in the sample data of AOP. The database contains numerous tables and views with raw data that can be used for reference.
Data Source
Hereby examples of data source for different options.
- SQL
- PL/SQL returning SQL
- PL/SQL returning JSON
- JSON
select 'file1' as "filename",
       cursor (
         select c.cust_first_name                  as "cust_first_name",
                c.cust_last_name                   as "cust_last_name",
                'https://www.apexofficeprint.com/' as "website",
                'AOP Website'                      as "website_text",      -- text to show for the link.
                'support@apexofficeprint.com'      as "AOPSupport",
                'mail to AOP support'              as "AOPSupport_text"   -- text to show for the link.
         from aop_sample_customers c
         where c.customer_id = 1
       )       as "data"
from dual;
declare
  l_return clob;
begin
  l_return := q'[
    select 'file1' as "filename",
           cursor (
             select c.cust_first_name                  as "cust_first_name",
                    c.cust_last_name                   as "cust_last_name",
                    'https://www.apexofficeprint.com/' as "website",
                    'AOP Website'                      as "website_text",      -- text to show for the link.
                    'support@apexofficeprint.com'      as "AOPSupport",
                    'mail to AOP support'              as "AOPSupport_text"   -- text to show for the link.
             from aop_sample_customers c
             where c.customer_id = 1
           )       as "data"
    from dual;
    ]';
  return l_return;
end;
declare
  l_cursor sys_refcursor;
  l_return clob; -- can also be varchar2, make sure it corresponds to the structure in the JSON
begin
  apex_json.initialize_clob_output(dbms_lob.call, true, 2);
  open l_cursor for
    select 'file1' as "filename",
           cursor (
             select c.cust_first_name                  as "cust_first_name",
                    c.cust_last_name                   as "cust_last_name",
                    'https://www.apexofficeprint.com/' as "website",
                    'AOP Website'                      as "website_text",      -- text to show for the link.
                    'support@apexofficeprint.com'      as "AOPSupport",
                    'mail to AOP support'              as "AOPSupport_text"   -- text to show for the link.
             from aop_sample_customers c
             where c.customer_id = 1
           )       as "data"
    from dual;

  apex_json.write(l_cursor);
  l_return := apex_json.get_clob_output;
  return l_return;
end;
[
  {
    "filename": "file1",
    "data": [
      {
        "cust_first_name": "John",
        "cust_last_name": "Dulles",
        "website": "https://www.apexofficeprint.com/",
        "website_text": "AOP Website",
        "AOPSupport": "support@apexofficeprint.com",
        "AOPSupport_text": "mail to AOP support"
      }
    ]
  }
]
Template
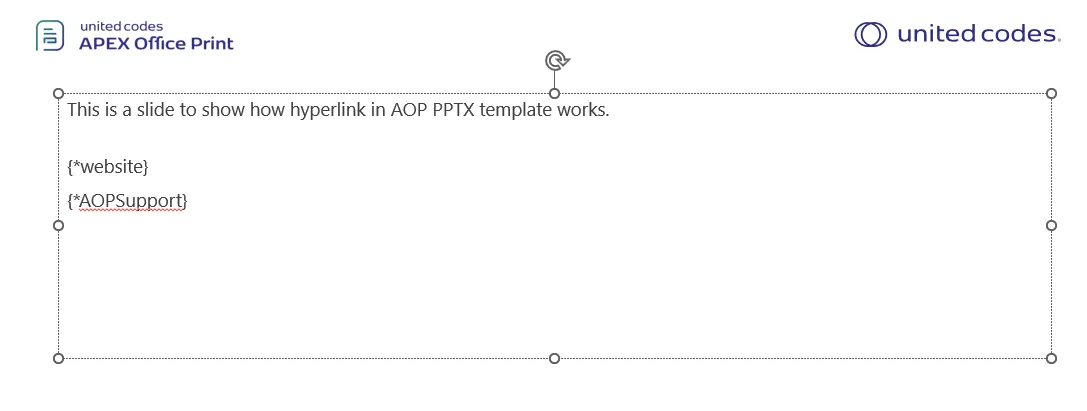
The template should contain the hyperlink tag which starts with * followed by column name inside delimiters.
For example we have the template with following content.
{*website}
{*AOPSupport}
Output
When the above data source (which results in a row with columns website, website_text, AOPSupport and AOPSupport_text with their respective values) together with the given template is passed to AOP, the output will be as follows.

Auto Link
Available From: v22.1The Auto Link tag is a feature that allows users to add text with different types of links and hyperlink them to a slide. It is composed of the *auto keyword followed by the column name enclosed within delimiters. With the use of this tag, users can easily create hyperlinks to other resources or webpages by including it in the text of a slide.
Available options while using auto tag of AOP are:
- font_color: This is used to set the font color of the text or hyperlink itself (e.g.,
text_font_color). The values should be the hex code of the respective color (e.g., #FFFFFF, #000000). - underline_color: Set the color of the underline for the link (e.g.,
text_underline_color). The values should be the hex code of the respective color (e.g., #FFFFFF, #000000).
Since hyperlinks are blue and always underlined, the styling cannot be disabled.
As a workaround, you can provide the font color of the text and the underline color to display it as normal text.
For example, you can set the font color to black and the underline color to white to show the link as normal text while still maintaining its hyperlink functionality.
Usage:
If sql as:
'This is a sample with multiple hyperlinks with url like https://www.apexofficeprint.com mails like support@apexofficeprint.com and other test case of test@gmail.com and http://www.test.com/' as "text",
You can use it in the template as follows:
{*auto text}
Please follow the example below for more information.
Example
The data source below was created using the database available in the sample data of AOP. The database contains numerous tables and views with raw data that can be used for reference.
Data Source
Hereby examples of data source for different options.
- SQL
- PL/SQL returning SQL
- PL/SQL returning JSON
- JSON
select
  'file1' as "filename",
  cursor (
    select
      c.cust_first_name as "cust_first_name",
      c.cust_last_name as "cust_last_name",
      -- For auto link
      'This is a sample with multiple hyperlinks with url like https://www.apexofficeprint.com mails like support@apexofficeprint.com and other test case of test@gmail.com and http://www.test.com/' as "text"
    from
      aop_sample_customers c
    where
      c.customer_id = 1
  ) as "data"
from
  dual
declare l_return clob;
begin l_return := q '[
      select
        'file1' as "filename",
        cursor (
          select
            c.cust_first_name as "cust_first_name",
            c.cust_last_name as "cust_last_name",
            -- For auto link
            'This is a sample with multiple hyperlinks with url like https://www.apexofficeprint.com mails like support@apexofficeprint.com and other test case of test@gmail.com and http://www.test.com/' as "text"
          from
            aop_sample_customers c
          where
            c.customer_id = 1
        ) as "data"
      from
        dual
        ]';
return l_return;
end;
declare l_cursor sys_refcursor;
l_return clob;
begin apex_json.initialize_clob_output(dbms_lob.call, true, 2);
open l_cursor for
select
  'file1' as "filename",
  cursor (
    select
      c.cust_first_name as "cust_first_name",
      c.cust_last_name as "cust_last_name",
      -- For auto link
      'This is a sample with multiple hyperlinks with url like https://www.apexofficeprint.com mails like support@apexofficeprint.com and other test case of test@gmail.com and http://www.test.com/' as "text"
    from
      aop_sample_customers c
    where
      c.customer_id = 1
  ) as "data"
from
  dual
apex_json.write(l_cursor);
l_return := apex_json.get_clob_output;
return l_return;
end;
[
  {
    "filename": "file1",
    "data": [
      {
        "cust_first_name": "John",
        "cust_last_name": "Dulles",
        "text": "This is a sample with multiple hyperlinks with url like https://www.apexofficeprint.com mails like support@apexofficeprint.com and other test case of test@gmail.com and http://www.test.com/"
      }
    ]
  }
]
Template
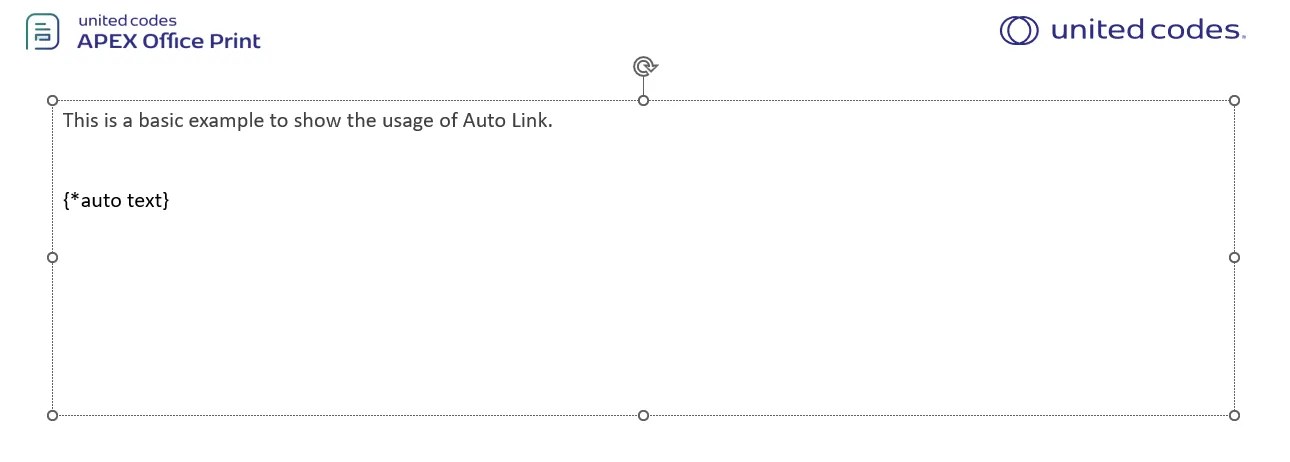
The template should contain the auto link tag in a cell which starts with *auto keyword followed by column name inside delimiters. For example we have the template with following content:
{*auto text}
Output
When the above data source (which results in a row with 'This is a sample text with hyperlink like https://www.apexofficeprint.com' as "text",) together with the given template is passed to AOP, the output will be as follows.

Link Slides
Available From: v19.3AOP enables the linking of two slides, which proves beneficial when utilizing slide repeat tags to generate side-by-side slides. Please use + charter followed by unique tag name anywhere in the slides to link together.
For instance, suppose you have a product record containing multiple products, and you wish to create two slides per product (one slide displaying price and description, and another slide showcasing special offers for that product). With a template comprising two slides (one for price and description, and another for special offers), AOP will initially generate slides with price and description for all products, followed by slides for special offers.
However, by linking these two slides together, AOP will first create two slides for each product (one with price and descriptions, and another with special offers), and proceed to do the same for the remaining products.
Example
The data source below was created using the database available in the sample data of AOP. The database contains numerous tables and views with raw data that can be used for reference.
Data Source
Hereby examples of data source for different options.
- SQL
- PL/SQL returning SQL
- PL/SQL returning JSON
- JSON
select 'file1' as "filename",
       cursor (
         select c.cust_first_name as "cust_first_name",
                c.cust_last_name  as "cust_last_name",
                c.cust_city       as "cust_city",
                cursor (
                  select o.order_total      as "order_total",
                         'Order ' || rownum as "order_name",
                         cursor (
                           select p.product_name                                    as "product_name",
                                  i.quantity                                        as "quantity",
                                  i.unit_price                                      as "unit_price",
                                  apex_web_service.blob2clobbase64(p.product_image) as "image",
                                  p.product_description                             as "product_description",
                                  p.list_price                                      as "list_price"
                           from aop_sample_order_items  i,
                                aop_sample_product_info p
                           where o.order_id = i.order_id
                                 and i.product_id = p.product_id
                         )                  "product"
                  from aop_sample_orders o
                  where c.customer_id = o.customer_id
                )                 "orders"
         from aop_sample_customers c
         where customer_id = 2
       )       as "data"
from dual;
declare
  l_return clob;
begin
  l_return := q'[
    select 'file1' as "filename",
           cursor (
             select c.cust_first_name as "cust_first_name",
                    c.cust_last_name  as "cust_last_name",
                    c.cust_city       as "cust_city",
                    cursor (
                      select o.order_total      as "order_total",
                             'Order ' || rownum as "order_name",
                             cursor (
                               select p.product_name                                    as "product_name",
                                      i.quantity                                        as "quantity",
                                      i.unit_price                                      as "unit_price",
                                      apex_web_service.blob2clobbase64(p.product_image) as "image",
                                      p.product_description                             as "product_description",
                                      p.list_price                                      as "list_price"
                               from aop_sample_order_items  i,
                                    aop_sample_product_info p
                               where o.order_id = i.order_id
                                     and i.product_id = p.product_id
                             )                  "product"
                      from aop_sample_orders o
                      where c.customer_id = o.customer_id
                    )                 "orders"
             from aop_sample_customers c
             where customer_id = 2
           )       as "data"
    from dual;
    ]';
  return l_return;
end;
declare
  l_cursor sys_refcursor;
  l_return clob; -- can also be varchar2, make sure it corresponds to the structure in the JSON
begin
  apex_json.initialize_clob_output(dbms_lob.call, true, 2);
  open l_cursor for
    select 'file1' as "filename",
           cursor (
             select c.cust_first_name as "cust_first_name",
                    c.cust_last_name  as "cust_last_name",
                    c.cust_city       as "cust_city",
                    cursor (
                      select o.order_total      as "order_total",
                             'Order ' || rownum as "order_name",
                             cursor (
                               select p.product_name                                    as "product_name",
                                      i.quantity                                        as "quantity",
                                      i.unit_price                                      as "unit_price",
                                      apex_web_service.blob2clobbase64(p.product_image) as "image",
                                      p.product_description                             as "product_description",
                                      p.list_price                                      as "list_price"
                               from aop_sample_order_items  i,
                                    aop_sample_product_info p
                               where o.order_id = i.order_id
                                     and i.product_id = p.product_id
                             )                  "product"
                      from aop_sample_orders o
                      where c.customer_id = o.customer_id
                    )                 "orders"
             from aop_sample_customers c
             where customer_id = 2
           )       as "data"
    from dual;

  apex_json.write(l_cursor);
  l_return := apex_json.get_clob_output;
  return l_return;
end;
[
    {
        "filename": "file1",
        "data": [
            {
                "cust_first_name": "William",
                "cust_last_name": "Hartsfield",
                "cust_city": "Atlanta",
                "orders": [
                    {
                        "order_total": 1640,
                        "order_name": "Order 1",
                        "product": [
                            {
                                "product_name": "Blouse",
                                "quantity": 4,
                                "unit_price": 60,
                                "image": " ...base64 encoded image... ",
                                "product_description": "Silk blouse ideal for all business women",
                                "list_price": 60
                            },
                            {
                                "product_name": "Skirt",
                                "quantity": 4,
                                "unit_price": 80,
                                "image": " ...base64 encoded image... ",
                                "product_description": "Wrinkle free skirt",
                                "list_price": 80
                            },
                            {
                                "product_name": "Ladies Shoes",
                                "quantity": 4,
                                "unit_price": 120,
                                "image": " ...base64 encoded image... ",
                                "product_description": "Low heel and cushioned interior for comfort and style in simple yet elegant shoes",
                                "list_price": 120
                            },
                            {
                                "product_name": "Bag",
                                "quantity": 4,
                                "unit_price": 125,
                                "image": " ...base64 encoded image... ",
                                "product_description": "Unisex bag suitable for carrying laptops with room for many additional items",
                                "list_price": 125
                            },
                            {
                                "product_name": "Wallet",
                                "quantity": 2,
                                "unit_price": 50,
                                "image": " ...base64 encoded image... ",
                                "product_description": "Travel wallet suitable for men and women. Several compartments for credit cards, passports and cash",
                                "list_price": 50
                            }
                        ]
                    },
                    {
                        "order_total": 730,
                        "order_name": "Order 2",
                        "product": [
                            {
                                "product_name": "Blouse",
                                "quantity": 4,
                                "unit_price": 60,
                                "image": " ...base64 encoded image... ",
                                "product_description": "Silk blouse ideal for all business women",
                                "list_price": 60
                            },
                            {
                                "product_name": "Skirt",
                                "quantity": 3,
                                "unit_price": 80,
                                "image": " ...base64 encoded image... ",
                                "product_description": "Wrinkle free skirt",
                                "list_price": 80
                            },
                            {
                                "product_name": "Bag",
                                "quantity": 2,
                                "unit_price": 125,
                                "image": " ...base64 encoded image... ",
                                "product_description": "Unisex bag suitable for carrying laptops with room for many additional items",
                                "list_price": 125
                            }
                        ]
                    }
                ]
            }
        ]
    }
]
Template without link
Lets see, without using link tag for below template and another example with the same template and addition of link. For example we have the template with following content:

Note that above template does not have link tag.
Output for template without link
When the above data source together with the given template without link is passed to AOP, the output will be as follows.
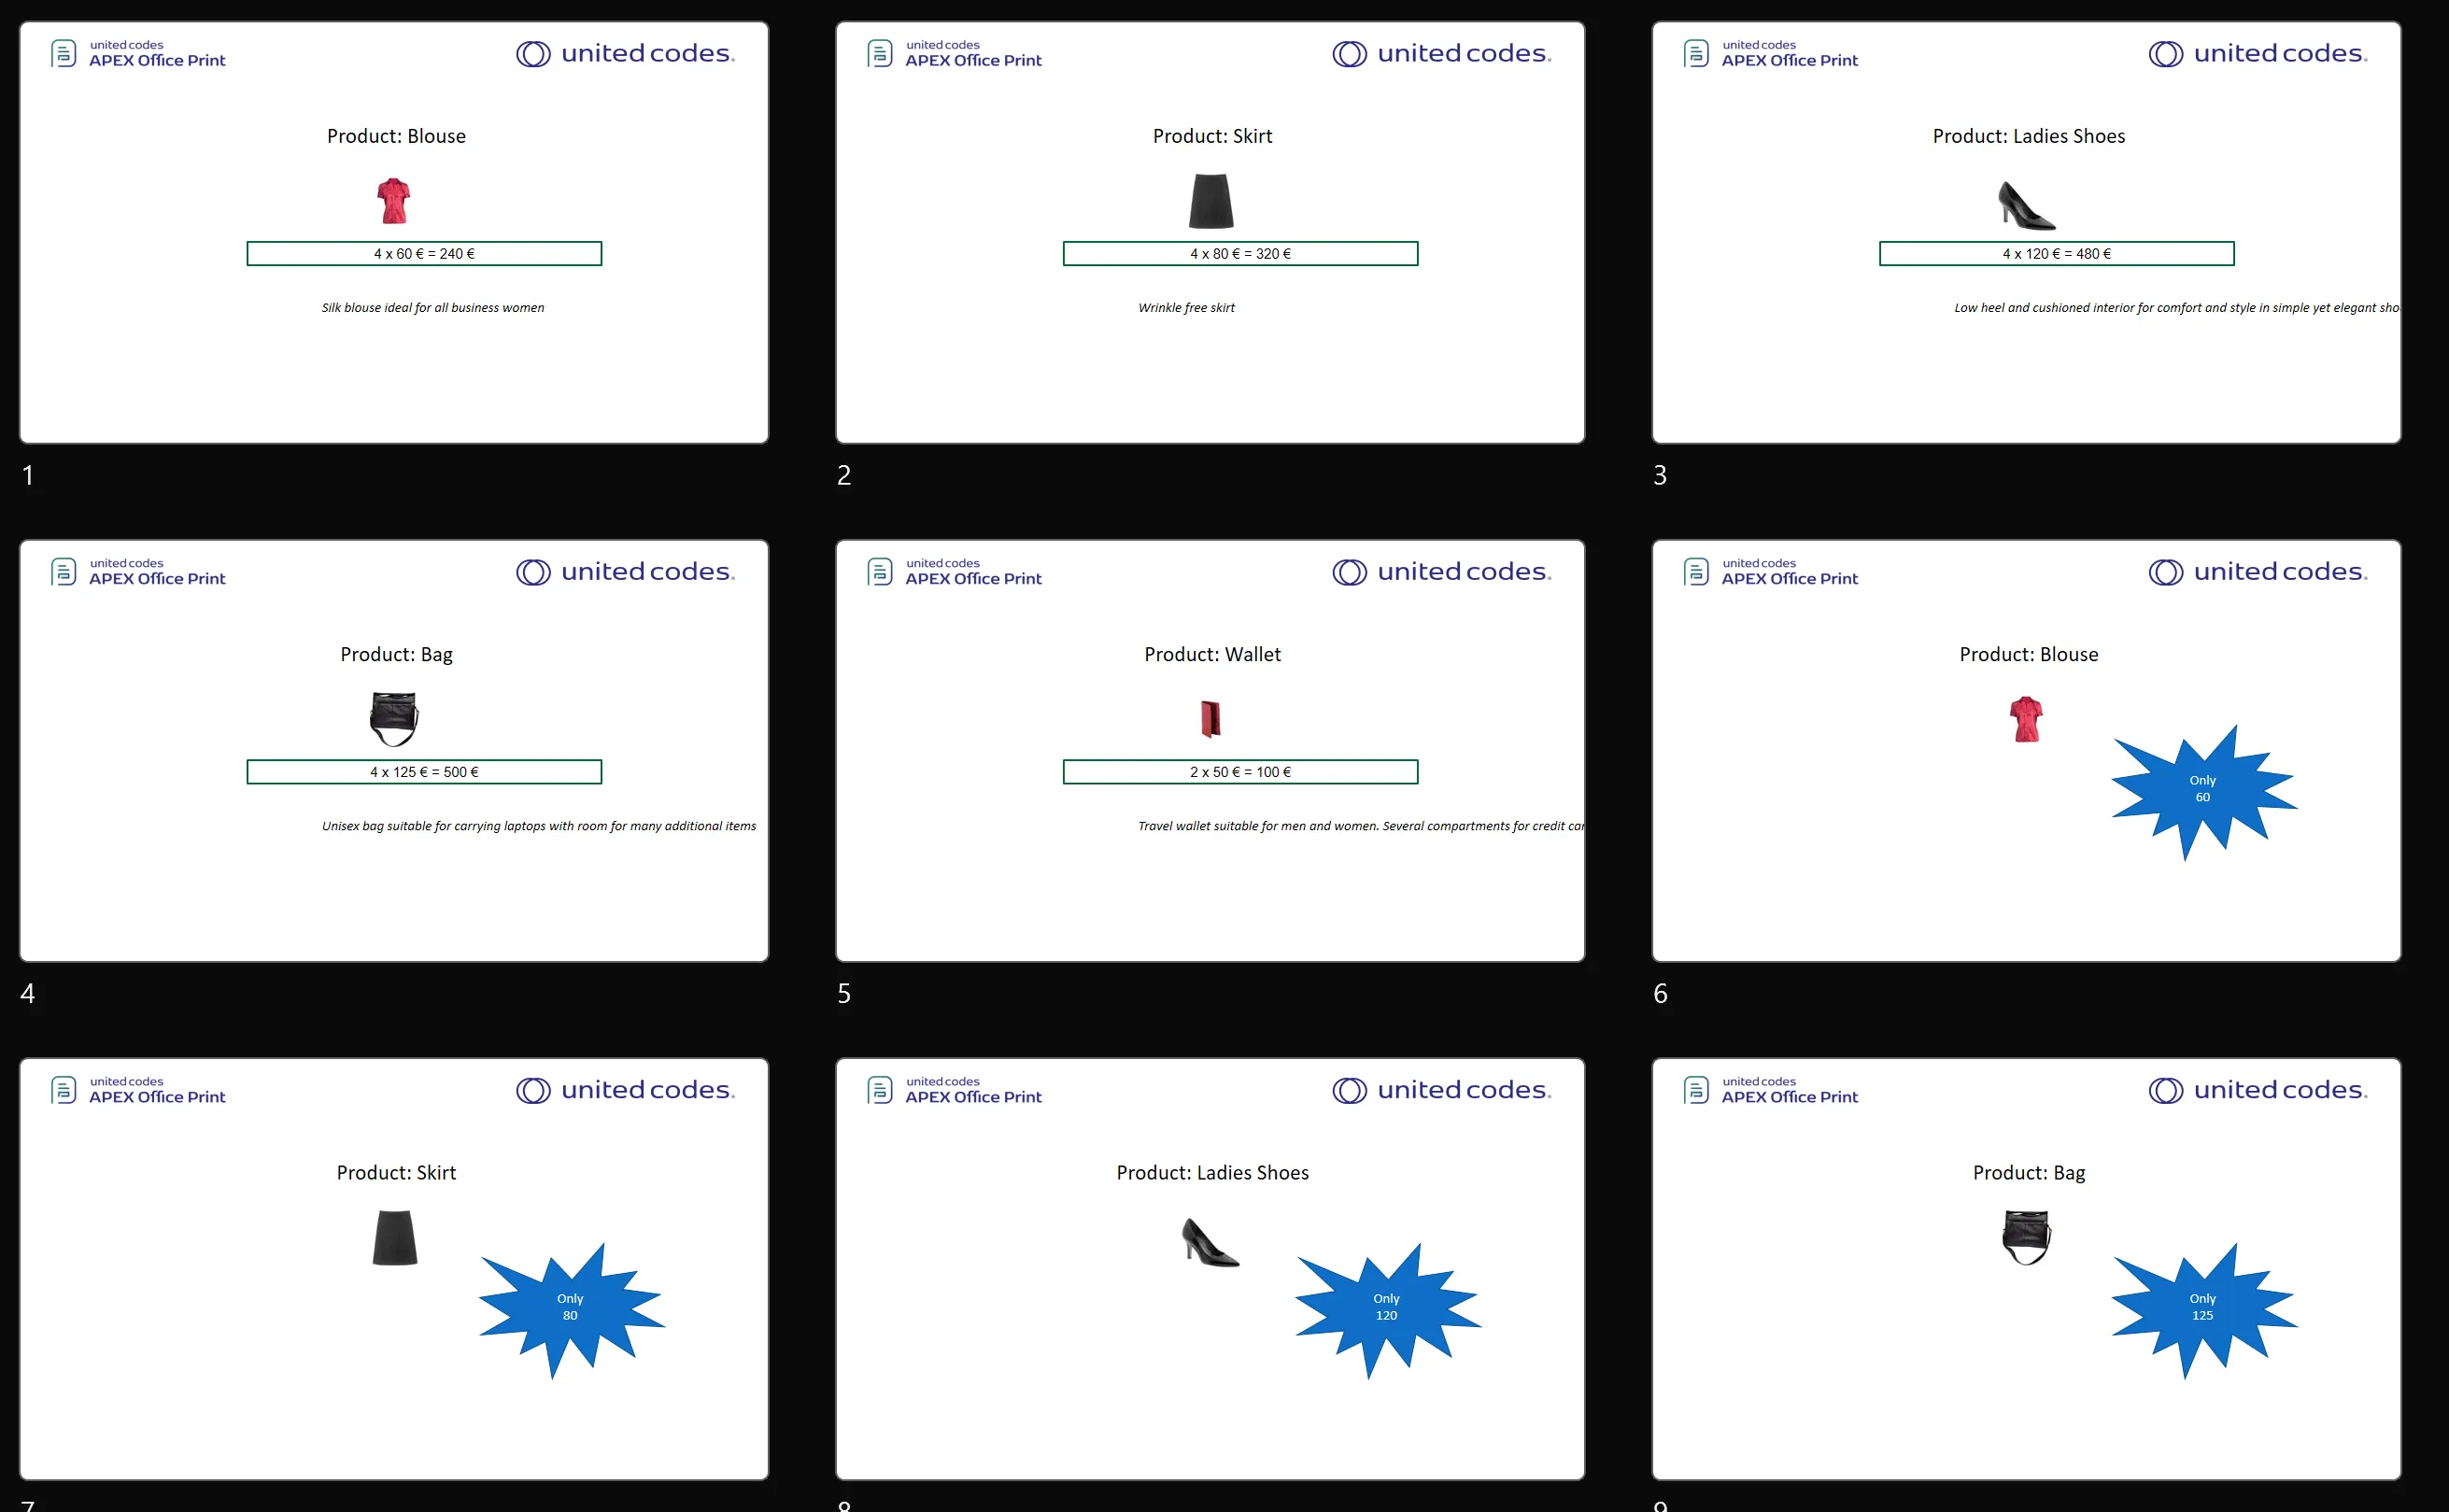
First, the slides with product prices and descriptions for all the products are created, followed by the slides containing special prices.
Template with link
For example we have the template containing link tag with following content:

Note that the template has link attribute, the output for the template is shown below.
Output for template with link
When the above data source together with the given template with link is passed to AOP, the output will be as follows.
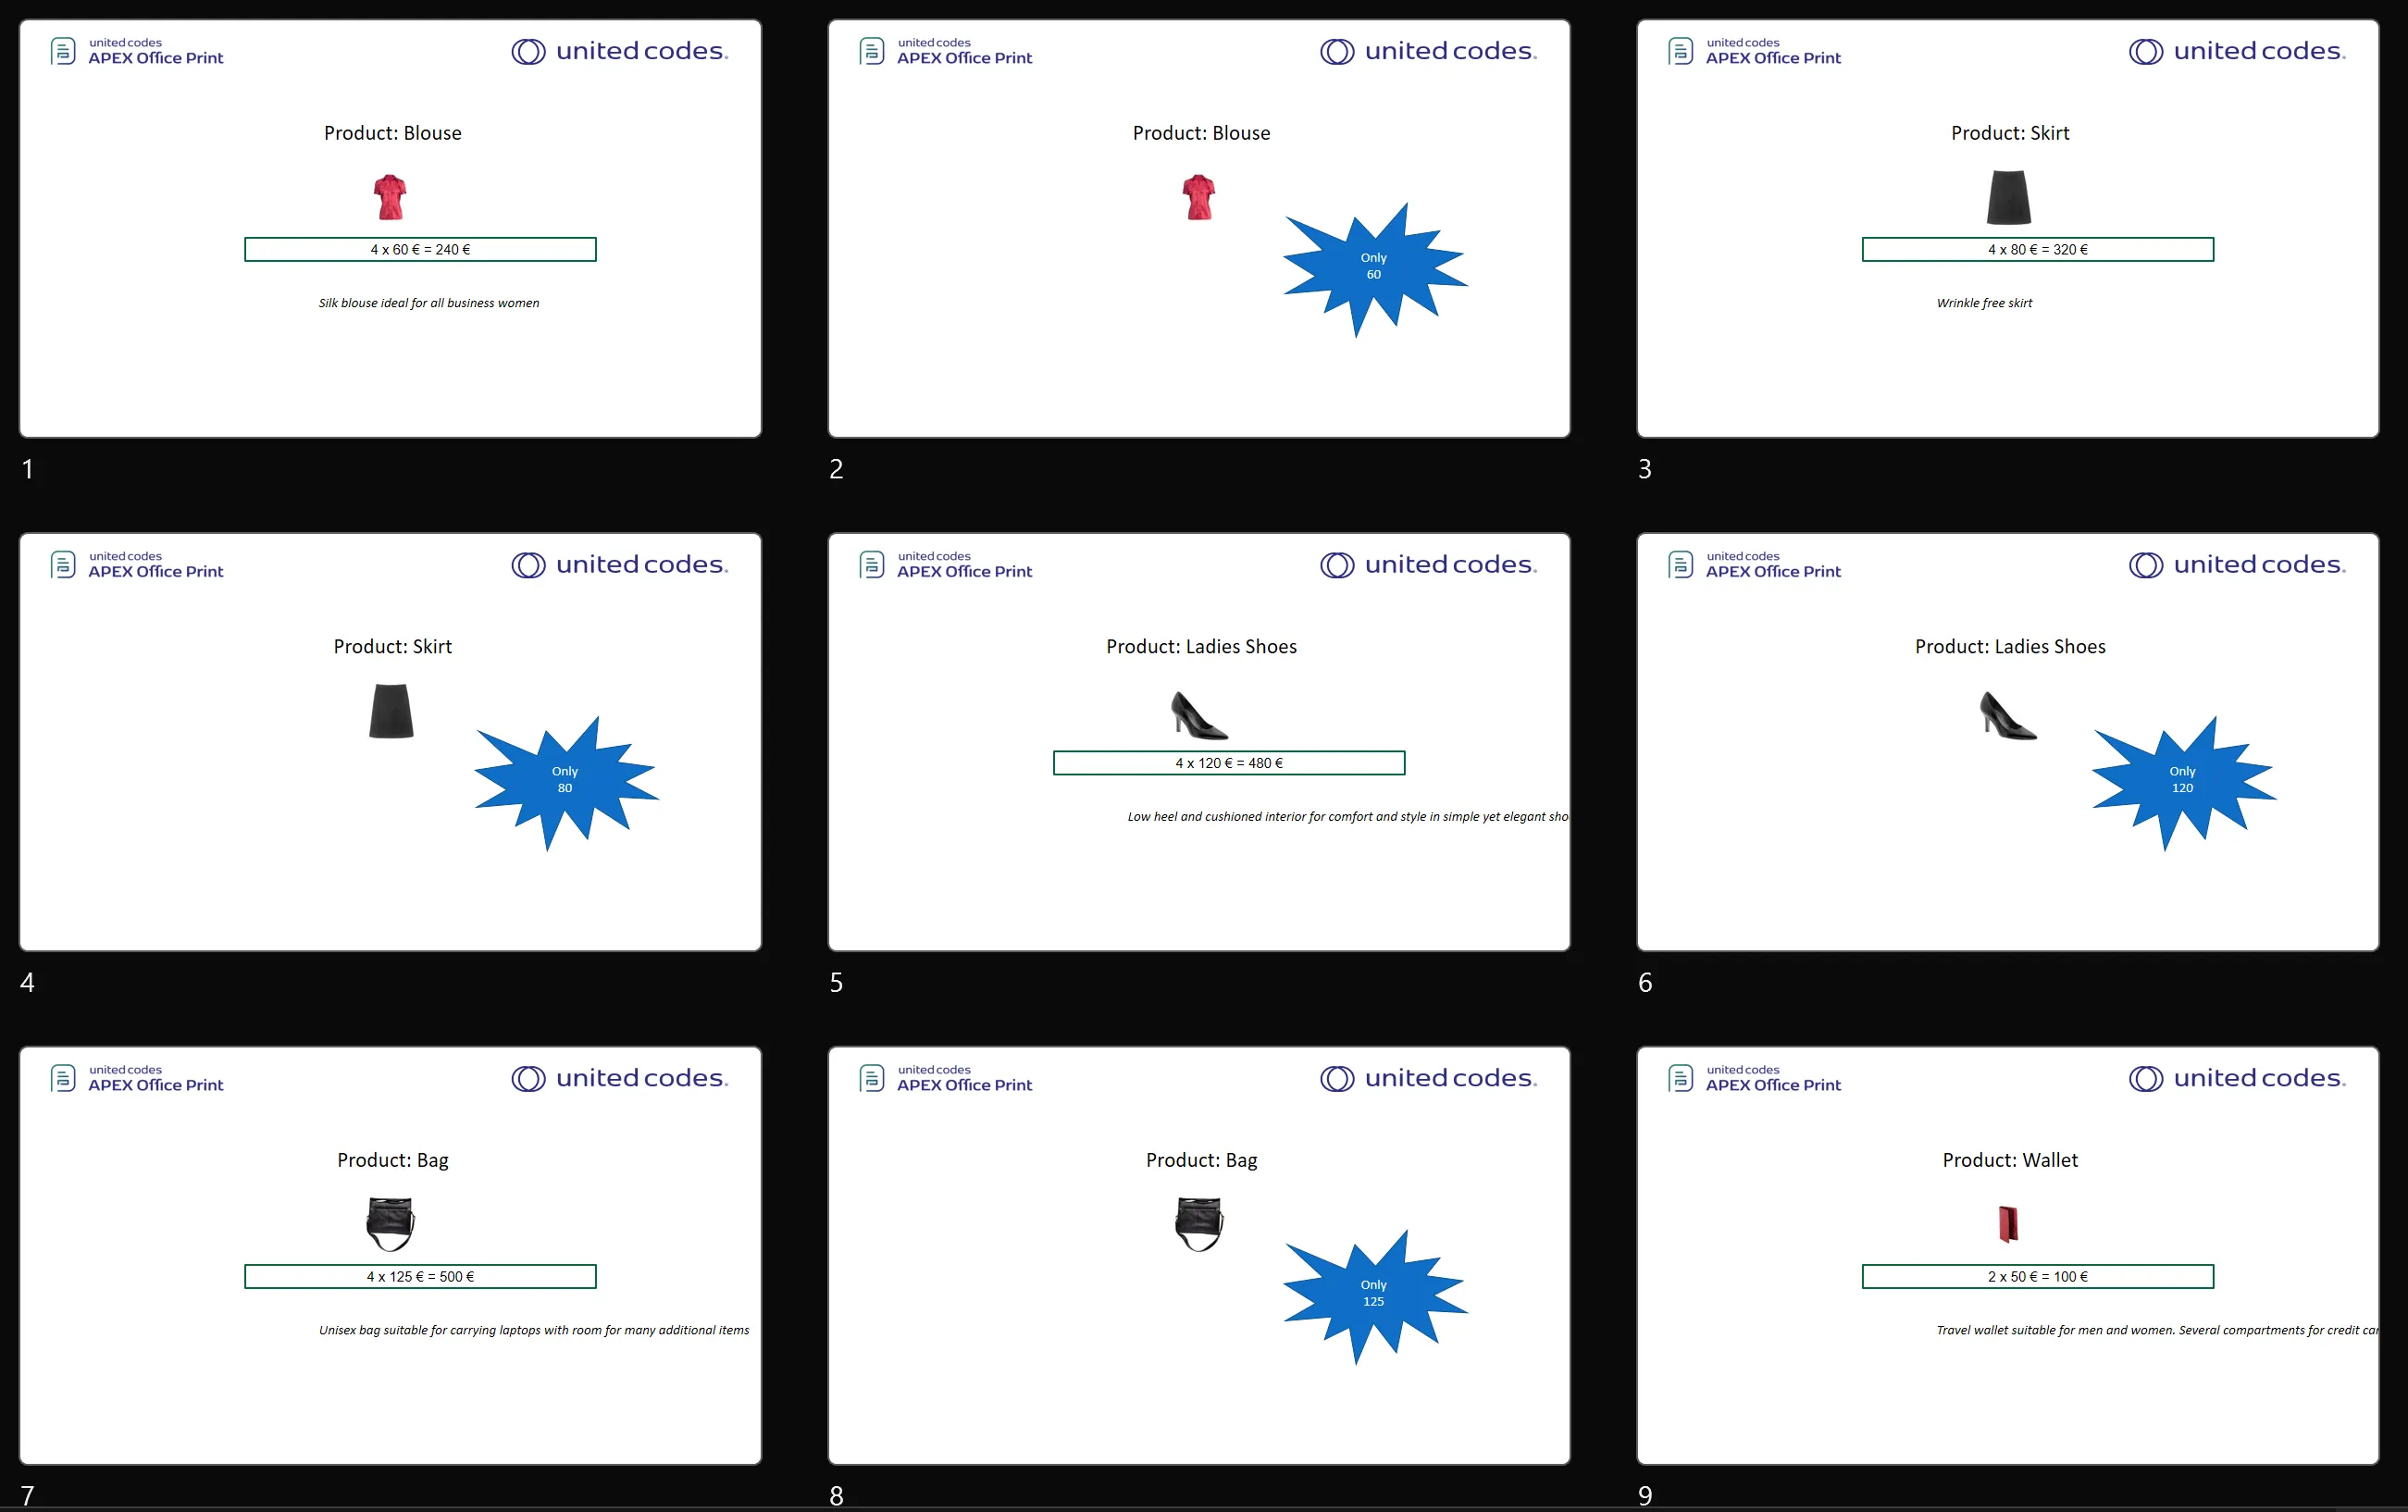
As you can observe, the sequence of slides is structured as follows: for each product, there is a slide displaying its description, followed by special offers, and then the slides for subsequent products in a similar manner.
AOP allows you to create link between more than 2 slides.
You can have group of slide link. For a template, you can link first 3 slides together with {+firstThree} and link last three slides({+lastThree}) at once.
Insert Document
Available From: v22.2With AOP you can include other files in your Powerpoint document. You can use the {?insert fileToInsert} (?insert keyword followed by column name) tag provided in AOP to insert document (xlsx, pdf, docx, pptx) in PowerPoint.
Source of the file can be URL, ftp, path to the file, and base64 string.
It is possible to provide the icon used to represent the file and the position of icon and both are optional.
All these option are optional and if they are not provided, then tag will be replaced by icon. However, it covers 2 rows down + 14px and 50px right of same column.
- If you open with libreoffice, it will not work because of the limitation of insert option in libreoffice.
- PDF and PowerPoint embedding will not work when the output file is opened in macOS. This is due to the limitation of Microsoft Office/ Libreoffice itself.
Example
The data source below was created using the database available in the sample data of AOP. The database contains numerous tables and views with raw data that can be used for reference.
Lets insert a docx file inside Powerpoint using ?insert tag of AOP.
Data Source
Hereby example data source for different options.
- SQL
- PL/SQL returning SQL
- PL/SQL returning JSON
- JSON
select
  'file1' as "filename",
  cursor(
    select
      c.cust_first_name as "cust_first_name",
      c.cust_last_name as "cust_last_name",
      'https://www.apexofficeprint.com/ords/r/aop_web/558/files/static/v399/aop_simple_letter.docx' as "fileToInsert"
    from
      aop_sample_customers c
    where
      c.customer_id = 1
  ) as "data"
from
  dual
declare
    l_return clob;
begin
    l_return := q'[
      select
        'file1' as "filename",
        cursor(
          select
            c.cust_first_name as "cust_first_name",
            c.cust_last_name as "cust_last_name",
            'https://www.apexofficeprint.com/ords/r/aop_web/558/files/static/v399/aop_simple_letter.docx' as "fileToInsert"
          from
            aop_sample_customers c
          where
            c.customer_id = 1
        ) as "data"
      from
        dual
        ]';
    return l_return;
end;
declare
  l_cursor sys_refcursor;
  l_return clob;
begin
  apex_json.initialize_clob_output(dbms_lob.call, true, 2) ;
  open l_cursor for
  select
    'file1' as "filename",
    cursor(
      select
        c.cust_first_name as "cust_first_name",
        c.cust_last_name as "cust_last_name",
        'https://www.apexofficeprint.com/ords/r/aop_web/558/files/static/v399/aop_simple_letter.docx' as "fileToInsert"
      from
        aop_sample_customers c
      where
        c.customer_id = 1
    ) as "data"
  from
    dual
  apex_json.write(l_cursor) ;
  l_return := apex_json.get_clob_output;
  return l_return;
end;
[
  {
    "filename": "file1",
    "data": [
      {
        "cust_first_name": "John",
        "cust_last_name": "Dulles",
        "fileToInsert": "https:\/\/www.apexofficeprint.com\/ords\/r\/aop_web\/558\/files\/static\/v399\/aop_simple_letter.docx"
      }
    ]
  }
]
Template
The template should contain the insert tag inside the textbox with the file to insert that were provided in the query above. For example we have the template with following content:
{?insert fileToInsert}

Output
When the above data source (which results in John as cust_first_name and Dulles as cust_last_name and ( link_to_file as fileToInsert) together with the given template is passed to AOP, the output will be as follows.
Hide Slide
There are two methods provided by AOP to hide a sheet, which are listed as follows:
- Adding suffix _hide to cursor name and setting it to true.
- Using hide tag ( hide ...)
The first option provide the way to hide slide by adding _slide in the data key from SQL part and the second option provide the way to hide slide based on condition provided on the template.
Adding prefix _hide to cursor name and setting it to true.
Available From: v22.2To hide a slide in AOP, you can append "_hide" to the key of the corresponding data field and set its value to "true". In the example given below, to hide a slide based on the product_id, you can set "product_hide" to true at the inner level. Similarly, you can set "orders_hide" to true at the outer cursor level to hide all the slides in the orders cursor.
The limitation of using _hide for slide hide is that it can only be used for hiding slides during generation(!slideGeneration)
Example
The data source below was created using the database available in the sample data of AOP. The database contains numerous tables and views with raw data that can be used for reference.
Data Source
Hereby examples of data source.
- SQL
- PL/SQL returning SQL
- PL/SQL returning JSON
- JSON
SELECT 'file1' AS "filename",
  CURSOR(
    SELECT c.cust_first_name AS "cust_first_name",
      c.cust_last_name AS "cust_last_name",
      c.cust_city AS "cust_city",
      CURSOR(
        SELECT o.order_total AS "order_total",
          'Order ' || rownum AS "order_name",
          CURSOR(
            SELECT p.product_name AS "product_name",
              i.quantity AS "quantity",
              i.unit_price AS "unit_price",
              APEX_WEB_SERVICE.BLOB2CLOBBASE64(p.product_image) AS "image",
              CASE
                WHEN MOD(p.product_id, 2) = 0 THEN 'false'
                ELSE 'true'
              END AS "product_hide"
            FROM aop_sample_order_items i,
              aop_sample_product_info p
            WHERE o.order_id = i.order_id
              AND i.product_id = p.product_id AND p.product_id <= 6
          ) "product"
        FROM aop_sample_orders o
        WHERE c.customer_id = o.customer_id
      ) "orders"
    FROM aop_sample_customers c
    WHERE customer_id = 1
  ) AS "data"
FROM dual;
declare
  l_return clob;
begin
  l_return := q'[
    SELECT 'file1' AS "filename",
      CURSOR(
        SELECT c.cust_first_name AS "cust_first_name",
          c.cust_last_name AS "cust_last_name",
          c.cust_city AS "cust_city",
          CURSOR(
            SELECT o.order_total AS "order_total",
              'Order ' || rownum AS "order_name",
              CURSOR(
                SELECT p.product_name AS "product_name",
                  i.quantity AS "quantity",
                  i.unit_price AS "unit_price",
                  APEX_WEB_SERVICE.BLOB2CLOBBASE64(p.product_image) AS "image",
                  CASE
                    WHEN MOD(p.product_id, 2) = 0 THEN 'false'
                    ELSE 'true'
                  END AS "product_hide"
                FROM aop_sample_order_items i,
                  aop_sample_product_info p
                WHERE o.order_id = i.order_id
                  AND i.product_id = p.product_id AND p.product_id <= 6
              ) "product"
            FROM aop_sample_orders o
            WHERE c.customer_id = o.customer_id
          ) "orders"
        FROM aop_sample_customers c
        WHERE customer_id = 1
      ) AS "data"
    FROM dual;

    ]';
  return l_return;
end;
declare
  l_cursor sys_refcursor;
  l_return clob; -- can also be varchar2, make sure it corresponds to the structure in the JSON
begin
  apex_json.initialize_clob_output(dbms_lob.call, true, 2);
  open l_cursor for
    SELECT 'file1' AS "filename",
      CURSOR(
        SELECT c.cust_first_name AS "cust_first_name",
          c.cust_last_name AS "cust_last_name",
          c.cust_city AS "cust_city",
          CURSOR(
            SELECT o.order_total AS "order_total",
              'Order ' || rownum AS "order_name",
              CURSOR(
                SELECT p.product_name AS "product_name",
                  i.quantity AS "quantity",
                  i.unit_price AS "unit_price",
                  APEX_WEB_SERVICE.BLOB2CLOBBASE64(p.product_image) AS "image",
                  CASE
                    WHEN MOD(p.product_id, 2) = 0 THEN 'false'
                    ELSE 'true'
                  END AS "product_hide"
                FROM aop_sample_order_items i,
                  aop_sample_product_info p
                WHERE o.order_id = i.order_id
                  AND i.product_id = p.product_id AND p.product_id <= 6
              ) "product"
            FROM aop_sample_orders o
            WHERE c.customer_id = o.customer_id
          ) "orders"
        FROM aop_sample_customers c
        WHERE customer_id = 1
      ) AS "data"
    FROM dual;


  apex_json.write(l_cursor);
  l_return := apex_json.get_clob_output;
  return l_return;
end;
[
    {
        "filename": "file1",
        "data": [
            {
                "cust_first_name": "John",
                "cust_last_name": "Dulles",
                "cust_city": "Sterling",
                "orders": [
                    {
                        "order_total": 2380,
                        "order_name": "Order 1",
                        "product": [
                            {
                                "product_name": "Business Shirt",
                                "quantity": 3,
                                "unit_price": 50,
                                "image": " ...base64 encoded image... ",
                                "product_hide": true
                            },
                            {
                                "product_name": "Trousers",
                                "quantity": 3,
                                "unit_price": 80,
                                "image": " ...base64 encoded image... ",
                                "product_hide": false
                            },
                            {
                                "product_name": "Jacket",
                                "quantity": 3,
                                "unit_price": 150,
                                "image": " ...base64 encoded image... ",
                                "product_hide": true
                            },
                            {
                                "product_name": "Blouse",
                                "quantity": 3,
                                "unit_price": 60,
                                "image": " ...base64 encoded image... ",
                                "product_hide": false
                            },
                            {
                                "product_name": "Skirt",
                                "quantity": 3,
                                "unit_price": 80,
                                "image": " ...base64 encoded image... ",
                                "product_hide": true
                            },
                            {
                                "product_name": "Ladies Shoes",
                                "quantity": 2,
                                "unit_price": 120,
                                "image": " ...base64 encoded image... ",
                                "product_hide": false
                            }
                        ]
                    }
                ]
            }
        ]
    }
]
Template
The templates consists of slide generation for the multi hierarchical loop of order and products.
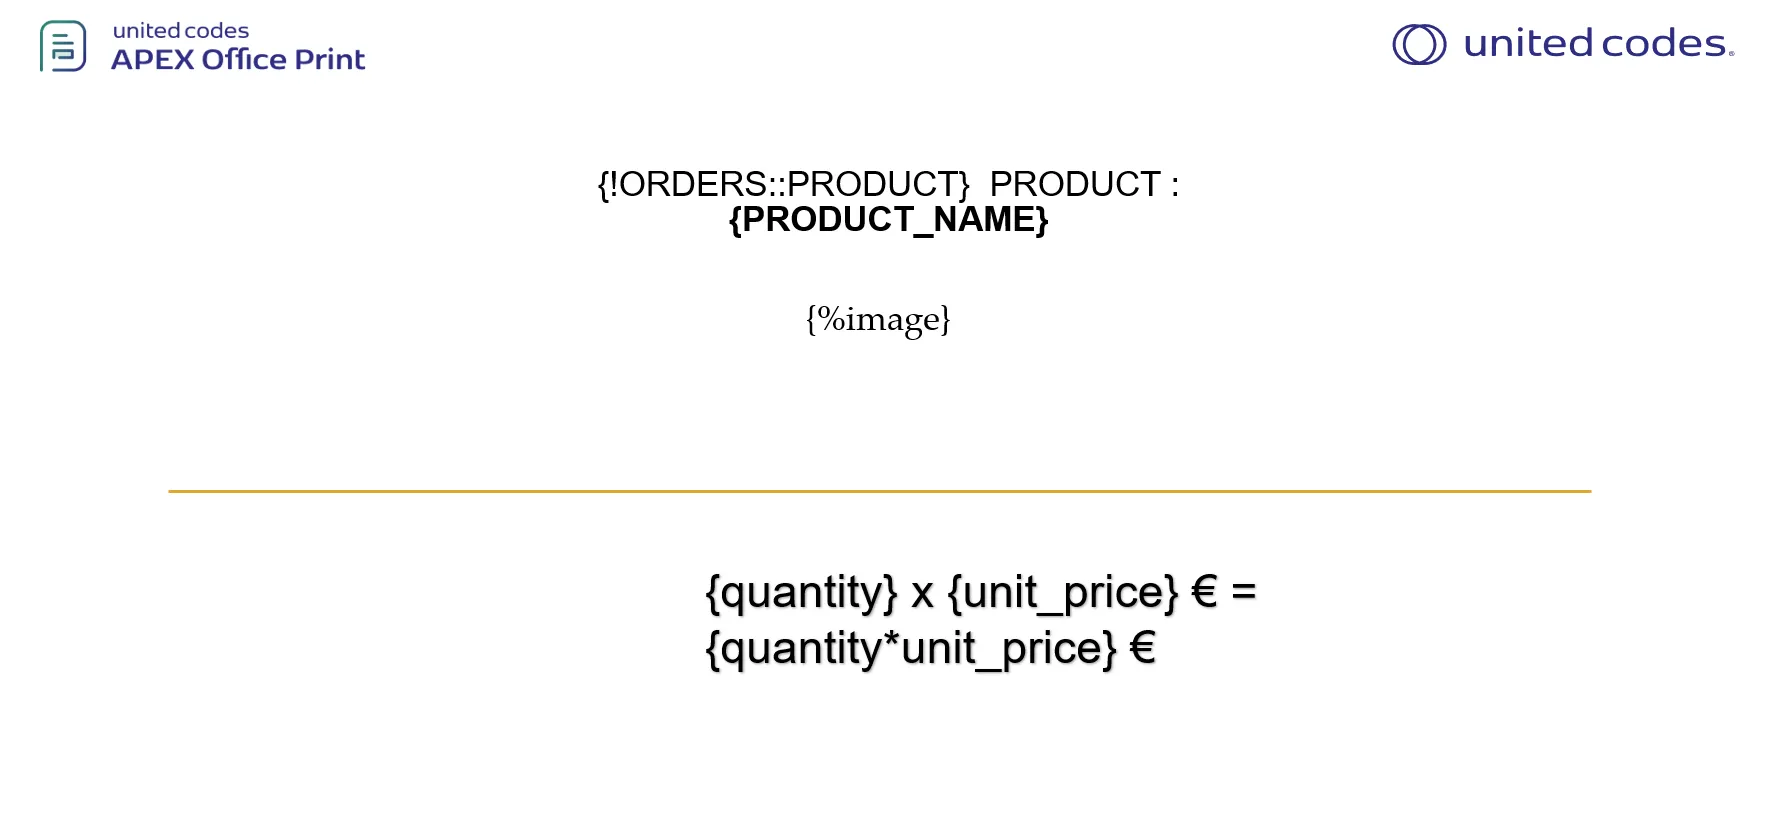
Output
The output generated from the provided data source and template produces multiple slides for different products. However, only the slides for products with even product_id are displayed, and those with odd product_id are hidden.
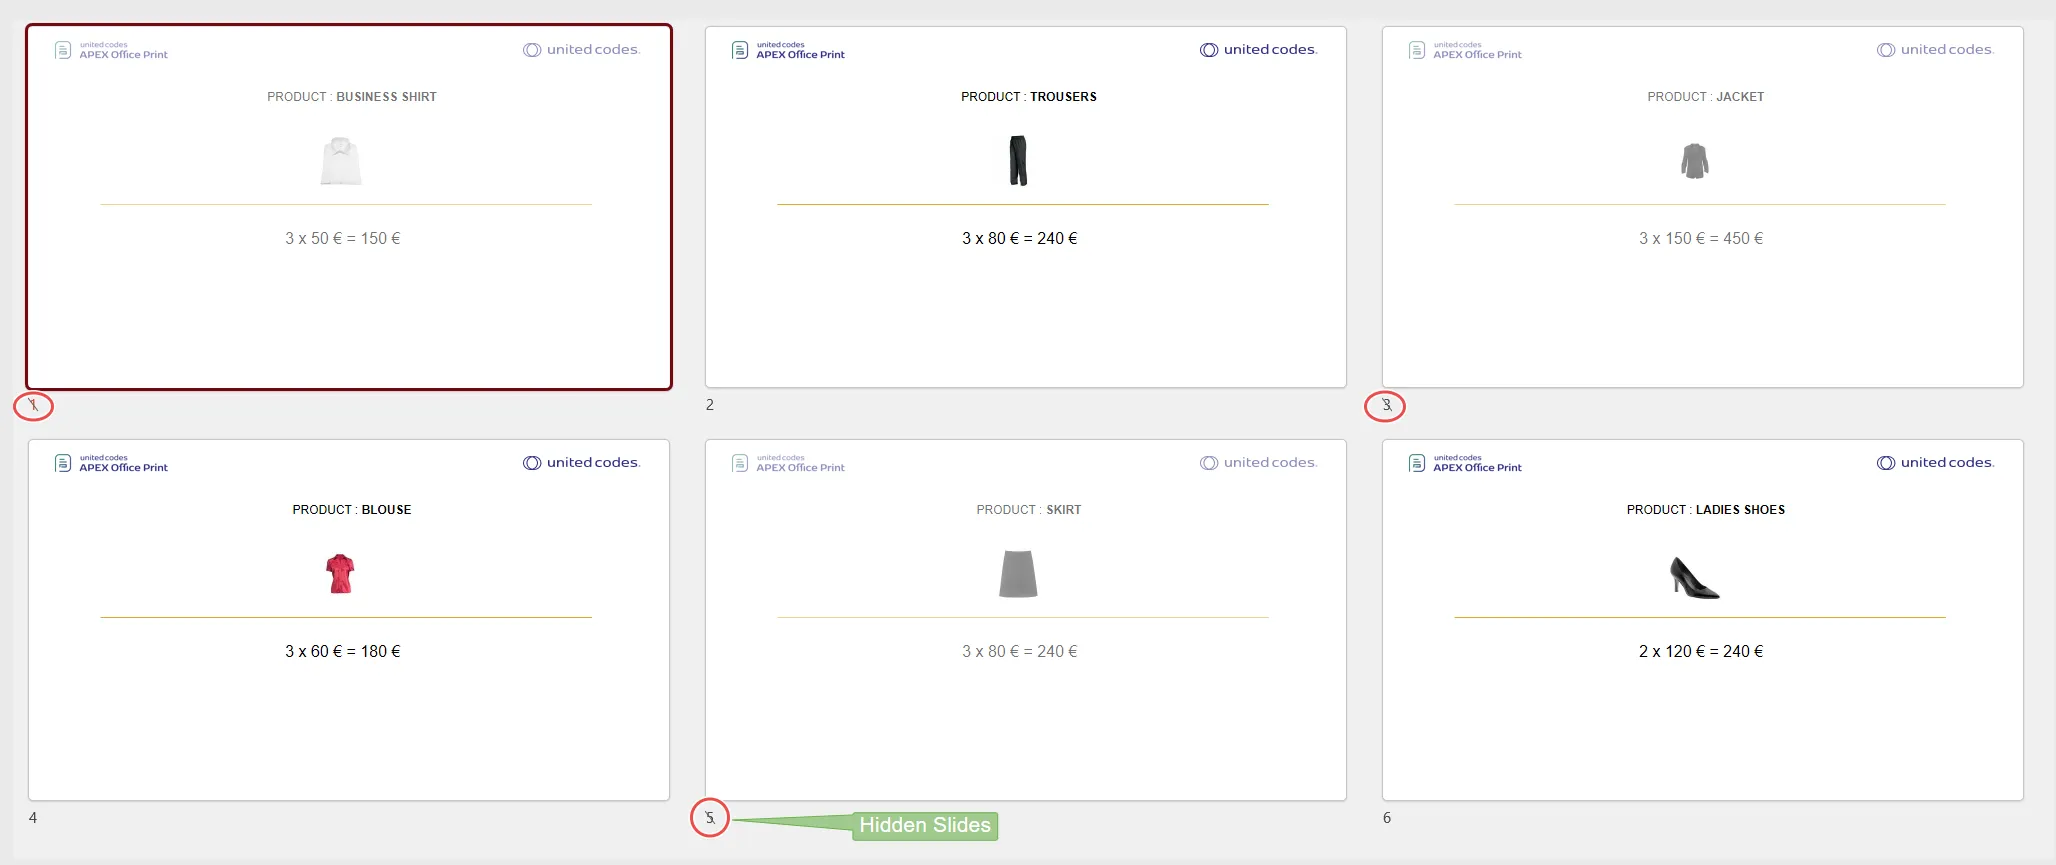
{hide condition} for slide hide
Available From: v22.2.2It is possible to hide slide in powerpoint using {hide condition} tag. You need to provide the condition after hide and enclose it by the delimiters.
For ex: If you have multiple slides having products and you want products without male category then you can use {hide category === "male"} anywhere in slide given category is accessible in that scope.
Example
The data source below was created using the database available in the sample data of AOP. The database contains numerous tables and views with raw data that can be used for reference.
Data Source
Hereby examples of data source.
- SQL
- PL/SQL returning SQL
- PL/SQL returning JSON
- JSON
select
  'file1' as "filename",
  cursor(select
      cursor(select
          c.cust_first_name as "cust_first_name",
          c.cust_last_name as "cust_last_name",
          c.cust_city as "cust_city",
          cursor(select o.order_total as "order_total",
                        'Order ' || rownum as "order_name"
                   from aop_sample_orders o
                  where c.customer_id = o.customer_id AND c.customer_id < 5
                ) "orders"
        from aop_sample_customers c
      ) as "customers"
     from dual
  ) as "data"
from dual
declare
  l_return clob;
begin
  l_return := q'[
    select
      'file1' as "filename",
      cursor(select
          cursor(select
              c.cust_first_name as "cust_first_name",
              c.cust_last_name as "cust_last_name",
              c.cust_city as "cust_city",
              cursor(select o.order_total as "order_total",
                            'Order ' || rownum as "order_name"
                       from aop_sample_orders o
                      where c.customer_id = o.customer_id AND c.customer_id < 5
                    ) "orders"
            from aop_sample_customers c
          ) as "customers"
         from dual
      ) as "data"
    from dual
    ]';
  return l_return;
end;
declare
  l_cursor sys_refcursor;
  l_return clob; -- can also be varchar2, make sure it corresponds to the structure in the JSON
begin
  apex_json.initialize_clob_output(dbms_lob.call, true, 2);
  open l_cursor for
    select
      'file1' as "filename",
      cursor(select
          cursor(select
              c.cust_first_name as "cust_first_name",
              c.cust_last_name as "cust_last_name",
              c.cust_city as "cust_city",
              cursor(select o.order_total as "order_total",
                            'Order ' || rownum as "order_name"
                       from aop_sample_orders o
                      where c.customer_id = o.customer_id AND c.customer_id < 5
                    ) "orders"
            from aop_sample_customers c
          ) as "customers"
         from dual
      ) as "data"
    from dual

  apex_json.write(l_cursor);
  l_return := apex_json.get_clob_output;
  return l_return;
end;
[
        {
            "filename": "file1",
            "data": [
                {
                    "customers": [
                        {
                            "sheet_name": "John Dulles",
                            "cust_first_name": "John",
                            "cust_last_name": "Dulles",
                            "cust_city": "Sterling",
                            "orders": [
                                {
                                    "order_total": 2380,
                                    "order_name": "Order 1"
                                }
                            ]
                        },
                        {
                            "sheet_name": "William Hartsfield",
                            "cust_first_name": "William",
                            "cust_last_name": "Hartsfield",
                            "cust_city": "Atlanta",
                            "orders": [
                                {
                                    "order_total": 1640,
                                    "order_name": "Order 1"
                                },
                                {
                                    "order_total": 730,
                                    "order_name": "Order 2"
                                }
                            ]
                        },
                        {
                            "sheet_name": "Edward Logan",
                            "cust_first_name": "Edward",
                            "cust_last_name": "Logan",
                            "cust_city": "East Boston",
                            "orders": [
                                {
                                    "order_total": 1515,
                                    "order_name": "Order 1"
                                },
                                {
                                    "order_total": 905,
                                    "order_name": "Order 2"
                                }
                            ]
                        },
                        {
                            "sheet_name": "Frank OHare",
                            "cust_first_name": "Frank",
                            "cust_last_name": "OHare",
                            "cust_city": "Chicago",
                            "orders": [
                                {
                                    "order_total": 1060,
                                    "order_name": "Order 1"
                                }
                            ]
                        },
                        {
                            "sheet_name": "Fiorello LaGuardia",
                            "cust_first_name": "Fiorello",
                            "cust_last_name": "LaGuardia",
                            "cust_city": "Flushing",
                            "orders": null
                        },
                        {
                            "sheet_name": "Albert Lambert",
                            "cust_first_name": "Albert",
                            "cust_last_name": "Lambert",
                            "cust_city": "St. Louis",
                            "orders": null
                        },
                        {
                            "sheet_name": "Eugene Bradley",
                            "cust_first_name": "Eugene",
                            "cust_last_name": "Bradley",
                            "cust_city": "Windsor Locks",
                            "orders": null
                        }
                    ]
                }
            ]
        }
    ]
Template
For example we have the template containing link tag with following content:
Output
When the above data source together with the given template with link is passed to AOP, the output will be as follows.
Slide Notes Rendering.
Available From: v24.2.2Notes slides are rendered and only normal substitution, simple loop tags and some styles of style tag are supported.
(bold, italic, underling strikethrough) are supported styles.
All styles are not supported because of the limitation of Power Point itself.
You can use notes slide with slide repeat tag.
You can use tags directly in slide note just like you use them in the slide.
Example
Lets see an example of using slide notes rendering.
Data Source
Hereby examples of data source for different options.
- SQL
- PL/SQL returning SQL
- PL/SQL returning JSON
- JSON
select 'file1' as "filename",
  cursor(
    select c.cust_first_name as "cust_first_name",
      c.cust_last_name as "cust_last_name",
      c.cust_city as "cust_city",
      cursor(
        select o.order_total as "order_total",
          'Order ' || rownum as "order_name",
          cursor(
            select p.product_name as "product_name",
              i.quantity as "quantity",
              i.unit_price as "unit_price",
              APEX_WEB_SERVICE.BLOB2CLOBBASE64(p.product_image) as "image",
            p.product_description as "product_description"
            from aop_sample_order_items i,
              aop_sample_product_info p
            where o.order_id = i.order_id
              and i.product_id = p.product_id
          ) "product"
        from aop_sample_orders o
        where c.customer_id = o.customer_id
      ) "orders"
    from aop_sample_customers c
    where customer_id = 1
  ) as "data"
from dual;
declare
  l_return clob;
begin
  l_return := q'[
    select 'file1' as "filename",
      cursor(
        select c.cust_first_name as "cust_first_name",
          c.cust_last_name as "cust_last_name",
          c.cust_city as "cust_city",
          cursor(
            select o.order_total as "order_total",
              'Order ' || rownum as "order_name",
              cursor(
                select p.product_name as "product_name",
                  i.quantity as "quantity",
                  i.unit_price as "unit_price",
                  APEX_WEB_SERVICE.BLOB2CLOBBASE64(p.product_image) as "image",
                p.product_description as "product_description"
                from aop_sample_order_items i,
                  aop_sample_product_info p
                where o.order_id = i.order_id
                  and i.product_id = p.product_id
              ) "product"
            from aop_sample_orders o
            where c.customer_id = o.customer_id
          ) "orders"
        from aop_sample_customers c
        where customer_id = 1
      ) as "data"
    from dual;
    ]';
  return l_return;
end;
declare
  l_cursor sys_refcursor;
  l_return clob; -- can also be varchar2, make sure it corresponds to the structure in the JSON
begin
  apex_json.initialize_clob_output(dbms_lob.call, true, 2);
  open l_cursor for
    select 'file1' as "filename",
      cursor(
        select c.cust_first_name as "cust_first_name",
          c.cust_last_name as "cust_last_name",
          c.cust_city as "cust_city",
          cursor(
            select o.order_total as "order_total",
              'Order ' || rownum as "order_name",
              cursor(
                select p.product_name as "product_name",
                  i.quantity as "quantity",
                  i.unit_price as "unit_price",
                  APEX_WEB_SERVICE.BLOB2CLOBBASE64(p.product_image) as "image",
                p.product_description as "product_description"
                from aop_sample_order_items i,
                  aop_sample_product_info p
                where o.order_id = i.order_id
                  and i.product_id = p.product_id
              ) "product"
            from aop_sample_orders o
            where c.customer_id = o.customer_id
          ) "orders"
        from aop_sample_customers c
        where customer_id = 1
      ) as "data"
    from dual;

  apex_json.write(l_cursor);
  l_return := apex_json.get_clob_output;
  return l_return;
end;
[
  {
    "files": [
      {
        "filename": "file1",
        "data": [
          {
            "cust_first_name": "John<br/> Ok",
            "cust_last_name": "Dulles",
            "cust_city": "Sterling",
            "orders": [
              {
                "order_total": 2380,
                "order_name": "Order 1",
                "product": [
                  {
                    "product_name": "Ladies Shoes",
                    "quantity": 2,
                    "unit_price": 120,
                    "image": " ...base64 encoded image... ",
                    "product_description": "Low heel and cushioned interior for comfort and style in simple yet elegant shoes"
                  },
                  {
                    "product_name": "Belt",
                    "quantity": 2,
                    "unit_price": 30,
                    "image": " ...base64 encoded image... ",
                    "product_description": "Leather belt"
                  },
                  {
                    "product_name": "Bag",
                    "quantity": 4,
                    "unit_price": 125,
                    "image": " ...base64 encoded image... ",
                    "product_description": "Unisex bag suitable for carrying laptops with room for many additional items"
                  },
                  {
                    "product_name": "Mens Shoes",
                    "quantity": 2,
                    "unit_price": 110,
                    "image": " ...base64 encoded image... ",
                    "product_description": "Leather upper and lower lace up shoes"
                  },
                  {
                    "product_name": "Wallet",
                    "quantity": 2,
                    "unit_price": 50,
                    "image": " ...base64 encoded image... ",
                    "product_description": "Travel wallet suitable for men and women. Several compartments for credit cards, passports and cash"
                  },
                  {
                    "product_name": "Business Shirt",
                    "quantity": 3,
                    "unit_price": 50,
                    "image": " ...base64 encoded image... ",
                    "product_description": "Wrinkle-free cotton business shirt"
                  },
                  {
                    "product_name": "Trousers",
                    "quantity": 3,
                    "unit_price": 80,
                    "image": " ...base64 encoded image... ",
                    "product_description": "Black trousers suitable for every business man"
                  },
                  {
                    "product_name": "Jacket",
                    "quantity": 3,
                    "unit_price": 150,
                    "image": " ...base64 encoded image... ",
                    "product_description": "Fully lined jacket which is both professional and extremely comfortable to wear"
                  },
                  {
                    "product_name": "Blouse",
                    "quantity": 3,
                    "unit_price": 60,
                    "image": " ...base64 encoded image... ",
                    "product_description": "Silk blouse ideal for all business women"
                  },
                  {
                    "product_name": "Skirt",
                    "quantity": 3,
                    "unit_price": 80,
                    "image": " ...base64 encoded image... ",
                    "product_description": "Wrinkle free skirt"
                  }
                ]
              }
            ]
          }
        ]
      }
    ]
  }
]
Template
The template for demo of the slide rendering is as follows:
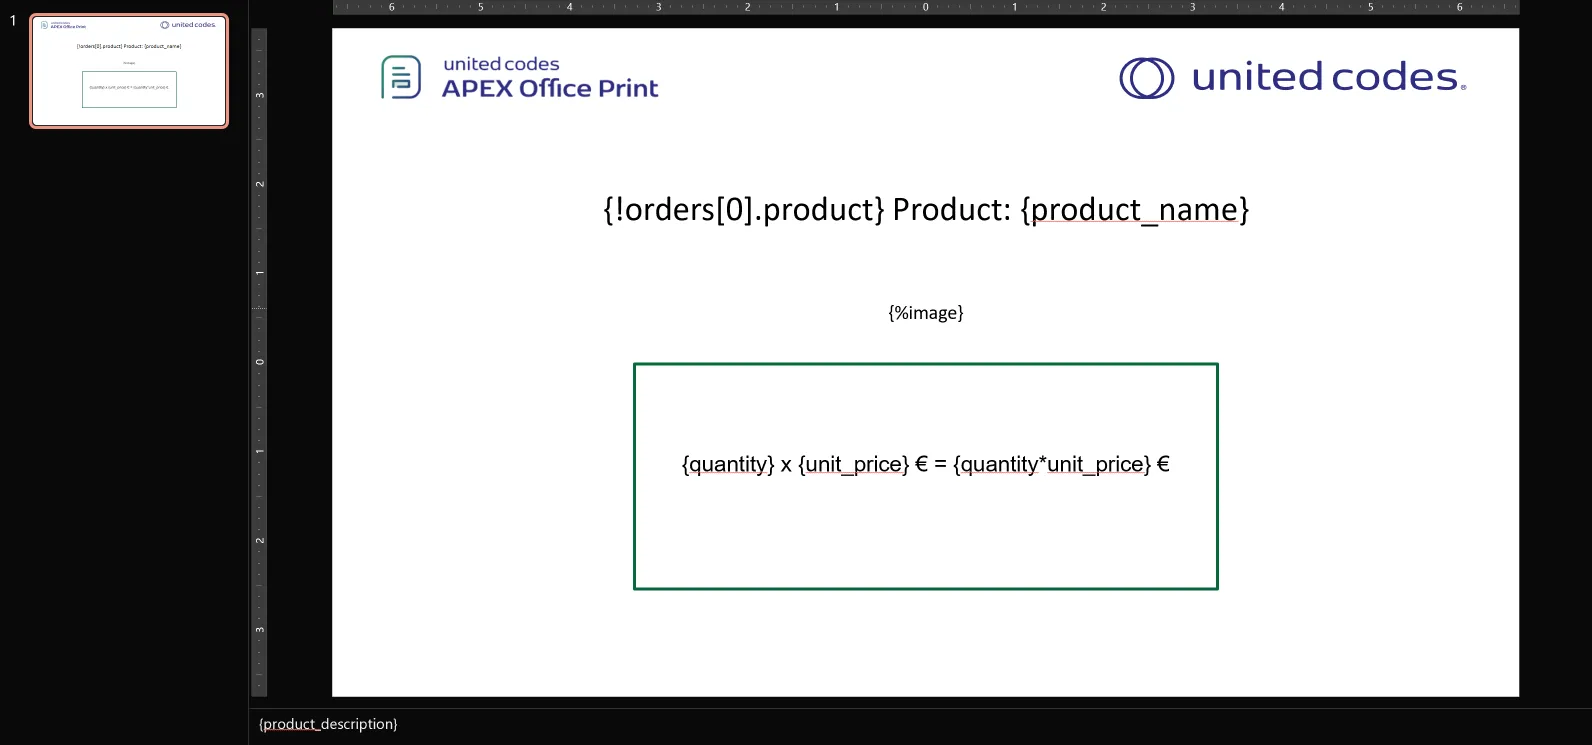
Output
When the above data source (which results in list of orders with multiple products with description) together with the given template is passed to AOP, the output will be as follows.
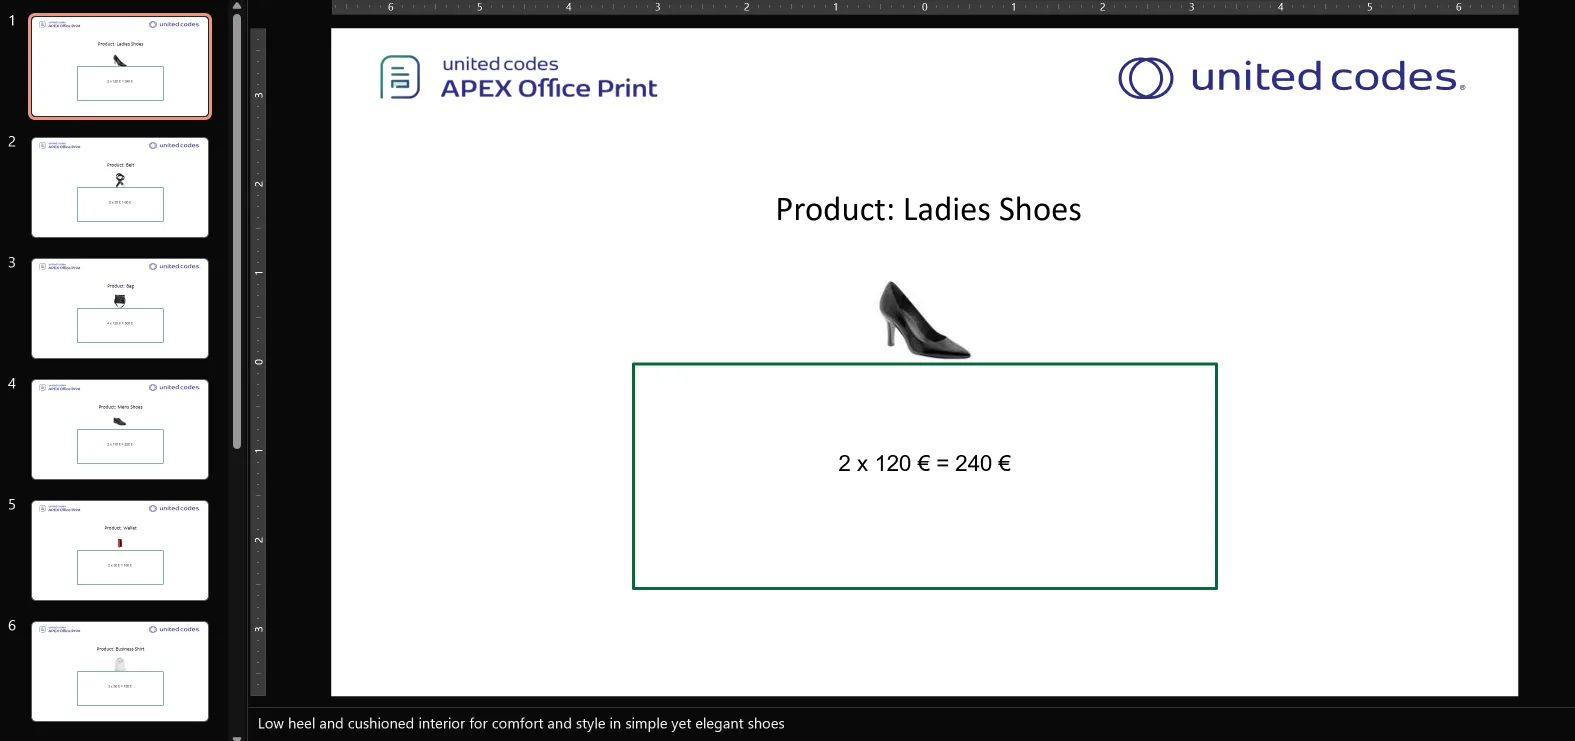
Text Box / Shape Remove Tag
Available From: v24.2.2Text Box/Shape Removal Tag {...?} allows the removal of an entire shape if the associated tag evaluates to false. For example, if a template slide includes a text box with the tag {toShow?} and the value of toShow is false or undefined, the entire shape will be removed from the slide.
Example
Hearby the example to show the usage of the text box/shape remove tag using the following template and data source.
Data Source
- SQL
- PL/SQL returning SQL
- PL/SQL returning JSON
- JSON
select
  'file1' as "filename",
  cursor(
    select
      'Hello World, Thank you for using AOP' as "greeting",
      'false' as "remove",
      '"When in doubt, look intelligent." - GARRISON KEILLOR' as "toShow"
      from dual
  ) as "data"
from dual
declare
  l_return clob;
begin
  l_return := q'[
    select
        'file1' as "filename",
        cursor(
            select
            'Hello World, Thank you for using AOP' as "greeting",
            'false' as "remove",
            '"When in doubt, look intelligent." - GARRISON KEILLOR' as "toShow"
            from dual
        ) as "data"
        from dual

    ]';
  return l_return;
end;
declare
  l_cursor sys_refcursor;
  l_return clob; -- can also be varchar2, make sure it corresponds to the structure in the JSON
begin
  apex_json.initialize_clob_output(dbms_lob.call, true, 2);
  open l_cursor for
    select
        'file1' as "filename",
        cursor(
            select
            'Hello World, Thank you for using AOP' as "greeting",
            'false' as "remove",
            '"When in doubt, look intelligent." - GARRISON KEILLOR' as "toShow"
            from dual
        ) as "data"
        from dual
  apex_json.write(l_cursor);
  l_return := apex_json.get_clob_output;
  return l_return;
end;
"files": [
    {
        "filename": "file1",
        "data": [
            {
                "greeting": "Hello World, Thank you for using AOP",
                "remove": false,
                "toShow": "\"When in doubt, look intelligent.\" - GARRISON KEILLOR"
            }
        ]
    }
]
Template
The template for demo of the shape removal tag is as follows:

template.pptx
Output
When the above data source together with the given template is processed, AOP will generate the following output.

output.pptx
PDFInclude Tag
Available From: v24.3The PDFInclude tag is used to include the contents of files within another document with output type as pdf. The tag is used in the template to include the file. The tag is used as follows:
Supported mimetypes and file sources are same as the Append Prepend tags,
{?pdfinclude filename}
Example
Data Source
- SQL
- PL/SQL returning SQL
- PL/SQL returning JSON
- JSON
SELECT
    'file1' AS "filename",
    CURSOR (
        SELECT
            CURSOR (
                SELECT
                    'view.png' AS "name",
                    'image/png' AS "mime_type",
                    apex_web_service.blob2clobbase64(
                        apex_web_service.make_rest_request_b(
                            p_url => 'https://picsum.photos/seed/picsum/200/300.jpg',
                            p_http_method => 'GET'
                        )
                    ) AS "file_content",
                    'base64' AS "file_source"
                FROM
                    dual
            ) AS "view"
        FROM
            dual
    ) AS "data"
FROM
    dual;
declare
  l_return clob;
begin
  l_return := q'[
    SELECT
    'file1' AS "filename",
    CURSOR (
        SELECT
            CURSOR (
                SELECT
                    'view.png' AS "name",
                    'image/png' AS "mime_type",
                    apex_web_service.blob2clobbase64(
                        apex_web_service.make_rest_request_b(
                            p_url => 'https://picsum.photos/seed/picsum/200/300.jpg',
                            p_http_method => 'GET'
                        )
                    ) AS "file_content",
                    'base64' AS "file_source"
                FROM
                    dual
            ) AS "view"
        FROM
            dual
    ) AS "data"
FROM
    dual;
    ]';
  return l_return;
end;
declare
  l_cursor sys_refcursor;
  l_return clob; -- can also be varchar2, make sure it corresponds to the structure in the JSON
begin
  apex_json.initialize_clob_output(dbms_lob.call, true, 2);
  open l_cursor for
SELECT
    'file1' AS "filename",
    CURSOR (
        SELECT
            CURSOR (
                SELECT
                    'view.png' AS "name",
                    'image/png' AS "mime_type",
                    apex_web_service.blob2clobbase64(
                        apex_web_service.make_rest_request_b(
                            p_url => 'https://picsum.photos/seed/picsum/200/300.jpg',
                            p_http_method => 'GET'
                        )
                    ) AS "file_content",
                    'base64' AS "file_source"
                FROM
                    dual
            ) AS "view"
        FROM
            dual
    ) AS "data"
FROM
    dual;

  apex_json.write(l_cursor);
  l_return := apex_json.get_clob_output;
  return l_return;
end;
[
  {
      "filename": "file1",
      "data": [
          {
              "view": [
                  {
                      "name": "view.png",
                      "mime_type": "image/png",
                      "file_content": "... base64encoded file ...",
                      "file_source": "base64"
                  }
              ]
          }
      ]
  }
]
Template
The template contains the tag {?pdfinclude view} which will be replaced by the contents of the file returned.
pdfinclude_template.docx
Output
Upon processing the provided template and data source, the following output is obtained.

