PDF Signing
Signing PDF with Certificate
Available from: v20.2It is possible to sign the output PDF if the output pdf has a signature field.
The certificate (pkcs #12 .p12/.pfx) should be passed in the aop_api_pkg.g_output_sign_certificatein a base64 encoded format (this can also be a URL, FTP location or a location in the file system).
The PDF document can be signed in the following ways:
- Signing PDF with Password Protected Certificate
- Signing PDF with Password Protected Certificate and PrivateKey
Example
The following example demonstrates how you can sign documents using a .p12 file.
Data Source
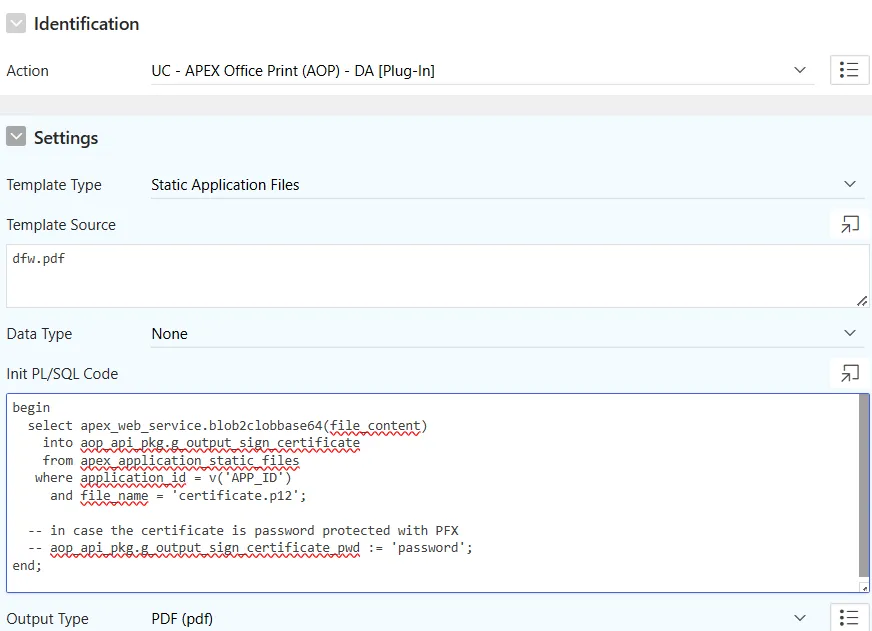
Hereby the examples of data sources for importing certificates. This example assumes that the certificate is stored within the static application files.

- INIT PLSQL
- JSON
BEGIN
    SELECT
        apex_web_service.blob2clobbase64(file_content)
    INTO aop_api_pkg.g_output_sign_certificate
    FROM
        apex_application_static_files
    WHERE
            application_id = v('APP_ID')
        AND file_name = 'certificate.p12';
END;
{
  "output": {
    "output_sign_certificate": ".... base64 encoded string of certificate file ...."
  }
}
Template
For the template, you can use any PDF file; this example demonstrates signing a map PDF.

Output
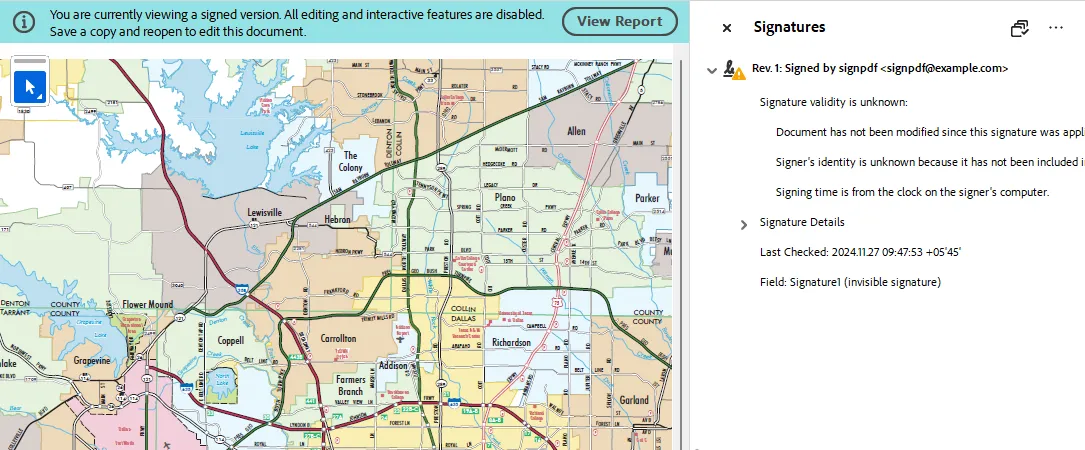
After processing the provided data source and template, AOP successfully generates a digitally signed PDF.

In the adobe reader, you can view the signature info as show in image.
Please note that the certificate names and any files that are present in examples might not be the same as in your application. So make sure to replace the example certificate names with the actual names of the certificates used in your application to ensure proper integration.
Signing PDF with Password Protected Certificate
Available from: v21.2It is possible to sign the output PDF if the output pdf has a signature field. The certificate (pkcs #12 .p12/.pfx) should be passed in g_output_sign_certificate
in a base64 encoded format (this can also be a URL, FTP location or a location in the file system). Along with the certificate,
the password of the certificate should be passed in g_output_sign_certificate_pwd in the INIT PL/SQL section.
- INIT PLSQL
- JSON
BEGIN
    SELECT
        apex_web_service.blob2clobbase64(file_content)
    INTO aop_api_pkg.g_output_sign_certificate
    FROM
        apex_application_static_files
    WHERE
            application_id = v('APP_ID')
        AND file_name = 'certificate.p12';

    aop_api_pkg.g_output_sign_certificate_pwd := 'certificatepassword';
END;
{
  "output_sign_certificate": "certificate",
  "output_sign_certificate_password": "certificatepassword"
}
For any PDF template, the output will be signed with the certificate provided.
This example assumes that the certificate is stored in the static application files.
Signing PDF with Password Protected Certificate and PrivateKey
Available from: v22.2It is possible to provide private key password if it is different from certificate password.
If you are signing with password protected private keys, you should specify g_output_sign_certificate, which can be in base64 encoded format
(this can also be a URL, FTP location or a location in the file system.) and g_output_sign_certificate_prp (private key password) in the INIT PL/SQL section.
- INIT PLSQL
- JSON
BEGIN
    SELECT
        apex_web_service.blob2clobbase64(file_content)
    INTO aop_api_pkg.g_output_sign_certificate
    FROM
        apex_application_static_files
    WHERE
            application_id = v('APP_ID')
        AND file_name = 'certificate.p12';

    aop_api_pkg.g_output_sign_certificate_pwd := 'certificatepassword';
    aop_api_pkg.g_output_sign_certificate_prp := 'privatekeypassword';
END;
{
  "output_sign_certificate": "certificate",
  "output_sign_certificate_password": "certificatepassword",
  "output_sign_certificate_privatekey_password": "privatekeypassword"
}
For any PDF as a template, the output PDF will be signed with the certificate provided.
This example assumes that the certificate is stored in the static application files.
Signing a Signature Field with Visual Signature
Available from: v22.1Visual signatures are a type of digital signature that allows you to add a visual representation of your signature to a PDF document. It is possible to create signature fields and create signature with visual representation. We can create multiple signature fields using AOP but can be signed only one at a time.
From AOP version 25.1, you can sign multiple signature fields in a single document.
There are various operations that can be done with signature fields.
- Creating a Signature Field.
- Creating a Signature Field and Signing it with Certificate.
- Signing an Existing PDF Signature Field.
From AOPv25.1, it is also possible to add labels to the reason, date in signature with field label as true.
While creating a signature field or a signature, the size of the field is customizable.
For that you can either provide the size as width and height,
or if you want predefined size, you can provide size as sm for small, md for medium and lg for large.
i.e. you can provide either of the following:
SELECT
  '150' AS "width"
  '50' AS "height" FROM dual
// or //
SELECT
  'sm' AS "size" FROM dual
If you provide both width and height, and size,
size will be given preference.
Specifying template for customizing visual signature
Available from: v25.1You can specify a template for customizing the visual signature. The template should be specified as an string as :
  SELECT
    'template' AS "template"
Structure of the template is as follows by default :
The possible values that can be used in the template are:
name- Name of the signerdate- Date of signinglocation- Location of signingreason- Reason for signingsigned_by- Name of the signer (Digitally Signed by {name})background_image- Background image (logo) of the signature
The area on the template are :
Please note that if center(left/right) part is not specified in the template, aop will assume only top and bottom part exists in the template. For example, if there is no content in center_right section, right part will automatically adjust to top_right and bottom_right.
The possible options for style are:
bold- Bold textitalic- Italic text
The structure of the template passed to AOP should be in content:position:size:style separated by | (pipe) character.
Let's say you want to create a template similar to default structure, you can do it as follows:
SELECT
    'name:center_left:14:bold|signed_by:top_right:10|date:bottom_right:10' as "template"
FROM
    dual
Creating a Signature Field
To create a new signature field on the template, you should provide the type as signaturefieldunsigned, with name, width and height of the field.
You should provide the following details in the field cursor if you want to create a signature field.
- SQL Option
- JSON Option
SELECT
    CURSOR (
        SELECT
            'signaturefieldunsigned' AS "type",
            'text1'                  AS "name",
            150                      AS "width",
            50                       AS "height"
        FROM
            dual
    ) AS "text1"
"text1": [
          {
            "type": "signaturefieldunsigned",
            "name": "text1",
            "width": 150,
            "height": 50
          }
        ]
This will create a signature field with name text1 with width_ 150 and height_ 50.
Creating a Signature Field and Signing it with Certificate
For creating a signature field and signing it with a certificate, you should provide the type as signaturefieldsigned, with name, value and password of the certificate.
Please note that the content used in this example is solely for demonstration purposes and is taken from the AOP PDF sample application. Replace it with your own certificates and certificate source. This will add a visual signature to the signature field named 'text2' with a medium size.
Example
Data Source
- SQL
- PL/SQL returning SQL
- PL/SQL returning JSON
- JSON
SELECT
    'file1' AS "filename",
    CURSOR (
        SELECT
            CURSOR (
                SELECT
                    'signaturefieldsigned' AS "type",
                    'text2'                AS "name",
                    (
                        SELECT
                            apex_web_service.blob2clobbase64(file_content) AS value
                        FROM
                            apex_application_static_files
                        WHERE
                            file_name = 'digital_signature.p12'
                            and APPLICATION_ID = :APP_ID
                    )                      "value",
                    (
                        SELECT
                            apex_web_service.blob2clobbase64(file_content) AS value
                        FROM
                            apex_application_static_files
                        WHERE
                                file_name = 'logo-apex-office.webp'
                            AND ROWNUM = 1
                    )                      "background_image",
                    'kirankandel' AS "password",
                    'md'                   AS "size"
                FROM
                    dual
            ) AS "text2"
        FROM
            dual
    )       AS "data"
FROM
    dual;
declare
  l_return clob;
begin
  l_return := q'[

    SELECT
        'file1' AS "filename",
        CURSOR (
            SELECT
                CURSOR (
                    SELECT
                        'signaturefieldsigned' AS "type",
                        'text2'                AS "name",
                        (
                            SELECT
                                apex_web_service.blob2clobbase64(file_content) AS value
                            FROM
                                apex_application_static_files
                            WHERE
                                file_name = 'digital_signature.p12'
                                and APPLICATION_ID = :APP_ID
                        )                      "value",
                        (
                            SELECT
                                apex_web_service.blob2clobbase64(file_content) AS value
                            FROM
                                apex_application_static_files
                            WHERE
                                    file_name = 'logo-apex-office.webp'
                                AND ROWNUM = 1
                        )                      "background_image",
                        'kirankandel' AS "password",
                        'md'                   AS "size"
                    FROM
                        dual
                ) AS "text2"
            FROM
                dual
        )       AS "data"
    FROM
        dual;
    ]';
  return l_return;
end;
declare
  l_cursor sys_refcursor;
  l_return clob; -- can also be varchar2, make sure it corresponds to the structure in the JSON
begin
  apex_json.initialize_clob_output(dbms_lob.call, true, 2);
  open l_cursor for

    SELECT
        'file1' AS "filename",
        CURSOR (
            SELECT
                CURSOR (
                    SELECT
                        'signaturefieldsigned' AS "type",
                        'text2'                AS "name",
                        (
                            SELECT
                                apex_web_service.blob2clobbase64(file_content) AS value
                            FROM
                                apex_application_static_files
                            WHERE
                                file_name = 'digital_signature.p12'
                                and APPLICATION_ID = :APP_ID
                        )                      "value",
                        (
                            SELECT
                                apex_web_service.blob2clobbase64(file_content) AS value
                            FROM
                                apex_application_static_files
                            WHERE
                                    file_name = 'logo-apex-office.webp'
                                AND ROWNUM = 1
                        )                      "background_image",
                        'kirankandel' AS "password",
                        'md'                   AS "size"
                    FROM
                        dual
                ) AS "text2"
            FROM
                dual
        )       AS "data"
    FROM
        dual;

  apex_json.write(l_cursor);
  l_return := apex_json.get_clob_output;
  return l_return;
end;
[
    {
        "filename": "file1",
        "data": [
            {
                "text2": [
                    {
                        "type": "signaturefieldsigned",
                        "name": "text2",
                        "value": ".... base64 encoded string of certificate file ....",
                        "background_image": ".... base64 encoded background_image  ....",
                        "password": "kirankandel",
                        "size": "md"
                    }
                ]
            }
        ]
    }
]
Please make sure that you change the values for fields value and background_image for the example to function properly in your cases if you're using SQL.
Here image are being loaded from the AOP Sample Application. You can use any image of your choice, and provide your digital certificate to sign the PDF.
Template
The template should have 2 signature fields with names text1 and text2 . They can be represented as follows in the document.
{?sign text1}
{?sign text2}
Output

If it is unclear which signature field names correspond to which actual field, the output option identify_form_fields can be used to fill in each signature field with the name of that field.
Signing an Existing PDF Signature Field
In some of the cases, we might want to sign an already existing PDF signature field. In this case, we can provide the name of the signature field in the INIT PL/SQL section.
you should provide field name in the g_output_sign_certificate_fld, certificate content in the g_output_sign_certificate and password in the g_output_sign_certificate_password variables.
Please note that the name of the field might be different in your case.
If you don't know the name, you can find instructions on how to find the name of the field in the Identifying PDF Form Fields section.
Example
The example below shows how you can sign a document by providing a .p12 file to an existing PDF signature field.
Data Source
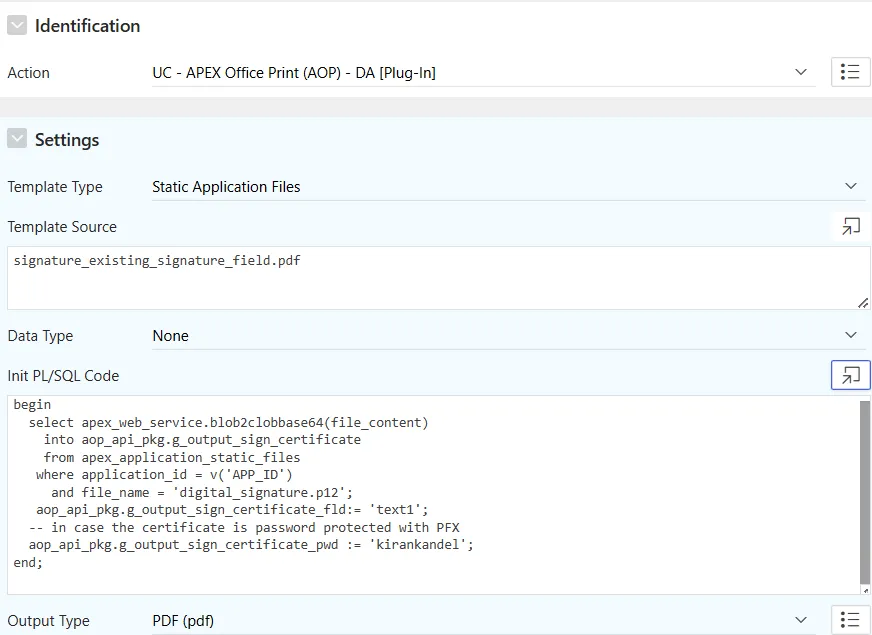
Hereby the examples of data sources for importing a certificate from static application files to sign documents using a pre-existing signature field.

- INIT PLSQL
- JSON
begin
  select apex_web_service.blob2clobbase64(file_content)
    into aop_api_pkg.g_output_sign_certificate
    from apex_application_static_files
   where application_id = v('APP_ID')
     and file_name = 'digital_signature.p12';
   aop_api_pkg.g_output_sign_certificate_fld:= 'text1';
  -- in case the certificate is password protected with PFX
  aop_api_pkg.g_output_sign_certificate_pwd := 'kirankandel';
end;
{
  "output": {
    "output_sign_certificate_field": "text1",
    "output_sign_certificate": ".... base64 encoded string of certificate file ....",
    "output_sign_certificate_password": "kirankandel"
  }
}
Here output_sign_certificate and output_sign_certificate_password are base64 representations of the certificate and password respectively. Please make sure to replace these with your own certificate and password.
Template
You can utilize any PDF file as a template that includes a signature field for for AOP to sign it.
Output
After processing the provided data source and template, AOP successfully generates a digitally signed PDF by signing on existing PDF signature field.

From AOP 24.1.2 onwards, you can add custom text in any language to the signature field, for that you must pass the text to be added in g_output_sign_certificate_txt property in the init PL/SQL section.
For example adding the following custom text would result in given signature :
aop_api_pkg.g_output_sign_certificate_txt:= 'によるデジタル署名';